| Author |
 Replies: 23 / Views: 4,238 Replies: 23 / Views: 4,238 |
Page 2 of 2
|
|
|
|
Moderator
 United States
23522 Posts |
I use Live View to focus from the LCD myself, except in my case, the LCD is a 24", 1900x1200 Dell U2410 rather than the camera's 3" LCD. I'm curious why you'd not use this capability when it's available to you.
|
|
Valued Member
 Canada
331 Posts |
Quote:
I'm curious why you'd not use this capability when it's available to you. Out of ignorance, I suppose. What do you feel would be the advantages over how I'm shooting now? |
|
Moderator
United States
23522 Posts |
Quote:
What do you feel would be the advantages over how I'm shooting now? Aside the obvious optical advantage of being able to determine focus sharpness on a far larger screen, you can make all parameter changes using your mouse, and see the resulting image in Live View. No more guessing about light, and results instantaneously displayed on your screen. I use two monitors myself, so the Live View and the shot following are on separate screens. With this setup, I can make radical changes and reshoot in less than 5 seconds, physically touching the camera only at the very start and end of the session. And, like shooting with a remote, a delay is not needed. I will never go back. Even with the bellows arrangement I'm using - no electronic connection to the lens, so I have to artificially open the aperture a lot wider than I'll actually use to get enough light to focus in Live View - it still beats the stuffin' out of having to fiddle with the camera itself for every new shot. |
|
Valued Member
Canada
331 Posts |
This is some food for thought. Maybe it's a case of not knowing what you're missing until you've tried it. Since I'm new to the game I'm still concentrating on more fundamental problems, like lighting solutions, and I did get my 2 flashlights wired for AC today. So much better! I had lost about 3 f stops to battery drain and I hadn't even noticed.
One more question - aside from the general suggestion of dark backgrounds some people suggest, what specifically do you use for background material? I've tried a few things, but nothing I'm really satisfied with. I guess I'm trying to find something that would be a dark shade of any colour and be free of detail under magnification.
|
|
Valued Member
Canada
331 Posts |
Here's a pic from tonight, a 2 image stack, 1/13s f/5.6 ISO 200. Couldn't quite keep all the highlights from blowing out. 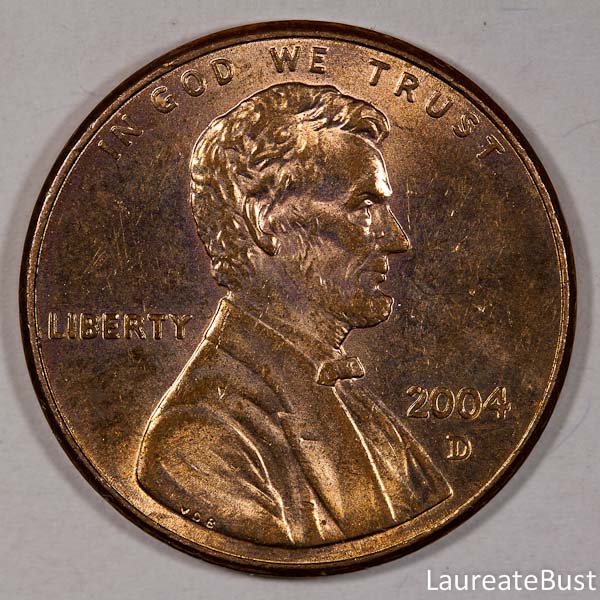 |
|
Pillar of the Community
United States
4038 Posts |
I'm not fond of 3:00 / 9:00 lighting, makes for an unnatural presentation of luster. What angle are the lights at for this shot? Looks like around 45-deg to me. I'd like to see this shot with the lights at 75-deg, 10:30 and 1:30...Ray
Contact me for photographic equipment or visit my home page at: http://macrocoins.com |
|
Valued Member
Canada
331 Posts |
Hmm, not sure of the exact positions of lights for this shot since I was playing around with them a bit, but it was something like 10:00 and 2:00, and an angle of maybe 60 to 70 degrees.
|
|
Moderator
United States
23522 Posts |
I personally use well-worn, 100% cotton t-shirts for background, as they're easy on the contacting face of the coin. Some use pizza-box supports or a cork on a pillar to "stand off" the coin; I'm not so worried about background intrusion. If I want a truly professional presentation, I'll postprocess for it anyway.
|
|
Valued Member
Canada
331 Posts |
SsuperDdave -  I am totally blown away by the changes tethering makes to workflow! Had to make some changes to my work setup, and will probably need to make more, but it's already pretty slick. I had no idea I'd be able to make minute adjustments to focus from the computer as well - thanks for suggesting this to me! Ray - I reshot the previous coin with better white balance, and lights at 11 and 1, and about 75 degrees. It's a single shot, 1/8 s, f/8, ISO 200:  |
|
Valued Member
Canada
331 Posts |
And, one more. 2-image stack, 1/5 s, f/8, ISO 200: 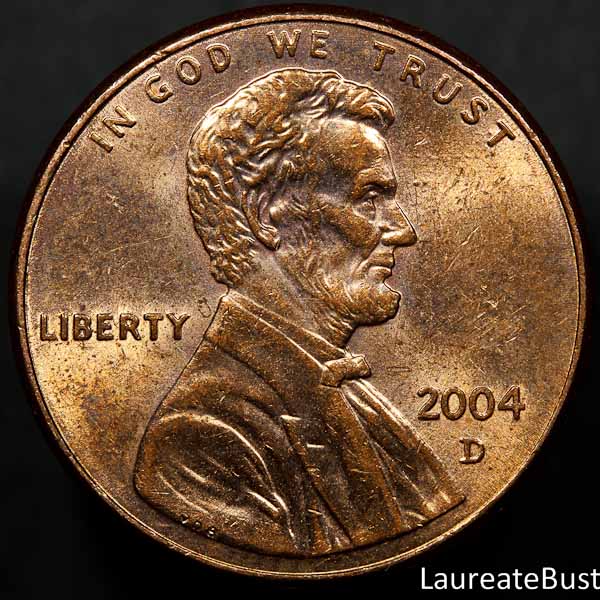 I need to get AC power for my camera! Live View shooting really eats the battery up fast. |
|
Pillar of the Community
United States
4038 Posts |
I like the lighting much better.
What is your down-sizing workflow?
|
|
Valued Member
Canada
331 Posts |
What I've been doing for these images is crop to 1:1 aspect ratio, then exporting from Adobe Lightroom 3.6 using these options:
Convert to format: jpg
Resize on long edge: 600 pixels
Keep filesize under: 100k
Presumably it sizes first, then figures out what jpeg compression it can impose to meet the filesize limit.
|
|
Pillar of the Community
United States
3076 Posts |
I would like to try stacking just to understand what it all entails and learn weather a photo representation needs to be stacked or not...Nice to see ones attempts and learnings, you have some great teachers here, I like to keep my ISO at 100, one interesting thing is I have noticed and I am many months since shooting, is the differences/RELATIONSHIP in apeture/shutter speed......... when you change the ISO......For any give shot... The result is the picture is darker or lighter depending on the varibles of the ISO and F/stop/ shutter speed, features.. I Believe its clear, higher ISO settings, while.. they seem to capture a good picture truely introduce noise into the pictures outcome... That being said... I don't meant to "JACK YOUR THREAD" My last 6 months are just following, and not contributing as construction and plumbing and every other catrastrofey I am working on and can't get back to photoing... I hope this is something you can think upon, I know it is something you are dealing with on the individual photo's with out stacking, and why stacking is about correcting this..  So I will post another thread concerning these relationships.  G |
|
Valued Member
Canada
331 Posts |
Hi aladdinslamp - the purpose behind focus stacking is to bring all parts of an image into focus, because at high magnification and wide aperture the depth of focus is so shallow that it might not be possible in one image at the time of capture. So this is my rudimentary understanding of the process: The program that I use after Ray's recommendation (CombineZ) takes multiple similar images and combines them into one composite image that uses the best focused portions from each image. It's basically a black box to me as far as knowing what the program does internally. I am a total novice of focus stacking, but the program is simple to use if you stick to the largely automated macros. With my lens I'm able to achieve a maximum reproduction ratio of 1:1, and I don't think I benefit from using more than 2 images to create a stack. I take one photo trying to focus on the highest point of relief, either the rim or part of the design, and then a second image focusing on the field. In some cases having the field slightly out of focus might actually help the final image Edited by LaureateBust
06/08/2012 11:32 am
|
|
Moderator
United States
23522 Posts |
Tethering is wondrous, ain't it?  I haven't looked back since the moment I first tried it. |
|
Page 2 of 2
|
Replies: 23 / Views: 4,238 |
Page 2 of 2
|


