| Author |
 Replies: 23 / Views: 4,790 Replies: 23 / Views: 4,790 |
Page 2 of 2
|
|
|
|
Pillar of the Community
United States
9395 Posts |
Looks good with the high-angle lighting. One thing you can try is turning off one light or the other. Sometimes this gives a more 3D look, although it isn't necessarily better for all coins. With a lens attached to the diffuser, you can move the lights around: for example, one close (less diffuse) and one farther from the diffuser (more diffuse), until you get the look you want.
|
|
Pillar of the Community
United States
1963 Posts |
Nice! I'm still tinkering with my camera.
|
|
Bedrock of the Community
United States
12477 Posts |
Quote:
Nikon 39-42mm (...Or is that the lens adapter? That sounds like an upstep filter adapter. If then, what filter are you using? I'm assuming UV or polarizing... Just another thing to consider. In Memory of Crazyb0 12-26-1951 to 7-27-2020
In Memory of Tootallious 3-31-1964 to 4-15-2020
In Memory of T-BOP 10-12-1949 to 1-19-2024
|
|
Pillar of the Community
United States
1298 Posts |
The diffuser you mention that is attached to the lens-could you show us what that looks like (pic), and how is it made? Thanks, Ham.
|
|
Pillar of the Community
 United States
666 Posts |
Quote:
EV is for exposure compensation (exposure value). On Canon SLRs you can adjust with the Av button on the back of the camera. That's a great looking setup! Much nicer than mine... Thank you!  Ah, I had read about exposure compensation in the Canon manual. I will go back and read it again with my new understanding that exposure value is an equivalent term. Much appreciated! ~ Mark |
|
Pillar of the Community
United States
666 Posts |
Quote:Quote:
Quote:
Nikon 39-42mm (...Or is that the lens adapter? That sounds like an upstep filter adapter. If then, what filter are you using? I'm assuming UV or polarizing... Just another thing to consider. I'll see if Ray can clarify regarding the adapter. The lens is a Nikon EL-Nikkor 63 mm f/2.8 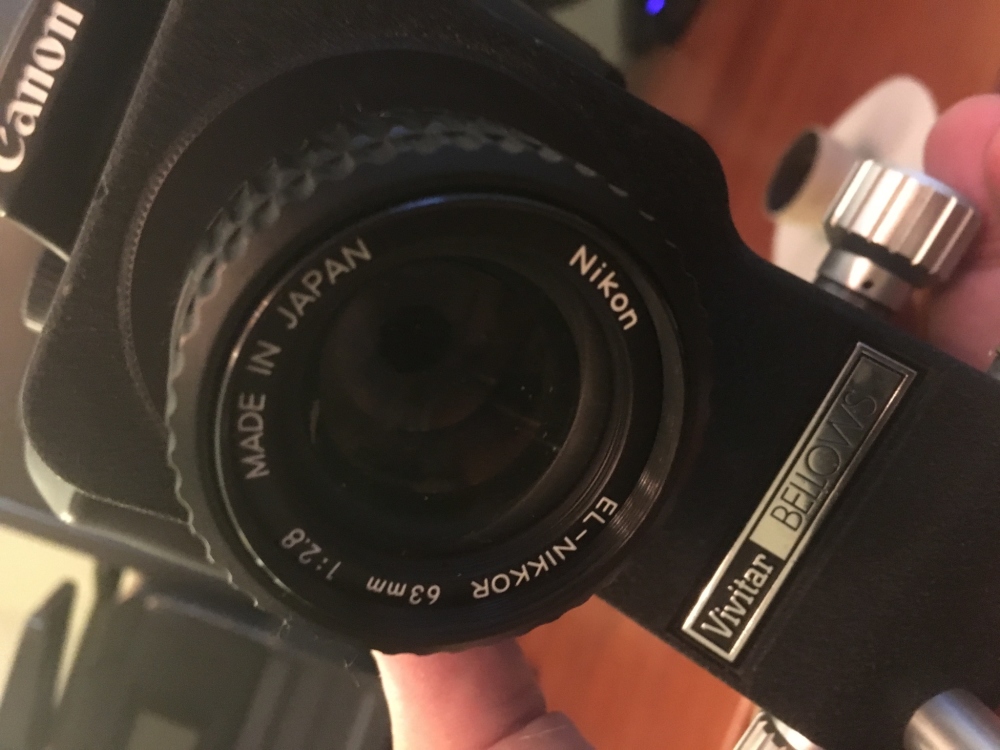 |
|
Pillar of the Community
United States
666 Posts |
Quote:
The diffuser you mention that is attached to the lens-could you show us what that looks like (pic), and how is it made? Thanks, Ham. Ray ( rmpsrpms) handmade the diffuser for me, so I will let him describe how he makes them. Btw, he also refers to this as a 'director', which might be a more accurate name  . Here are some pics: 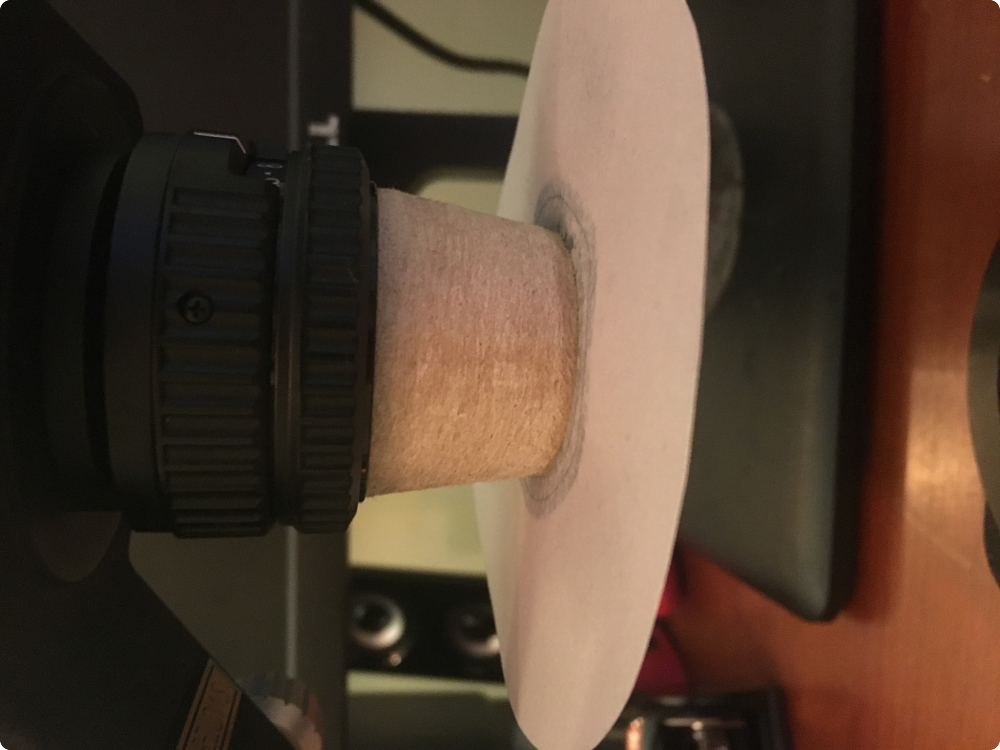    |
|
Valued Member
United States
441 Posts |
The second set of the penny photos look MUCH better. It may be me, but they still look a bit out of focus. Are you using Live View to focus? I never had much luck using LV to focus and now focus using the cam's eyepiece, then use LV to snap the pic. My setup allows for this without any prob...just need to occasionally stand to look through the eyepiece. Works for me  |
|
Pillar of the Community
United States
666 Posts |
Quote:
The second set of the penny photos look MUCH better. It may be me, but they still look a bit out of focus.
Are you using Live View to focus? I never had much luck using LV to focus and now focus using the CAM's eyepiece, then use LV to snap the pic. My setup allows for this without any prob...just need to occasionally stand to look through the eyepiece. Works for me Thanks! Yes, I have been using Live View, but I have also thought the focus does not look right in the finished product (vs. how it looks when I focus it, but before snapping the picture). I will try your recommendation and report back!  Edited by dd27
01/03/2017 10:24 pm
|
|
Pillar of the Community
 United States
4038 Posts |
Mark,
To determine if your system is vibrating and causing some blurriness, pick a spot on the Cent to do a comparison. I like to critically-focus on Lincoln's throat, with cheek and field in view to make sure they are all in reasonable focus (ie make sure depth of field is OK with the aperture I am using). Then snap the shot. Then open DPP and view the image at 100%, and move the widow around so that when you tab between the Live View image and the image in DPP they are lined-up on your screen. They should look exactly the same. If not, then something is going wrong with vibration or other issue.
The adapter you are using converts from the 42mm (T-mount) of the Vivitar bellows to the 39mm thread of the Nikon lens.
When using the Director, you can follow pepactonius' advice and move the lights around for best effect. Your last photos are close enough that now we're talking about subtle optimizations. I'd suggest moving both lights closer to the coin, between 1" and 5" from the Director, and at 10:30 and 1:30. Then move them around until you find the placement you like best. Personally I prefer a little more light on Lincoln's forehead and cheekbone. Coin lighting looks more natural when it's more coming from above the subject than below.
Contact me for photographic equipment or visit my home page at: http://macrocoins.com |
|
Pillar of the Community
United States
666 Posts |
Quote:
andywoj00 wrote on 01/03/2017 at 9:31 pm: The second set of the penny photos look MUCH better. It may be me, but they still look a bit out of focus. Are you using Live View to focus? I never had much luck using LV to focus and now focus using the CAM's eyepiece, then use LV to snap the pic. My setup allows for this without any prob...just need to occasionally stand to look through the eyepiece. Works for me. Thank you Andy - your suggestion worked! You really can't see the difference with the photos below (I had reduce them to 300KB). But the manual shot coin does look more in focus. Here is a photo using Live View: 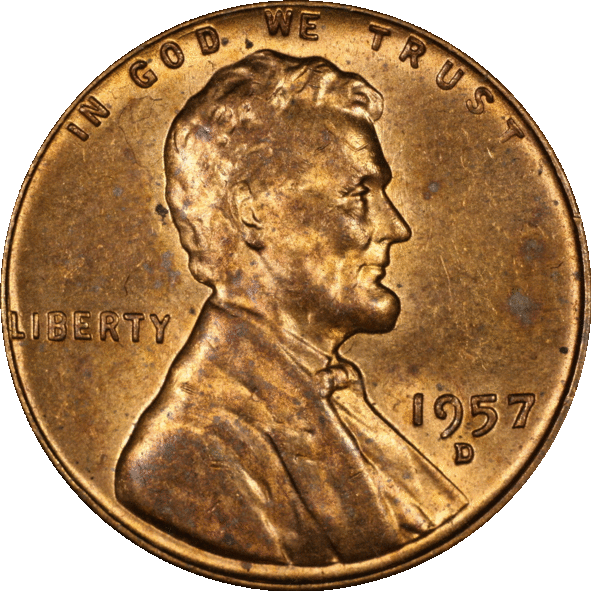 And the same coin, shot manually, all settings the same:  Edited by dd27
01/21/2017 11:56 pm
|
|
Valued Member
United States
441 Posts |
You're welcome. FWIW, the pics above are almost too close to call. I guess it all depends on what you see on your monitor, how much cleanup/tweaking you do in post, and how good/poor your eyesight is.
Regardless, if you're happy with the outcome, that's what matters. Vast improvement, keep up the good work!
|
|
Pillar of the Community
United States
9395 Posts |
Quote:
I never had much luck using LV to focus and now focus using the CAM's eyepiece, Are you using the 5x or 10x enlarged live view on a PC monitor for focusing? I've had the opposite experience -- focusing through the poor optical viewfinders in modern DSLRs (before live view was available) is much harder than using 5x (or 10x) live view. In the days of film, before autofocus came along, the optical viewfinders were much better (split prism focusing, microprisms, etc.) |
|
Valued Member
United States
441 Posts |
Pepactonius....I've done it both ways with poor redults. Maybe I'm not picking the right part of the coin to focus on....high point, low point, somewhere in between? I may have to re-engage on this if using LV will make it easier. Open for suggestions /help.
Edited by andywoj00
01/22/2017 11:34 am
|
|
Pillar of the Community
United States
4038 Posts |
I couldn't do what I do without Live View's zoom function. The process of focusing using Live View is called "critical focusing" and involves identifying the plane of best focus, and the range of planes of acceptable focus. As an example, on the Lincoln Cent, I zoom in on the area centered at Lincoln's throat. This area has all the critical focal planes of the coin: high point of beard; low point of the field just in front of the throat; and the middle point of the throat itself. I critically-focus on the throat, then look at both field and beard to see if they are in acceptable focus. If my aperture is too large, the throat will be very sharp, while field and beard will be fuzzy. Stopping-down a little, the throat will stay reasonably sharp, while beard and field will get sharper. Stopping down some more, and the throat will start to soften, and beard and field further sharpen, until all three levels are well-matched. It is at this aperture where the levels are well-matched but still sharp that you want to use your lens. If you stop down even more, all levels will soften, and you have gone too far. I think this will end up being Quick Tip #10 or maybe #11. |
|
Page 2 of 2
|
Replies: 23 / Views: 4,790 |
Page 2 of 2
|


