| Author |
 Replies: 41 / Views: 4,889 Replies: 41 / Views: 4,889 |
|
|
|
Pillar of the Community
Australia
4411 Posts |
Awesme! some of the best I've seen.
|
|
Pillar of the Community
 United States
4132 Posts |
@daniels: Check out my other thread where I describe the setup in more detail.
|
|
Pillar of the Community
United States
627 Posts |
Captain, great first images!! I will say, I much prefer the look of most coin images with 3 Jansjos. If you are shooting anything US quarter size or larger, 3 Jansjos are a must to illuminate the full coin.
Are you using those diffusers you describe in your other thread for these images -- or are these just the Jansjos bare?
Also, just wondering, but when you downsize the images by 1/5, are you applying a small amount of sharpen afterwards? I find that the slightest amount of sharpen improves the look of the final images (in Adobe CS4 I use 0.1 pixel @ 70% smart sharpen).
|
|
Pillar of the Community
United States
627 Posts |
BTW Captain, you mentioned at one point that "the slab probably looks dark to everyone else". Just remember, it doesn't matter if the slab is properly exposed, what matters is the coin. A guy on another site tried to tell me that my photos were under exposed because the NGC slab was "gray not white". I was like, of course they are gray -- I am properly exposing my image for the coin, not the plastic! As an example, try to take a picture of a BN piece of copper exposed so the NGC holder is "perfectly white". Not a very useful image as you can imagine.  Edited by brg5658
07/27/2012 11:53 am
|
|
Pillar of the Community
United States
4132 Posts |
The first couple shots I just pointed two Jansjös at that cent and started shooting. It looked so nice and sharp and pretty, I didn't bother with diffusers for any of those shots.
For the slabbed dimes just pointing the lights down at the slab didn't work because of glare and shadows from the insert. I tried to use the diffusers I made, but they were a complete failure. They're too bulky to get together close together near the lens so I can't get them at a high enough angle to make use of the "smile" effect. I could get them at a higher angle by putting them below the lens, but they're so bulky that they actually get in the way of the shot at that point.
What I settled on was a down-reflector configuration. I will take a picture of the lighting configuration tonight. I took an 8.5x11 piece of white card stock and made a hole in the center and a slot in one side so that hangs off the lens end of the bellows. For the 1945 I used two Jansjös, and for the 1943-D I used three. I can control the "size" of each light by changing the distance between the light and the reflector, so I can have some small spots for more luster or a single very broad diffuse source (I have four Jansjös total now, so I can dump a lot of light on the thing.) I also applied some black artist tape to the card to break up the light a bit more to add more luster.
The card actually sags quite a lot at the edges, which is good. It means I can use it to get light at both high and low angles, so I can highlight the nice color near the rims of these dimes. It's been hard to get that effect in a satisfactory way before now.
One problem with how I've taken these is that it's not repeatable. I'm placing the lights in arbitrary positions until the coin on the preview looks pretty. It's pretty well impossible to get the same configuration again in the future if I want to reproduce a shot for some reason, or want to try to match the lighting on a different coin.
I haven't applied any sharpening after resizing; I've erred on the side of less processing to avoid messing with with too many variables at once. I like a sharp image, but I HATE over-sharp images with halos. On some images, even the halos produced by down-sizing with bicubic interpolation will bug me. But down-sizing does introduce a little fuzz, so a just a touch of sharpening may be just what the doctor ordered.
Regarding the color of the slabs - I was actually worried that the pictures overall would look dark, not the slab insert, because every picture I edit on that monitor ends up looking that way. But I think I have built in a little mental compensation for it now because they look OK on my calibrated monitor at work. I might need to punch up the contrast some on the dimes; they don't seem to be in danger of blowing out the blacks or highlights much.
|
|
Rest in Peace
United States
10625 Posts |
Great pictures Captain and thank you for starting this thread. I'm very close to pulling the trigger on a new Canon because my old A620 is on it's last leg I'm afraid.
|
|
Pillar of the Community
United States
4132 Posts |
I've learned a lot in the past couple weeks, let me know if you have any questions.
|
|
New Member
United States
21 Posts |
 Fantastic  |
|
Pillar of the Community
United States
4132 Posts |
Here's the down-reflector. I can rearrange, add or remove tape to suit the situation. Not sure yet how much affect it has compared to the closeness of the lights. My theory is that it adds a bit more punch to the luster versus a plain white card, even if I put the lights close. 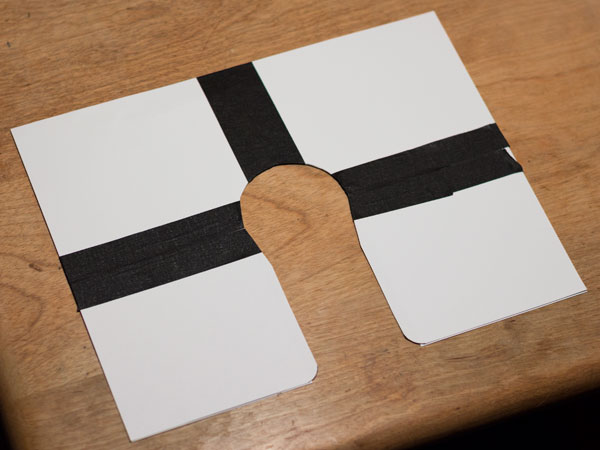 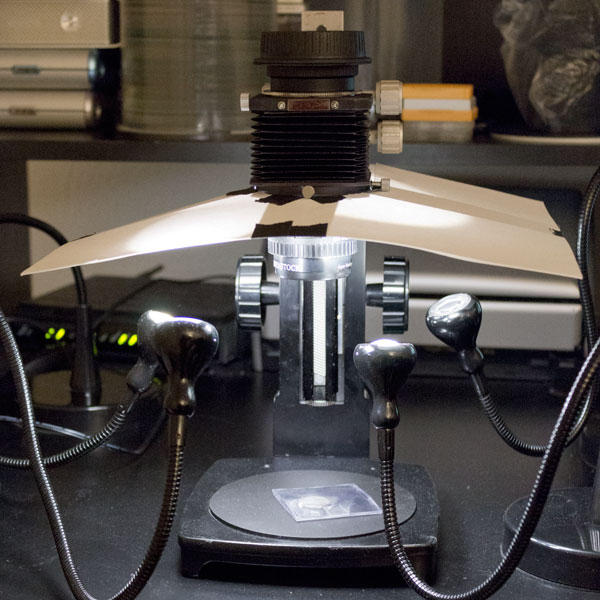 |
|
Pillar of the Community
United States
1193 Posts |
Captain, ABSOLUTELY incredible! I have about 150 coins in the mail to you that need photographing. LOL I'm kidding! Well, at I own the same ikea desk lamps hahaa... I can't subscribe to this thread unfortunately, as my O.C.D. will without question lead me to spend and spend on a setup of my own!
|
|
Pillar of the Community
United States
4132 Posts |
You can get very similar quality without spending quite as much. I got a T3i with kit lens, but the T2i has the same sensor, and you could get a body only, which would knock a couple hundred off what I spent and get identical quality (just losing out on the flip-out screen and some obscure firmware features). You could even get a T1i, which only has 15MP sensor, but since the optics are diffraction limited, it's not going to lose much quality. You could watch Ray's "el-cheapo lenses" thread for a great $20-30 lens which will get 90% of the performance of the 75ARD1. It might be possible to get similar performance out of a micro-four-thirds camera, though the smaller sensor will mean some other adjustments will need to be made due to the higher effective magnification.
There are some point-and-shoots with decent macro for more casual photographers - if it's got enough working distance, you can probably get some very nice photos at web-usable resolutions. The key will be combining a stable, precise stand and some clever lighting. The images that I'm taking are about 3400 pixels on a side, but for posting on a forum or blog, 400-800 pixels on a side is more typical.
The key is lighting, lighting, lighting (true for any photography, but doubly true for coins.) And it happens that it's one of the cheapest parts of the setup.
Edited by CaptainFwiffo
07/29/2012 2:41 pm
|
|
Pillar of the Community
 United States
4038 Posts |
I'd highly recommend avoiding anything but a Canon DSLR that can be tethered and has EFSC. It is possible to get quality shots with Nikon and other equipment but the EFSC takes away about 80% of the extra effort required to compensate for deficiencies in the camera at these magnifications, and tethering is an absolute must for productivity and general sanity. The T1i is a good choice. I personally feel the T3i is overkill as it has features I don't use for coins, but if you are going to use the camera for general photography the T3i with kit lens is a great choice...Ray
Contact me for photographic equipment or visit my home page at: http://macrocoins.com |
|
Pillar of the Community
United States
4132 Posts |
Yeah, if you're going the DSLR route, Canon is better for coins (or even macro generally.) This setup makes it almost completely effortless - light, focus and click. But if a DSLR setup is out of someone's budget, there are cheaper options that produce good or very good images for web resolutions even if they don't produce mind-blowing sharpness.
|
|
New Member
United States
23 Posts |
|
|
Pillar of the Community
United States
4132 Posts |
Just found one flaw... The setup includes a short M42 extension to make it easier to take the camera on and off and make more orientations possible, but that means the minimum magnification isn't quite low enough to fit a large dollar on the sensor. I figured that would be OK - dollars are not my focus, so I figured I could take the extension out when I needed to. Well it turns out that the T3i is slightly bulkier than the T2i, and it doesn't quite fit on the bellows without the extension. Probably I could take a Dremel and shave about 2mm off the bellows, but that's another point in favor of the T2i.
|
| |
Replies: 41 / Views: 4,889 |


