|
This page may contain links that result in small commissions to keep this free site up and running.

Welcome Guest! Registering and/or logging in will remove the anchor (bottom) ads. It's Free!
To participate in the forum you must log in or register. | Author |
 Replies: 35 / Views: 7,356 Replies: 35 / Views: 7,356 |
|
Pillar of the Community
United States
627 Posts |
I think I have finally gotten my axial lighting set-up down, after a few tweaks and some initial practice time. I just wanted to share a couple example images. To really show the differences in axial lighting versus direct overhead lighting, a mint state coin or medal with proof-like surfaces does the trick. I chose a Ulysses S. Grant medal, that is one of my favorite historic pieces. It was struck by the Philadelphia Mint for a parade to honor President U.S. Grant upon his return to the USA after a couple years abroad (after his presidency, he traveled extensively). The medals were handed out to parade goers as souvenirs, and the mintage is not clearly known. Despite this method of disbursement, this little example survived in pristine condition, and is graded MS65 by NGC. I believe it to be one of the nicest examples probably still around. It was struck in brass, and has proof-like surfaces -- quite the "wow" factor in hand! Without further ado, the photographs follow: Axial lighting: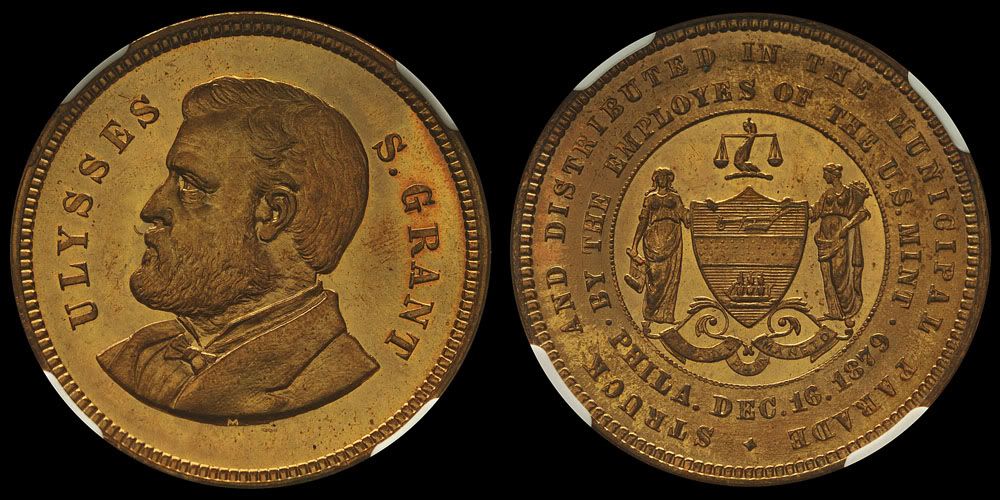 Direct lighting: Direct lighting: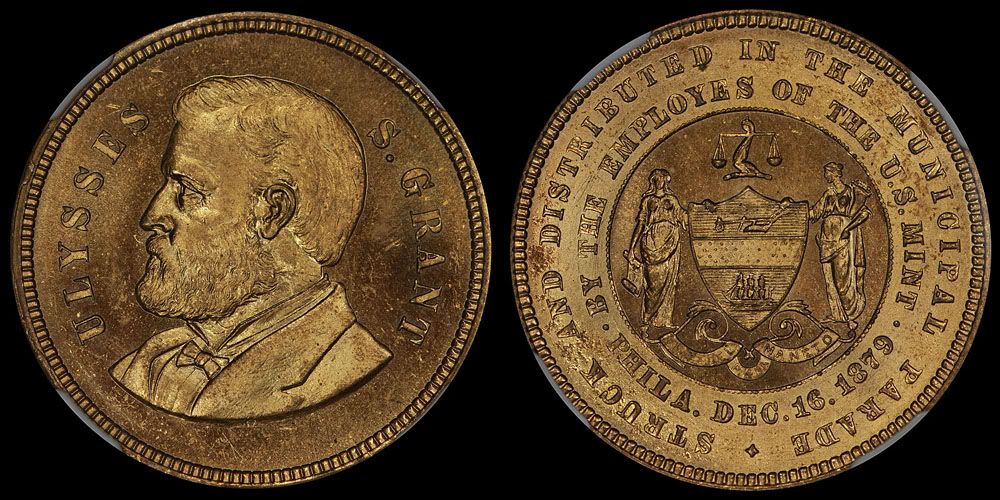 |
|
|
|
Pillar of the Community
 United States
4037 Posts |
Ahh, you're just pulling our legs. The direct lighting is really just a negative of the axial, right? Nice medal...Ray
|
|
Pillar of the Community
 United States
627 Posts |
LOL, one would think, right? I wish getting an axial look was as easy as just doing a negative! That silly little contraption I made took me a long time to get "right".  |
|
Pillar of the Community
United States
9792 Posts |
Way before digital cameras I took the ANA summer seminar on coin photography, quite enlightening to say the least, they use axial lighting for all there photography, probably still do. The had a simple box constructed of wood to hold the glass and the lamp, made it quite simple, somewhere I have the design in a storage unit with all my other seminar handouts (I'd look for it if it wasn't 1800 miles away right now). They were using optical glass, which if you look for it is quite expensive, until I figured out the glass from a flatbed scanner would probably be ideal, I have an old grayscale SCSI Apple one scanner that has no real value any more, I plan on busting out the glass and using it after I cut it to fit, the ANA axial glass was about 8" square as I recall. I got the scanner idea after pricing optical glass (about $60.00 for a 4"x5" piece) when I was contracted to scan 10,000+ negatives, my Epson scanner has the transparency top on it for full 11" x 14" scan area, but the negatives would always move on me even using the negative carriers, so I planned on going to a piece of glass to hold them flat. I was scanning 645, 6x7 and 35mm strips, along with many mounted slides. Still have not tried it though. Would love to see a photograph of the axial setup used to shoot this with. Nice shot really shows off the color nicely. "Buy the Book Before You Buy the Coin" - Aaron R. Feldman - "And read it" - Me 2013! ANA Life Member #3288 in good standing since 1981, ANS, Early American Coppers Member (EAC), Colonial Coin Collectors Club member (C4), Conder Token Collector Club member (CTCC), Civil War Token Society (CWTS) member, Liberty Seated Collectors Club (LSCC) & Numismatic Bibliomania Society member (NBS), USMex, Member in good standing, 2¢ variety collector. See my want page: http://goccf.com/t/140440Edited by westcoin
02/03/2012 06:29 am
|
|
Pillar of the Community
United States
507 Posts |
Nice shots and thanks for sharing. I'd also like to see the setup. Are you using the jansjo lamps? From how far away?
This has been on my to-do list for a while, but I believe my proof and other coins that would benefit from the technique are few and far between. Scanners are cheap (free on craigslist) and if the glass is ideal, that would be great to know.
-wheatiefan
ps - I don't see the horse on that medal!
|
|
Pillar of the Community
United States
7840 Posts |
Looks real nice! My lighting seems to be my drawback at the moment.
Edited by oih82w8
02/03/2012 11:10 am
|
|
Pillar of the Community
United States
4037 Posts |
So I have to ask...how do you deal with the direct reflections of the axial lighting off the slab surface? I can understand the use of axial lighting on raw coins, and have done that myself with various setups, but axial lighting produces direct reflection of the light up to the sensor from slab surface, which is not always very pretty. At best this reduces the contrast, and at worst it completely obscures the coin. From the earlier pic of your axial setup, it seems you are using diffusors on the lights to minimize this effect, but I don't think it's possible to make it go away. Contrast is important to me. The effect of direct reflections is similar to flare in the lens, which I go to great lengths to avoid. What does an un-processed photo with this setup look like, and how much contrast adjustment do you apply to eliminate the reflections? The axial shot is a lot lower contrast than the direct, which to me shows the achilles heel of the axial setup...Ray
Contact me for photographic equipment or visit my home page at: http://macrocoins.com |
|
Pillar of the Community
Mexico
1304 Posts |
WoW, that is quite a difference due to the lighting. Never even noticed the difference beween the two ways to shoot a coin, but it makes sense. Thanks for shaing!
|
|
Moderator
United States
23522 Posts |
What's missing from the picture above is something to block the direct light from hitting the coin. If you're going to shoot axial, you need to have the reflected light be the *only* light which hits the coin. It's difficult; you usually need to raise the light somewhat and for those of us who shoot at close distances with bellows, it will be problematic.
Keep in mind, the 45-degree angle is not set in stone. I could conceive of setting the light below the coin, and varying the angle of the glass to get the light right. That's for you, too, Ray - you can shoot slabs axially but the angle will vary from 45. The end result may have to be a circular crop, because the area of direct reflection will be close in order to get enough light onto the coin.
A single light source and sheer wattage count dramatically here. It's not a job for a Jansjo; 60w of incandescent is a bare minimum, and 100w is recommended.
|
|
Pillar of the Community
United States
627 Posts |
Hi everyone, First I will post a picture (schematic and actual) of my axial set-up. It is a low-budget set up, using two 8x10 frames from Hobby Lobby ($7 for the pair) and a small set of brass hinges from the same store (< $2). I hinged together the two frames with the two "back sides" out and the two "picture sides" sandwiched toward one another. I did it this way so the glass had a lip to sit on while I angled it up. I have flexibility of angle of the set-up by using a small dowel with sticky tack on each end to keep the glass stable and fixed at the angle I choose. As Dave mentioned, you must diffuse your light source when doing axial shots, and it needs to be as brights as possible. I use two Ott light bulbs put in gooseneck lamps, and I position them behind the frame set up, with a diffusion curtain between (I have used a white pillow case for this, or paper towels -- again, low-budget here!)
Schematic:
Actual set-up: --------------------------- As Ray mentioned, there is a loss of contrast when shooting images this way, especially when the coins are in slabs. And, I had to post-process the images to get that contrast back. I actually prefer to use the Gamma correction in Photoshop to accomplish this, with a subsequent brightening. This is what I have found to work best. I usually do a Gamma correction of around 0.75, and then brighten anywhere from 20-30. I don't mess with saturation or contrast (at least not on the few shots I have taken). I have found that after the Gamma and brightness adjustments, you can improve some images further by bringing in the edges in a levels adjustment -- this is most useful for dark copper (with blue toning) that I have tried to image. When I get home this evening, I can post the unprocessed images of this medal, just for comparison. The exposure times are quite long (1.5 seconds for these images), so stability and a timer/remote release are a must. In reality, I'm just playing with this method because it brings out colors on certain coins, and it emphasizes prooflike surfaces of some others. In general, I prefer the direct or semi-diffused direct lighting with Jansjos because it is more true to how the coin looks in hand. But, there are certain things you can see in axial lit images that completely escape standard lighting images. I hope this is helpful, and I really look forward to further dialogue here. :) -Brandon |
|
Moderator
United States
23522 Posts |
Brandon - block the direct light from the Otts. You could do it with a matchbook placed on its' side, right next to the coin. You haven't seen contrast yet. |
|
Pillar of the Community
United States
627 Posts |
Dave, The Otts are placed pretty low, and the lip of the frame already blocks most of the direct light. I will try adding a little additional block there and see if it makes a difference. Thanks for the hint.
|
|
Pillar of the Community
United States
4037 Posts |
Quote:
Keep in mind, the 45-degree angle is not set in stone. I could conceive of setting the light below the coin, and varying the angle of the glass to get the light right. That's for you, too, Ray - you can shoot slabs axially but the angle will vary from 45. The end result may have to be a circular crop, because the area of direct reflection will be close in order to get enough light onto the coin. Well, by definition "axial lighting" is having the light shine directly down the axis of the lens such that the reflections shine directly back to the sensor, or get scattered. Anything other than this 90-deg to the horizontal is not truly axial. If it is other than 90-deg, to minimize reflections, you might as well use simpler setups. The setup I posted a while back, with lights shining up to a reflector just above the lens, gives essentially this type of light for a lot less fuss. In fact the recent "final setup" I have been using brings the lights up to almost the point where there are direct reflections from the coin, but not quite. This spurs me into trying the reflector setup again to compare with my "final setup"...Ray Contact me for photographic equipment or visit my home page at: http://macrocoins.com |
|
Pillar of the Community
United States
7840 Posts |
I am going to try the direct Jansjo lamps technique since I don't have the acreage to place this type of set-up on.
Edited by oih82w8
02/03/2012 11:16 am
|
|
Pillar of the Community
United States
627 Posts |
What I'm imaging is definitely 90 degrees, and axial lighting. I adjust the glass on the little frame contraption to position the most direct (brightest) swath of light over the coin. I didn't get out my protractor, but I'm guessing it's about 45 degrees spot on Everything else you said is true though Ray. There are other set-ups that allow about the same effect. I did find that tilting the slab causes me to have parallel plane issues, whereas this set-up allows me to keep my field flat from corner to corner. I don't have a tilt lens, so my options are limited in that arena. With the axial set-up, I used an f-stop of between 5.6 and 8 with the 75ARD1. That allowed for enough light to properly focus, and sufficient depth of field to keep the full coin/medal in focus. Again, I don't see myself using this set-up for many of my coins. But, it's handy to have in your arsenal of methods. |
|
Moderator
United States
23522 Posts |
Quote:
Well, by definition "axial lighting" is having the light shine directly down the axis of the lens such that the reflections shine directly back to the sensor, or get scattered. Anything other than this 90-deg to the horizontal is not truly axial. You are *such* an engineer.  At this level, much of what we're doing is analog, not digital. We've figured out how to obtain sharp focus and stark contrast, and the only thing left is to achieve what we think looks "good" in a coin shot. That's a subjective decision, and what looks good to you might not work for me. I believe it's tilting at windmills to try and settle on one final standard for that reason. I will, at the risk of sounding disrespectful (obviously not intended), urge you guys to point the lens at some truly lustrous Morgans. That hasn't happened much during this ongoing dialogue of the last few months. You will be presented with problems in contrast unlike any other - lustrous gold comes close - and it's my contention that some theories currently accepted as gospel will need to go by the wayside when tackling lustrous silver. Lustrous copper or nickel is a walk in the park by comparison to a silver coin with huge, smooth fields. |
| |
Replies: 35 / Views: 7,356 |
To participate in the forum you must log in or register.
Disclaimer: While a tremendous amount of effort goes into ensuring the accuracy of the information contained in this site, Coin Community assumes no liability for errors. Copyright 2005 - 2026 Coin Community Family- all rights reserved worldwide. Use of any images or content on this website without prior written permission of Coin Community or the original lender is strictly prohibited.
Contact Us | Advertise Here | Privacy Policy / Terms of Use
|
| Coin Community Forum |
© 2005 - 2026 Coin Community Forums |
| It took 0.38 seconds to rattle this change. |
 |
|
| |
| |


