| Author |
 Replies: 612 / Views: 111,727 Replies: 612 / Views: 111,727 |
|
|
|
Valued Member
United States
110 Posts |
Super image!
Your giving me great expectations on the rig I'm building.
I also would like to see the same image with the coin sitting on top of a thin pedestal so that the background is far outside the depth of field.
I was wondering, also, what do you think of the quality of the image posted here, versus the 7+MPixel (uncompressed) image you can get on your monitor?
|
|
Pillar of the Community
United States
715 Posts |
Thanks pc2! I will definitely hunt down some cork or something. I don't mind the background currently, but maybe I'll be even happier with the cork setup. If you're building the rig Ray recommended at the start of this thread, you'll be able to take pictures of this quality, too. I'm sure of it.
The uncompressed pictures don't look much different until you begin zooming in. And even then it's not an enormous difference. Since these pics are meant to capture whole coin faces, I think the compressed pictures do just as well as the uncompressed pics for the purposes of say, online grading. When it comes to details, trying to zoom in on these pics will start to show more differences, but that's what the Plan4 objective will be for anyway. I need to play with that, too. I'm certain the lighting will be quite different for those macro shots.
So are you building the setup Ray recommended? Let us know if there's anything that's confusing that we might be able to clear up. =)
|
|
Pillar of the Community
United States
715 Posts |
Edited by Oijogja
05/03/2017 11:37 pm
|
|
Pillar of the Community
 United States
4038 Posts |
You definitely have some hotspotting on this one. You can reduce this with more diffusion on the lights. I also suggest using exposure compensation to avoid over-exposing, then bringing back the overall exposure in post processing. Shiny copper is very difficult to get evenly lit and exposed.
Great shot with the objective. As you can see, the depth of field is not sufficient to get every level in sharp focus. Best way to solve this is with focus stacking.
You're shooting up the learning curve very quickly!
Contact me for photographic equipment or visit my home page at: http://macrocoins.com |
|
Pillar of the Community
United States
715 Posts |
So the second set of photos in the above post were lit like this!  I might need some directing when it comes to diffusing the light. I tried a plastic bag, sheets of paper, vellum, but none seemed to do the trick. Tried bouncing the light, but couldn't get that to work either, except as shown above. Can you explain exposure compensation? Is this setting to a lower f-stop then rebrightening in post? Also, can you explain focus stacking? This will allow different depths of field to be more equally in focus? |
|
New Member
Canada
49 Posts |
|
|
Pillar of the Community
United States
4038 Posts |
I assume you are in Av mode? When in Av or other auto modes, the camera sets exposure such that the brightest areas are pushed just into saturation on the luminance channel. This is bad for red cents, because the R channel is significantly over-exposed. You can over-ride this a bit by using exposure compensation to force a lower exposure. Here is where you find the control:  |
|
Pillar of the Community
United States
715 Posts |
I will try this out, Ray. I'm sure there's some other shiny copper around here somewhere...
I was looking into focus stacking and I've got two questions. Do you have software you recommend for this? I don't have access to Photoshop currently. Second question outs regarding focus rails. If I'm going to take multiple images to composite them, I'm going to need a much more stable base for my camera. Adjusting focus manually practically guarantees at least a very slight shift in camera position. What can you recommend to overcome this problem? I figure this means either getting a different support structure for the camera itself or getting a helicoid that can be adjusted via the computer, assuming those exist.
|
|
Pillar of the Community
United States
4038 Posts |
I use Helicon Focus. It is not free. Zerene Stacker is also an option. Free options are CombineZP, which I used for a long time, or others like Picolay, which I have not tried. Others are out there as well.
The programs will align the frames to eliminate small changes in position/rotation/magnification from frame to frame.
Based on your Plan 4 pic, you can probably get away with 3-4 shots for the stack: field around the RPM; top details of the RPM; top details of the date. Then stack those for a sharp image. It's often better to focus on the details you want to capture rather than just letting an automated system step a fixed amount.
Edited by rmpsrpms
05/04/2017 09:18 am
|
|
Pillar of the Community
United States
715 Posts |
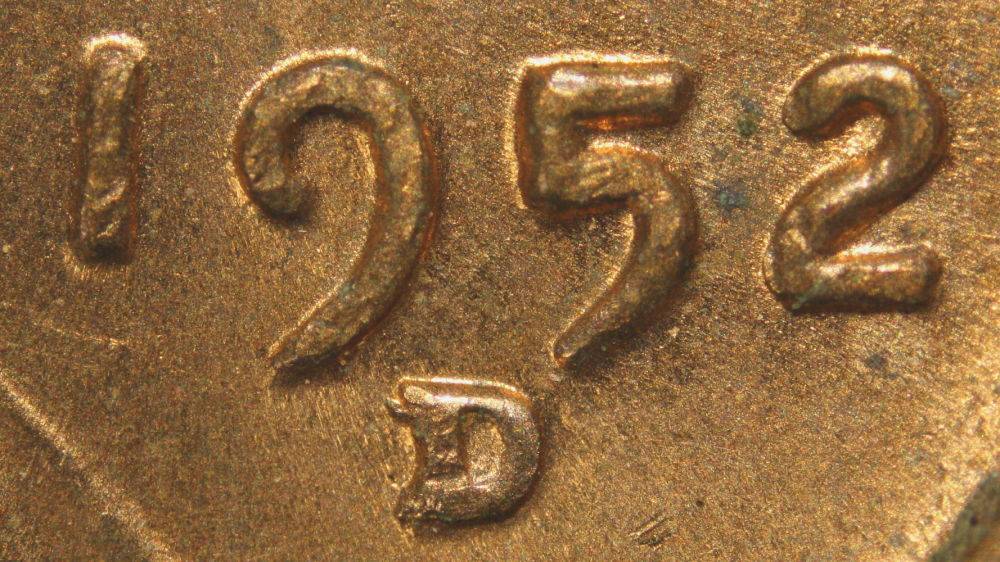
A go at focus stacking. 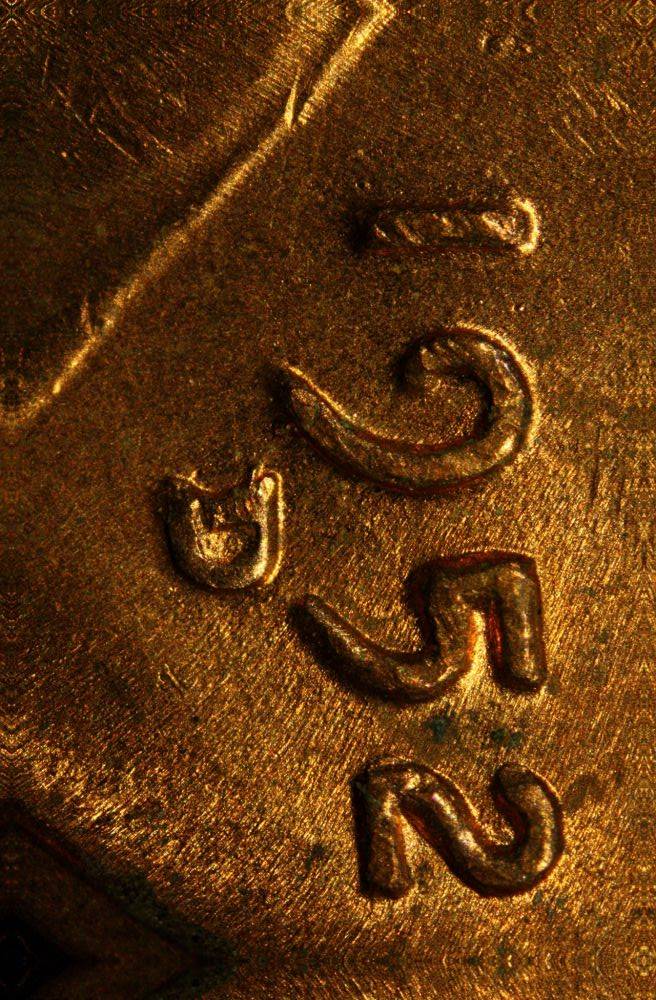 |
|
Valued Member
United States
110 Posts |
Background is not as busy and distracting. I think it's better. But you might look at the website that Ray pointed out on the thread about "Gray Backgronnds": rmpsrpms Pillar of the Community United States 2806 Posts Posted 04/10/2017 09:45 am Show Profile View Users Recent Posts Bookmark this reply Add rmpsrpms to your friends list Get a Link to this Reply Yep, there are lots of different "gray" definitions. Take a look here: https://en.wikipedia.org/wiki/Middle_grayI personnally like the value of about "Gray 110". Your paper pedestal is ingenious for precision! Edited by pocketchange2
05/04/2017 11:17 am
|
|
Valued Member
Canada
288 Posts |
Maybe this has been addressed somewhere, but I'll ask again. I've got all the components I was supposed to get, but I don't know which order they go in. Here's what I have so far, in order, for my Nikon D90. When I assemble it, I get F--- flashing and it won't work. What am I missing? I also have the M42 to RMS adapter, but I don't know where it fits.
El-Nikkor 75mm lens
M42 Extension tubes
M42 Helicoid
M42 Lens to Nikon
|
|
Pillar of the Community
United States
4038 Posts |
Your camera is expecting a lens with electronic contacts for focus and aperture. It needs a lens with these contacts or it gives an error. For your D90, I believe you must be in Manual (M) mode to operate without a compatible lens.
Some M42-Nikon adapters are "chipped" and have the proper electronic contacts. The chip in the contacts makes the camera think it has a 50mm lens attached, so the error you are seeing won't happen. Of course there is no lens, so focus and aperture settings must be made manually. The best mode to use in this case is "A", or Aperture priority. In this mode, the camera will adjust the shutter speed and ISO for proper exposure. If you fix the ISO to 100 or 200 so that the sensor noise is minimized, then only the shutter speed will be adjusted.
Most Canon cameras will allow Av mode without a chipped lens, but I believe most or all Nikon cameras require the chip to operate in anything other than M mode.
|
|
Valued Member
Canada
288 Posts |
Thanks! Switched it and it looks like we're in business. Bought all my parts after reading this thread in December 2016. This is the first time everything has come together. Can't wait to get started.
And for the record, you guys are seriously amazing. Not just the photos you take, but in the advice you give and the patience you display.
|
|
Valued Member
Canada
288 Posts |
Here's one of my first images with the set up. Let me know what you think, what needs improvement, etc.  |
| |
Replies: 612 / Views: 111,727 |