| Author |
 Replies: 64 / Views: 9,679 Replies: 64 / Views: 9,679 |
|
|
|
Valued Member
United States
374 Posts |
Nice pictures! I hope you are happy with your setup. I remember trying digicamcontrol with the 3200 and pretty much just gave up.
|
|
Pillar of the Community
 United States
1304 Posts |
mgillette I am very happy with the setup (and the camera). I have a lot of practice ahead of me, but I think I'll master it with patience. Digicamcontrol works 100% for me. While the on screen live view isn't that great, it does instantly transfer my photo over for me to review. I will NOT be using this for manual focus, digicamcontrol just doesn't have that kind of resolution (or it could be the camera liveview itself). But, it does speed up the process!
|
|
Moderator
 United States
23522 Posts |
Quote:
I am adjusting the exposure compensation as I'm finding out the P setting in my camera is underexposing everything. What setting are you using for Metering? If you're using Matrix or Center Weighted, the camera is using brightness outside the coin to determine exposure. The more you allow the camera to choose for settings, the more you should use Spot Metering (the only setting I ever use personally) so the camera takes all of its' exposure information from the coin itself. That said, Exposure Compensation is a pretty powerful tool for adjustment because it has more granular settings than anything else affecting the amount of light hitting the lens. Live View by nature should transfer the image at the same resolution the sensor sees it. Must be the implementation for your particular camera. |
|
Pillar of the Community
United States
4038 Posts |
I use Av mode with exposure compensation and evaluative metering to minimize over-exposure. You can move the zoom box around to ensure highlights are metered.
Contact me for photographic equipment or visit my home page at: http://macrocoins.com |
|
Moderator
United States
23522 Posts |
When you have the coin 1:1 on the sensor, evaluative metering makes sense because essentially all of the information the sensor gets is about the coin itself aside the extreme corners. With a lens like the 18-55 in use here, though, most information is coming from areas which are not coin and spot metering is in order.
|
|
Pillar of the Community
United States
1304 Posts |
I did have it set on matrix metering. I will try it with spot metering. That makes sense in my case since I can't get the entire coin to fill the sensor with the lens. The camera is likely looking at the white from the light around the coin and weighing that too much. Thanks for the tip!
|
|
Pillar of the Community
United States
1304 Posts |
Quote:
Live View by nature should transfer the image at the same resolution the sensor sees it. Must be the implementation for your particular camera. What digicamcontrol appears to be doing, is only showing the liveview as it would appear on the camera lcd itself. Meaning the resolution appearing on the screen is the same as what appears on the lcd on the camera. So all I see is a tiny and somewhat grainy image on my computer. This pretty much eliminates any hope of manual focus using digicamcontrol, so I have to rely on autofocus. Even so, digicamcontrol still lets me control the settings on the camera, autofocus and instantly transfer to computer rather than it being stored on the SD card. This alone really makes a huge difference. |
|
Pillar of the Community
United States
1304 Posts |
Spot metering resulted in overexposed photos. But, I like the look of adjusting the exposure compensation down better so I think i'll be using spot metering for these shots and then correcting the exposure from there. Here is an example using this process.  |
|
Pillar of the Community
United States
1304 Posts |
I've noticed that photographing raw coins is easy, I'm still having trouble with coins in slabs, because the plastic has a tendency to form what I describe as a haze on the image, at least compared to raw coins. Is there a lighting trick that would alleviate this issue?
|
|
Pillar of the Community
United States
1476 Posts |
EF, I have noticed that if I keep my lights as close to the len's as possible and as far away from the slab as possible it works out ok for me. As long as I don't see the reflection of the light points on the coin itself. I'm new to this but I'd thought I'd share. Also, Not trying to hijack the thread but, one says spot metering and one says evaluative metering?  Also, are you using exposure compensation on a case by case basis or do you have it set a few clicks into the pos/neg to start out? When talking about having the image 1:1 on the screen, does that mean I should set my camera to have a 1:1 aspect ratio instead of the 3:2 that I have it set? Or are you talking about when you are zoomed in at 1:1? Edited by Dar
05/19/2015 5:54 pm
|
|
Moderator
United States
23522 Posts |
EFLC is currently using an 18-55 lens which cannot fill the sensor with a coin; it lacks the magnification. So, spot metering where the camera meters only from the coin in the center of the sensor is appropriate. Once you reach 0.5-1:1 magnification where single coins fill the sensor, Ray's advice of Evaluative Metering is the way to go because - as he explained - you can leverage it to help with highlights. Too little space which is not coin exists to affect the shot.
|
|
Pillar of the Community
United States
1304 Posts |
Dar. I started with exposure compensation but switched to simply full manual and adjusting shutter speed until I liked what I was seeing. I do have to change this as the color of the coin I'm shooting changes. I need to upgrade from the kit lens. Either the 85mm Nikon or the 90mm Tamron AF. I have some research ahead of me. Having the image fill the sensor will be nice, I can already see the limitations with the kit lens, even though it is doing a really good job. Here is another shot I managed with the kit lens. 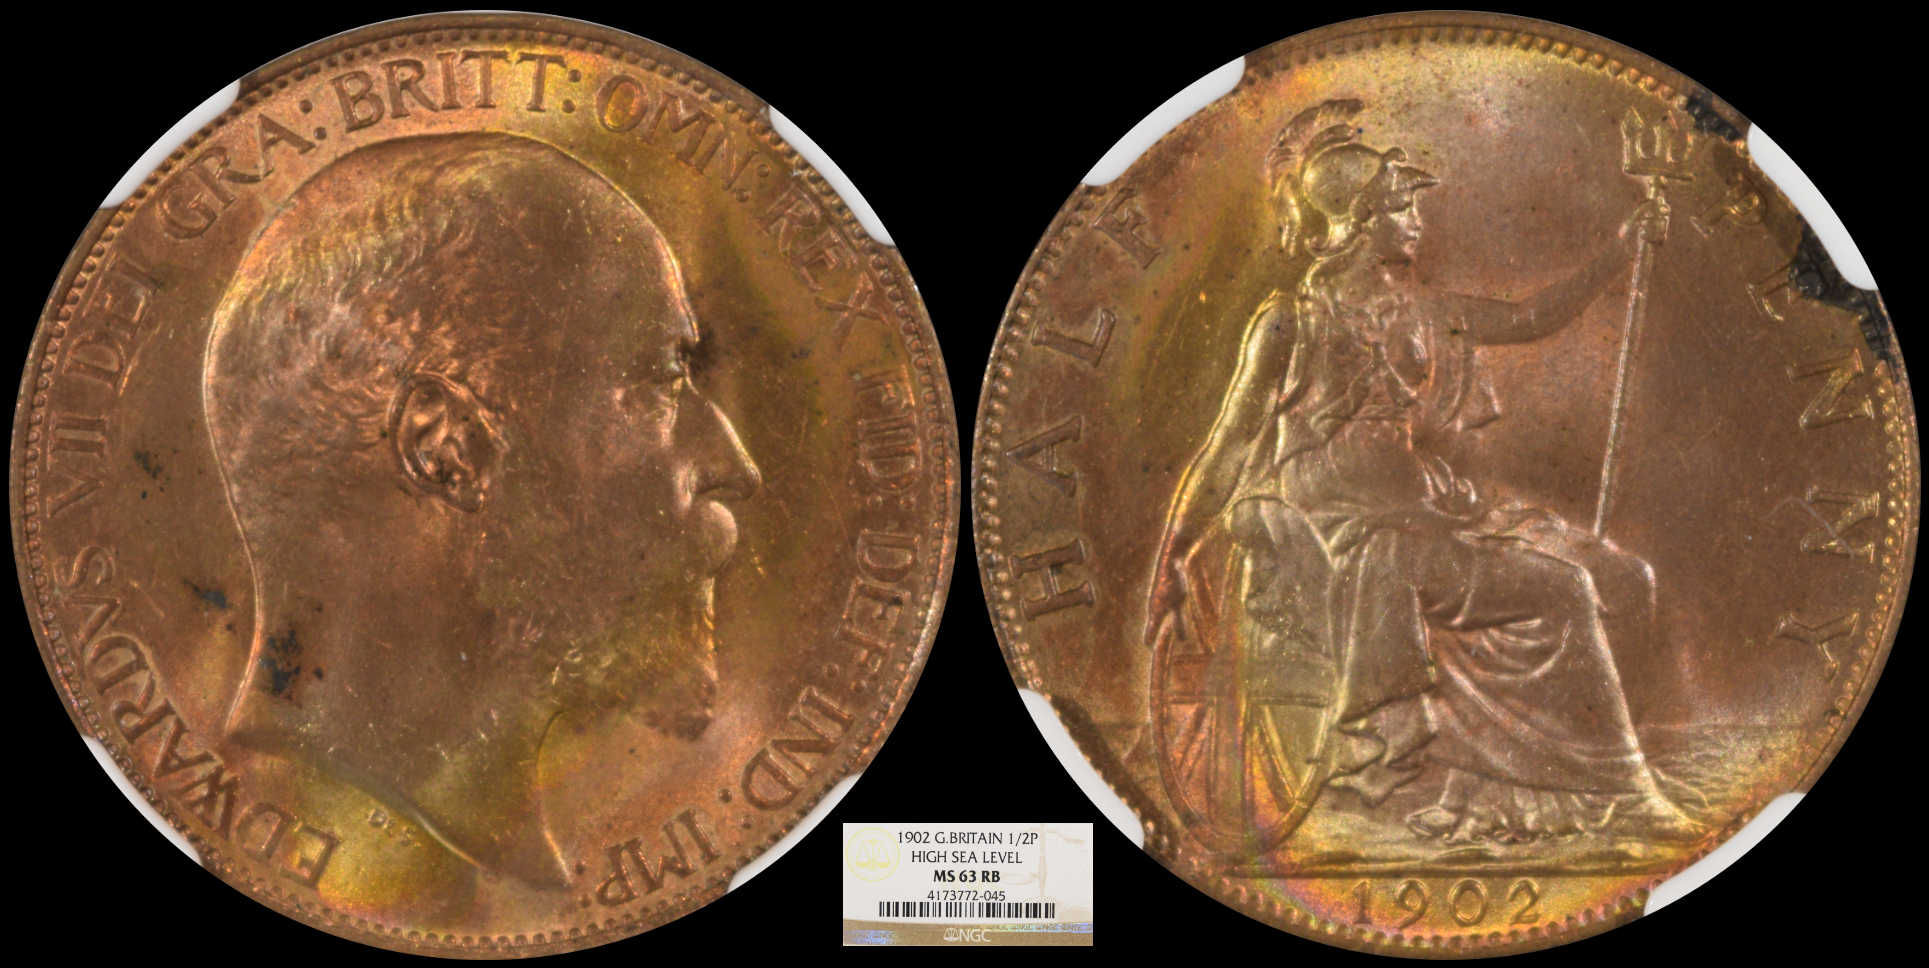 |
|
Pillar of the Community
United States
9395 Posts |
Quote:
I started with exposure compensation but switched to simply full manual and adjusting shutter speed until I liked what I was seeing. I also use fully manual shutter speed. Given the lens aperture (f/8 usually) and lighting, I use the slowest speed that doesn't burn out the highlights on the coin. This usually results in a pretty dim image, especially for shiny coins. The gamma ("curves") has to be adjusted during post processing in Photoshop, to lighten up most of the image while preserving the highlights. Is there some advantage to letting the camera adjust the shutter speed automatically? |
|
Valued Member
United States
374 Posts |
I do everything in full manual as well, setting the aperture first so the DOF is sufficient (f/12-f/22 since I use a tripod and not a copy stand). My next adjustment is shutter speed - the slowest I will go for is usually 1/8 or faster to tone down hot-spots enough that they do not over-saturate. Quote:
Is there some advantage to letting the camera adjust the shutter speed automatically? While I don't see a huge benefit for coin photography, I do this all the time outdoors or for portraits with my macro lens when I know what I want for my DoF - I'll set the camera to Aperture mode and more or less forget about the lighting. Using aperture mode with the 85-mm micro-Nikkor:  |
|
Pillar of the Community
United States
4038 Posts |
Quote:
I've noticed that photographing raw coins is easy, I'm still having trouble with coins in slabs, because the plastic has a tendency to form what I describe as a haze on the image, at least compared to raw coins. Is there a lighting trick that would alleviate this issue? Does the haze change as you move the lights around? And do you see the haze even if you don't see the direct reflection from your light(s) off the slab surface? If so, then you're seeing one of two things: 1)Flare from off-axis reflections hitting the lens 2)Hotspotting from your extension tubes, adapters, or bellows Remove your camera, and look down into the tubes/bellows and see if you have lots of light reflecting off the inner surfaces. If so, you will need to flock those surfaces. Note that I'm seeing exactly the same issue with the setup I'm putting together for mcshilling. This is the first actual setup like this I've built, and did not expect the problem. If you're seeing something else, please post an image with the haziness so we can debug it. Quote:
Ray's advice of Evaluative Metering is the way to go because - as he explained - you can leverage it to help with highlights. Too little space which is not coin exists to affect the shot. An important point to note (maybe worth being TIP#2)is when using Live View, canned metering functions are disabled. You see the metering selector when you are tethered but not in Live View, but when you engage Live View the selector goes away. I'm talking Canon here...I can't remember what happens with Nikon, it's been so long but I think it's the same. So when you are in Live View, metering is done on a 'simulation' basis, ie what you see on the screen is what you get in the image, plus or minus. The metered area is the 100% magnification rectangle. If you move the rectangle from a light to a dark area, the image will lighten. Dark to light, image darkens. The tip/trick here is to move the rectangle so it includes the brightest highlights (judged visually on-screen). This will ensure those highlights are metered. Unfortunately, the metering software will still push the brightest highlights such that their "brightness" is maxed-out. If the highlights are grey color (if you're shooting untoned silver coins, for instance), this may be OK, but usually there is some color and the predominant color channel is pushed well into saturation, skewing white balance in that area. To avoid this, select -.3EV or -.5EV (or even -1EV), which will help to push the highlights down a bit and keep from oversaturating a color channel. Look at the RGB histogram and you should see this effect and know how much you need to drop the EV to compensate. Edited by rmpsrpms
05/19/2015 10:36 pm
|
| |
Replies: 64 / Views: 9,679 |


