| Author |
 Replies: 33 / Views: 8,029 Replies: 33 / Views: 8,029 |
|
Pillar of the Community
2087 Posts |
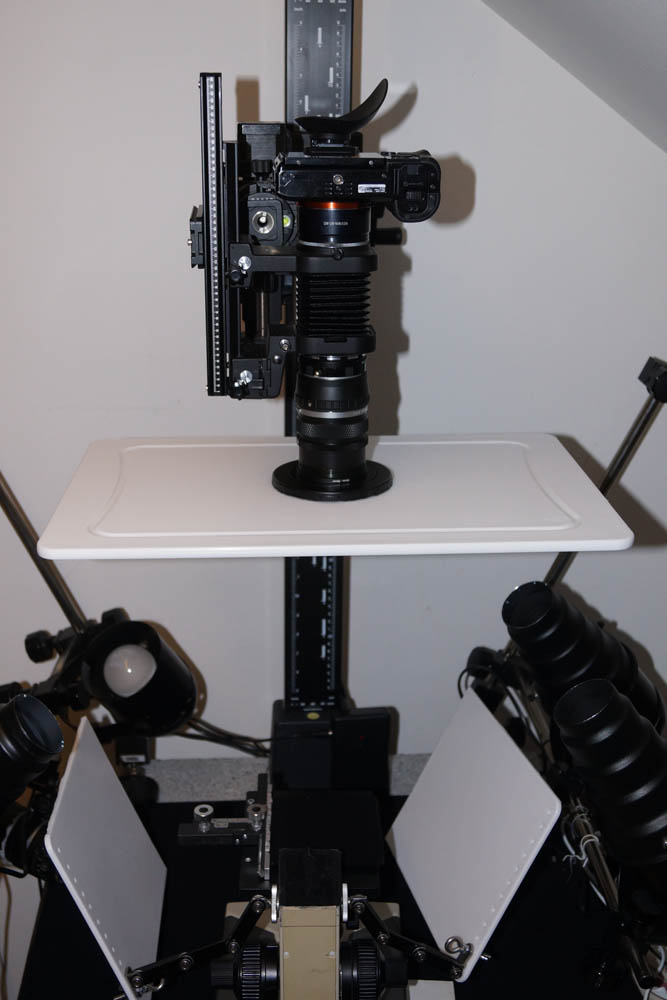
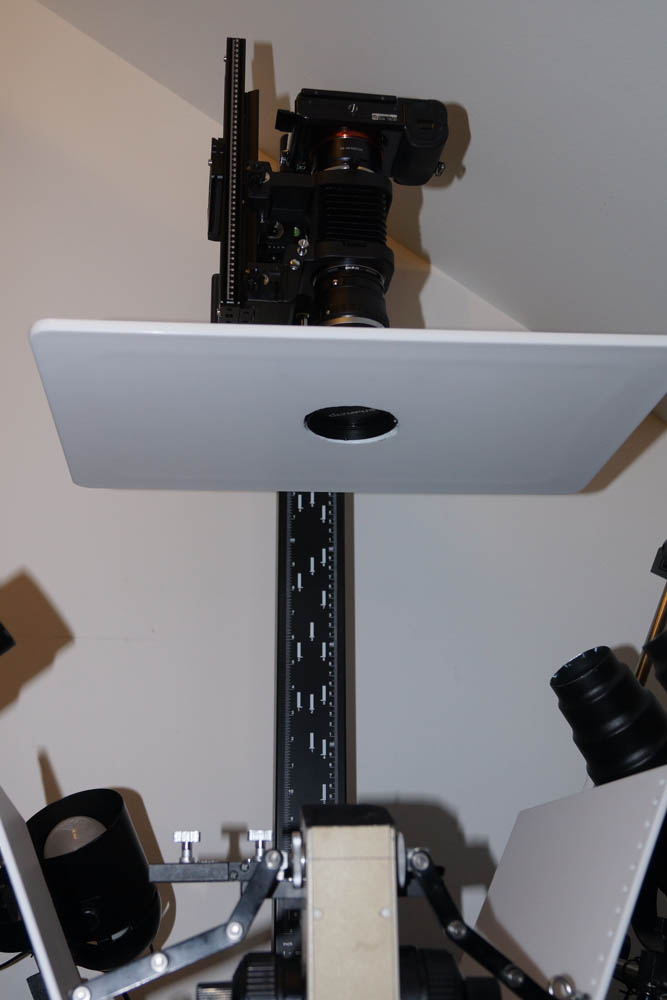
I have been trying out different lighting and diffusion methods and one simple method has impressed me....I still need to do some work on it but I like the results. Using a modified Olympus CH2 Microscope (with an X, Y stage) as a coin stage I used three lights (with snoots) placed either side but below the stage. The lights were directed at two white polypropylene kitchen cutting boards mounted at 10:00 O'clock and 2:00 O'clock respectively( with the coin at 6:00 O'clock). I tried it with two subjects a 1996 Silver eagle and a 1986 5 oz silver medal (65 mm in diameter) the lighting was very good with the silver eagle... the larger medal provided some challenges... and I still need to do some more experimentation( but I have posted the most "artistic shots so far. I was also trialing a new coin edge mirror RAF camera made for me). Both subjects were photographed on a black background then in post processing were "placed" on a grey background. I do not apply sharpening in post processing. The cutting boards are really nice reflectors they have a cross hatched surface that helps keep the reflected light "defocused". The boards were held by microscope illuminator arms. Those arms allowed me to adjust the way the light was reflected on to the subjects. Over the last year I have always kept an eye out for cheap household items that would make good reflectors/diffusers. To date these cutting boards seem to be the best reflectors and only cost US$2.00 each.   Edited by austrokiwi
08/01/2015 08:34 am
|
|
|
|
Pillar of the Community
 2087 Posts |
Heres a quick photo of the lighting set up 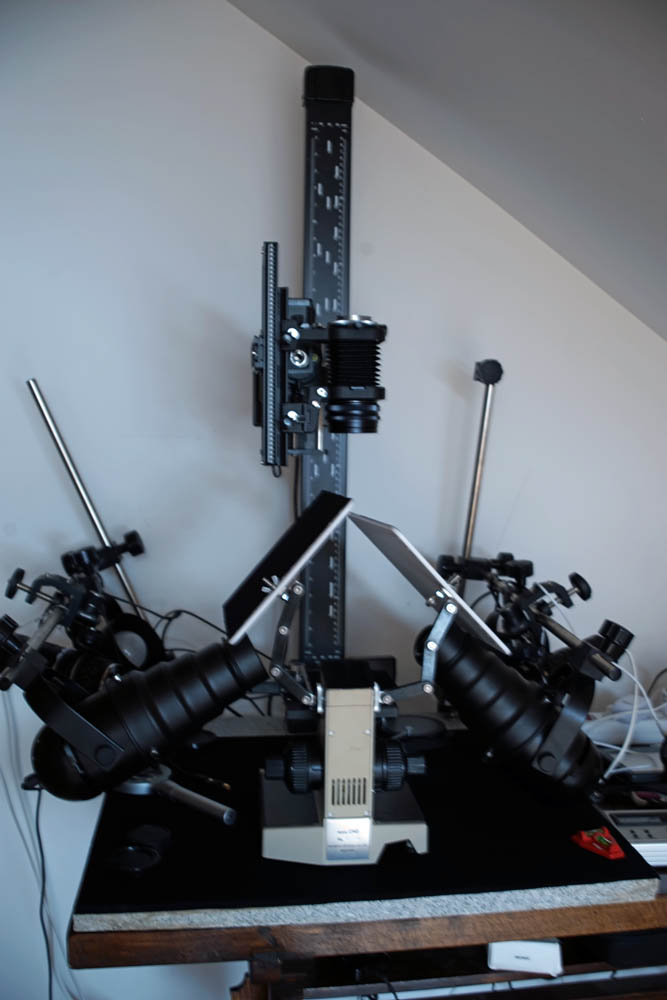 |
|
Pillar of the Community
 United States
4038 Posts |
I did something similar a while back but with the lights pointed straight up and the reflectors placed flat from above rather than at 45-deg. I really liked the look of it. What is happening here is a much higher level of diffusion than you can easily get from "direct" lighting. I suspect this is why folks who use natural light like it so much, since it comes from a VERY large apparent source. Another way to go is Lieberkuhn reflectors, which do a similar thing only in a semi-axial way.
I'd suggest trying your technique at even flatter angle to see how it looks.
Contact me for photographic equipment or visit my home page at: http://macrocoins.com |
|
Pillar of the Community
2087 Posts |
I had been thinking about placing a reflector the way you mentioned. I have a dead Chinese ring light and the plan of action is to use the lens filter fittings from that ring light and attach a cutting board to the ring light housing which clips on to those fittings.
I have also been looking out for the Oly Lieberkuhn reflectors for 18 months but they are ridiculously expensive and I think too small for coins
Edited by austrokiwi
08/01/2015 10:25 am
|
|
Pillar of the Community
United States
4038 Posts |
Problem with the Lieberkuhn reflectors that are available is they are set for a particular lens and magnification combination. I have a Nikon 65mm Macro-Nikkor from a Multiphot system and have been searching for its Lieberkuhn for a long time, but the 65mm was designed for 5x and the Lieberkhuhn focus is set for this WD. Probably won't be too useful if I ever do find one for a reasonable price. I have a few parabolic reflectors purchased to try out as Lieberkuhns but need to find the time to test them. Would be nice if the focus was a bit longer than the WD I believe, not shorter, so the light spreads a bit but still has more vertical ray directions. See my first attempt at down-reflection here: https://goccf.com/t/87392&whichpage=7And a little more refined second attempt here: https://goccf.com/t/87392&whichpage=8Contact me for photographic equipment or visit my home page at: http://macrocoins.com |
|
Pillar of the Community
2087 Posts |
|
|
Valued Member
United States
215 Posts |
If you have time could you shoot a newer Lincoln Cent with that diffusion. I've been playing with axial lighting through glass with a little sucsess but still not happy. |
|
Pillar of the Community
2087 Posts |
Sorry for the subject, its not a great example. This coin was in some change I picked up in Colorado at the summer seminar. The boards were positioned as RMPSRMPS suggested. I think I need to bring the fourth light I have into play but I only have three snoots( a fourth is in the post) I used only two lights and removed the honeycomb at the end of the snoots. I also had to change the lens ( previously I was using a Minolta 100mm F4 bellows lens) to an oly 135 mm F 4.5 bellows lens. The reason for the change was at the magnification I was using the minolta and bellows were colliding with the boards. I set it up so quickly I forgot to check what F stop I was using. Magnification is just over 1:1 Edit just checked the lens was at F8, 5.6 is actually the best for the lens and magnification on my rig.  Edited by austrokiwi
08/02/2015 04:25 am
|
|
Pillar of the Community
2087 Posts |
This morning I decided I would take a comparison shot using my DOAL rig the heart of which is a new edmonds 50/50 beam splitter ( with anti reflective coating) The picture after the shot of the coin is to show the degree of light control I have with that rig...all I did was leave all the settings the same(yes I left the light on: 5600 K LED light panel) I just removed the coin and took a photo of effectively nothing. If you look carefully you will see the odd hair and speck of lint in places. I think it demonstrates a decent level of light control. I think this Doal( Diffuse On Axis Lighting) shot of the subject is pretty lifeless I much prefer the the first shot using the Cutting board reflectors. With a Rainbow toned coin I believe the doal works much better BTW this product is brilliant : http://www.edmundoptics.com/lab-pro...erial/54585/I have placed it on the backside of the cutting boards and when need be I can use those boards,reversed, as light stoppers. Most of my base board is covered with that product.   One more picture this is the out of the camera picture of the penny using the Doal rig. You can see one of the annoying faults with DOAL: Ghosting. I understand The Ghost tells you which side of the coin the beam splitter was angled. the ghost is on the left hand side that indicates the beam splitter was angled down to the right. My beam splitter has an anti reflective coating!! I don't think you can eliminate ghosting completely. I say that as it seems that, as I made modifications to control unwanted reflections the ghosting appeared to become more obvious.  Edited by austrokiwi
08/02/2015 09:15 am
|
|
Pillar of the Community
2087 Posts |
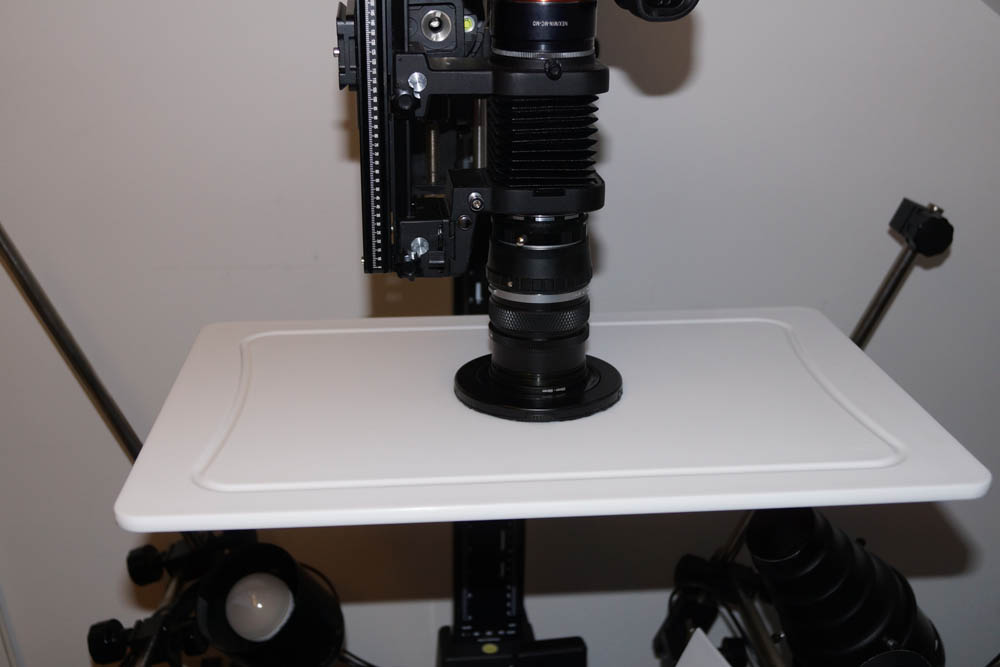
rmpsrmps made a suggestion regarding the positioning of the boards. It matched an idea I had had for a long time. After the trial with the penny, which impressed me despite the less than ideal subject, I decided to put that idea into action. As mentioned earlier in this thread I had a dead ring light, yesterday I removed the LEDS and wiring I then permanently modified it with a dremel. This morning I purchased a very large polypropylene cutting board. The new board is 45cm by 30 cm( aprox 1 ft 6 inches by 1 ft) I cut a hole dead center then epoxied in the ring light housing. I can now screw the ring light filter mounts on to my lenses and then clip on the board. It looks ridiculously large but I like the results( same two coins as previously pictured):   Lens was an Olympus ( Oly) OM 135 F4.5 bellows lens. I set it to F8 as there is a limitation with my rig. The camera arm is friction drive. With too much weight it sits slightly off level, so although F 5.6 is best, with the weight of this new reflector, F 8 was necessary to ensure the coins were in focus Edited by austrokiwi
08/04/2015 01:23 am
|
|
Pillar of the Community
2087 Posts |
Edited by austrokiwi
08/04/2015 01:34 am
|
|
Valued Member
Canada
491 Posts |
WOW!  |
|
Moderator
United States
23522 Posts |
Forgive me for seeming contrary, but all I'm seeing here is confirmation of why we do not recommend reflected light for anything but DMPL and Proof coins.
|
|
Pillar of the Community
2087 Posts |
I find this comment rude and worse completely unhelful! Quote:
Forgive me for seeming contrary, but all I'm seeing here is confirmation of why we do not recommend reflected light for anything but DMPL and Proof coins. I react that way because in other forums one can at least expect constructive teaching criticism. The people there will add links to other threads that serve to teach and encourage. That shouldn't have to be pointed out here. If you are going to make such comments then you need to go all the way and explain where your coming from How does it provide confirmation? Here is a "coin" the technique seems to be very good for. It is neither a proof nor a DMPL The medal is 64.5 mm in diameter is cataloged as morel number one. It is a very important part of New Zealand Numismatics, this example being silver is only 1 of 10. There is one gold example in the Dunedin Museum. Much more common is the copper strike( Maximum population 25 examples)   Yes on the reverse I over exposed some highlights. Camera Sony A7r, lens minolta 100 mm F4 @ F8. Used silent shutter mode so neither the front shutter or the rear shutter were activated. Edited by austrokiwi
08/07/2015 3:47 pm
|
|
Pillar of the Community
United States
4038 Posts |
The technique seems to do well with medals. Nice medal BTW! But the highly-diffuse nature of a white reflector is tough to use with other coins IMO. My work with the technique resulted in only liking the reflectors with aluminum foil surface rather than white to reduce diffusion when photographing Cents.
Contact me for photographic equipment or visit my home page at: http://macrocoins.com |
|
Pillar of the Community
2087 Posts |
Quote:
My work with the technique resulted in only liking the reflectors with aluminum foil surface rather than white to reduce diffusion when photographing Cents. Interesting point to raise I will keep note of it. Your experience matches mine prior to finding the cutting boards. I gave up on Aluminium foil long ago for that same reason. However one day I will try it again to see if I can develop my own technique for using it. I made an observation earlier in the thread, but I didn't emphasize it. I repeat and expand: I think the cutting boards I am using are acting much more like diffusers' than reflectors. The cutting surface is covered with a minute cross hatch pattern, I assume to stop vegetables and meat from slipping when the board is wet. When I used smooth white reflectors( such as a white acrylic tray) I did not get results anything like what I am seeing now. The cutting board is producing significantly different results. I suspect what is happening is the light when it hits the cross hatched surface is, as it is being reflected, being scattered in many different directions. Effectively the cutting boards are allowing me to increase the lighting distance while ensuring the light has a fog like/defocused quality when it illuminates the subject. The second important factor that I suspect is involved is the fact that the boards are slightly transparent. I first tried them out as normal diffusers, but the amount of light they transmitted made for exposures approaching 30 seconds( bulb). The boards are therefore transmitting some light( at a guess, from my diffuser attempt 15%). It is highly likely some of the reflected light is not just coming from the boards surface but also its internal structure...which of course would also create a fog like quality/glow I feel I am using clumsy wording so I hope I am communicating what I believe is happening adequately. Edited by austrokiwi
08/08/2015 12:07 am
|
| |
Replies: 33 / Views: 8,029 |