|
This page may contain links that result in small commissions to keep this free site up and running.

Welcome Guest! Registering and/or logging in will remove the anchor (bottom) ads. It's Free!
To participate in the forum you must log in or register. | Author |
 Replies: 9 / Views: 2,106 Replies: 9 / Views: 2,106 |
|
|
Valued Member
United States
245 Posts |
|
|
|
|
Valued Member
United States
142 Posts |
John, I think I can shed some light in this for you. So I can do a better job, would you mind posting the make and model of your camera?
|
|
Valued Member
 United States
245 Posts |
dcv, it's a Canon Powershot A650 IS. And it's a WHOLE lot smarter than ME!  |
|
Valued Member
United States
142 Posts |
I have company over for dinner right now, but later tonight I plan to review the specs on your camera and write you up something meaningful.
For right now, when you have a moment I would make one, right-off-the-bat suggestion. Check out your owner's manual for a section on "exposure compensation". Try to lean toward this, in place of ISO adjustments. I think it will better take you where you are trying to go. ISO should be reserved for secial situations and generally "coin photography" is not likely to be among them. ISO is more for circumstances you cannot control (shooting in a dim church for example).
Assuming you have a tripod or copy stand and some type of lighting, you should have all the control you need to work at at 100-200 ISO. For the moment, think if ISO as a last resort only after you have exhausted the other things you have control over...shutter speed, aperture, light placement (distance and angle) and exposure compensation. More on all of this later.
BTW, you have the relationship between ISO and light sensitivity reversed. Higher ISO settings increase light sensitivity.
|
|
Valued Member
United States
377 Posts |
JohnAP,
I'm in the same boat, I just picked up the Powershot A570 IS.. It has fantastic potential.. I just have to figure it out, I'm staying tuned to this thread.
|
|
Valued Member
United States
142 Posts |
OK...Here goes.
First a little photographic theory. All of these things we are discussing in this thread have to do with the amount of light that reaches your camera's sensor and consequently makes your picture brighter or darker. There are several ways to make a picture brighter or darker. I suggest you not use ISO settings for this purpose unless there is no other alternative. I am not saying it is a horrible idea, but using some of the other available options will serve you better, and in the process, using them may give you a better understanding of camera functions that may even be of some help when you take the camera out of your coin room to photograph a family picnic.
First, even though I am steering you away from ISO adjustments for now, I will tell you a little bit about what they are and where they came from.
Back in the "film" days, you will probably remember that when you went to buy film, there was usually a big "100", "200", "400" or even higher numbers on the box. This was the ASA or ISO number. It was a rating for the light-sensitivity of the film. If you were going to a bright beach or outdoor summer picnic you would use 100...maybe 200. If you were going to be shooting on a darker, cloudy day...or early evening, you might use 400 or higher. The general rule was always to use the lowest ISO that would meet your needs, because these lower ISO films had finer grain and truer colors. Higher ISO films tended to make for grainier prints that were often tinted off color a bit.
In the early years you had to "tell" the camera which ISO film you were using via the ISO dial. In later years the film was "DX-coded" which means if you put in into a newer camera, the coding on the film canister would tell the camera what the ISO was for that roll of film. This not only saved the trouble of setting the dial, but more importantly, eliminated the prospect of forgetting and having the camera set for the wrong ISO.
What would happen if you did forget to change the ISO dial when changing film speeds? Well if you put ISO 200 film in the camera, and the ISO dial was set for 800, the camera's exposure system would think that you had this very sensitive ISO 800 film in the camera, and set aperture and/or shutter speeds accordingly. But because the film was really the less sensitive ISO 200, the pictures would be quite dark.
Unless he was intentionally going for some type of effect, you would seldom see a photographer using high speed films for commercial or portrait photography or any other "studio" work. He generally could control the light to be suitable for the higher-quality lower-speed films. He would only use the higher speeds for location shooting where he was at the mercy of sunlight or church lighting...etc.
Summing it all up, He generally would use the lowest ISO film he could considering his lighting capabilities and in the studio when he had virtually "complete control" he would go for the lowest ISO.
The same is true of digital, except instead of the light being captured to film, it is captured to a sensor and when you change the setting you actually change the sensitivity of that sensor instead of film.
I suspect you want the clearest, sharpest pictures of your coins you can achieve so, as long as you can reach the proper exposure without upping you ISO, which is what I recommend you do.
There are several ways to deal with a photo that is too dark, but before we do that, lets take a look at your camera.
You have the Canon PowerShot A650 IS. It has several shooting modes...Lets look at some of them
Auto is "full auto". It is truly "point and shoot"! You don't even tell the camera what type of picture you are shooting. It uses average mathematical formulas that actually do a pretty good job in 90% of circumstances. This is a great choice for anyone who is basically shooting snapshot type pictures and chooses not to learn a single thing about
photography. Probably not a good choice for coins though.
Next I am going to skip to the "special scene" modes - Portrait, Landscape, closeup...etc. These give you the tiniest bit of control by telling the camera which type of scene you are shooting. aside from that...you can't change a thing. It is tempting to say that the close-up (flower icon on your mode dial) setting would be good for coins, but one potential problem...most coins are shiny and reflect more light than a stamp or a flower would and there is big potential for this extra reflected light to throw off the exposure and make your pictures dark. Close...and may work for some no-too-shiny brown pennies, but for silver or gold with a reasonable luster...could be exposure issues.
Then there is the "Program Mode". Now we are getting somewhere, it is fairly automatic...the camera chooses aperture and shutter speed, but lets you make some decisions (ISO, Focus modes, white balance, exposure compensation and a few others) This might be a good place to start before going to any of the other modes. If you need more control you can go to Tv(time value or shutter speed) where you choose the shutter speed and the camera chooses the aperture, or Av(aperture value or f-stop) where you choose the aperture and the camera chooses the shutter speed or even Manual where the cameras processor takes a nap and you decide everything. Let's leave these last 3 modes I mentioned for a later lesson if we need them. For now I am going to recommend "P"- Programmed Auto Exposure.
Your lens has a wonderfully close minimum focus range of less than 1/2 inch, but I am going to recommend you move at least a few inches away from the coin. (even further might be worth an experiment) You have a 12.1 MP camera so you can back off a little and still have a huge crystal clear picture. Basically you need to move far enough away so your light source is not obstructed.
(there is a huge difference in how to handle different types of lighting and I should have asked what type you are using, but we can attack that later)
The nice thing about shooting on "P" is that 2 of the areas you are having issues with are both controllable in this mode....Exposure and white balance.
I would take a picture in the "p" mode. Make sure the lens is zoomed all the way out so the macro will kick in. Have the ISO at 100 or 200. Have the white balance on Auto.
Take the picture and see what you get.
COLOR BALANCE:
If the color balance is off, it is because of the type of light you are using. Incandescent moves it toward red-orange...Fluorescent toward green-blue and strobes (flashes) are generally white and do not cause color balance issues. (they can cause other problems though...they can white out areas of your coin....another lesson).
If you don't like the color balance of your test shot, you can change the balance to compensate. (example...you are getting a very red-orange cast...move the white balance to the "bulb" symbol = incandescent.
Hopefully playing around with this setting will clear up your color balance issue. If not, you will either need to modify your light source or correct the color afterwards in Photoshop or some other photo editing program.
EXPOSURE:
If your pictures are too dark or light there are several things you can do.
-move your lights closer to or further from the coin
-point them from a different angle
-if they are controllable you can dim or brighten them
-if they are bright and harsh you can put a piece of white cloth in from of them to reduce and soften the light (careful of fire hazards if bulbs are hot)
(please let me know what type of lighting you are using)
But one of the easiest an most effective tools in this "P" mode is "Exposure Compensation". In a case where the picture is too bright or too dark but everything else about the picture is fine...exposure compensation should do the trick. It is your way of telling the camera to "do exactly what you just did but just make the picture a little brighter/darker"
Trusting you have consulted your owner's manual on how to access exposure compensation, just move it a couple notches to "+" for brighter or to "-" for darker and look at the difference. You may need to compensate even more...or less.
This should get you started...I won't leave you hanging. Let me know how it goes and even posting a couple of your problem pictures could go a long way to help you troubleshoot.
One last thing. Have you installed the Canon Software to your computer? It has a wonderful feature (not sure if it works with the A650 IS but I would guess it does). I have a Rebel XTi and I can connect the camera to the computer with a USB cord and open up the Remote Shooting feature and shoot while I am connected. Each time I take a shot, it pops up on the screen in the Canon Zoom Browser. If I see a problem...I make an adjustment and shoot again. It saves so much time for any "trial and error" shooting.
I am right now having problems similar to you so I am shopping for new lights to illuminate my coins.
Good luck. I will watch this thread and be there to answer any questions while you figure this out.
|
|
Valued Member
United States
142 Posts |
John,
I just want to qualify my last post by saying:
I have been involved in photography (professionally and as a hobbyist) for about 30 years. I, however, am every bit as new (maybe newer) than you are at photographing coins. I just want you to know that I have no specific practiced expertise in this area nor macro-photography as a whole.
That said, when I saw your post, the content was specifically related to areas that I am quite familiar with so I shared with you the theory and resolutions for these issues as they apply to the general principals of photography. I am certain that there are a number of little, tricks of the trade for photographing coins that I am yet to learn myself. The information I gave you is valid and will address the issues you presented but keep an eye open for any words of wisdom or shortcuts that experienced coin photographers have to share...and I will be watching for them along with you.
|
|
Valued Member
United States
245 Posts |
dcv, THANKS for all your patience and expertise! This has been a big help to me! I'm currently using 2 flourescent replacement bulbs in incandescent lamps with goosencks. They are placed at aproximately 10 and 2 oclock, about a foot above and slightly behind the coin. The camera is mounted on a tripod so that the lens is aproximately 4" above the coin. Most of the coins I have attempted to take pics of are silver. Yes I have read through most of the owners manual, but I must confess I skimmed through the Program mose very quickly. I've been working on the remote shutter release (computer control?), but it is not available with the A650 IS without the CHDK hack. All pics were taken with a 10 sec shutter delay. Here is one of the best I've been able to come up with to date: Image Insert: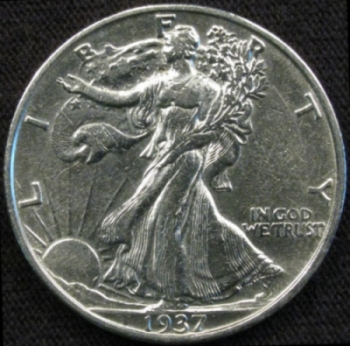 Image Insert: Image Insert: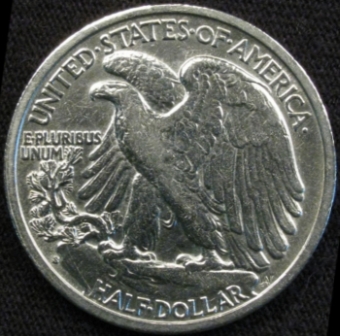 Thanks again for all your help, I'll definitely be tuned in! |
|
Valued Member
United States
142 Posts |
Jim. I think the pics look pretty good. Exposure and color balance look great. The only 2 things I see that could be better are:
GLAREThere is a glare at the top of the relief areas (shoulders especially). I think that this glare can add to the aesthetics of the coin, but when selling a coin or submitting a photo for grading opinions, obviously detail is preferable to glare in these areas. For what it is worth, in my own experience I am having trouble with this same issue and ultimately I have decided that if I want to eliminate it completely I may have to look into and entirely different light source. But there are things that can be tried: -Moving lights further away (this will also effect exposure...depending on your shooting mode, the camera may compensate automatically or you may need to employ exposure compensation) -Set lights at different angles (although in most cases this will just move the glare to different parts of the coin) -You can diffuse the light (stretch a piece of clean white cotton over a frame made out of coat hanger {like a miniature trampoline} and place between each light and the coin. Depending on the size of the diffuser you make there is usually enough hanger left over to fashion a stand) -You can point the lights away from the coin and bounce the light back with a flat white surface (poster board can work if you want to try this) -Natural light streaming through a window on a cloudy or overcast day can provide a beautiful light source but it clearly restricts when you can shoot and you will get different results on different days and at different times) These are just some ideas you can mix or match if you want to eliminate the glare. If your purposes for photographing coins are such that the glare is not a problem...leave it. Again...I think it is appropriate from an artistic standpoint, just not from a technical standpoint.
FOCUSThe focus looks a little soft. Could be a slight camera shake but I don't think so. You are already delaying the shutter which helps, but the mechanics of the shutter can also cause shake...especially in a macro close-up. If it is camera shake, one thing that could help would be hanging a heavy weight from the bottom of the center post of your tripod. For the moment, though, I am going to assume it is a focus issue. I know your camera is 12.1 MP and that you are shooting macro. Judging from the size of the photos you posted, you clearly reduced them so maybe the original was as sharp as a tack. If this is the case and you are losing that much detail when you reduce a photo, you will need a better program or technique for reduction. If this is the case, you can ignore the tips below. If your original was also soft, the immediate solutions coming to mind are: -Try experimenting with the camera different distances from the coin. -In the spec list for your camera I didn't see mention of a manual focus, but if it is available, that could solve the problem. -You could shoot in Av mode and experiment with "higher number" f-stops (again...some exposure compensation could re required) This will extend the depth of field and improve focus. -As long as your focus is "close" you can sharpen afterward in Photoshop or similar program as I have done below with your obverse photo.  |
|
Valued Member
United States
245 Posts |
Thanks for all your help dcv! I haven't done anything in regards to post processing, other than cropping and scaling. The originals are a little "soft", and the glare isn't as pronounced. I will see what I can do to come up with a light diffuser. Thanks again!
|
| |
Replies: 9 / Views: 2,106 |
|
To participate in the forum you must log in or register.
Disclaimer: While a tremendous amount of effort goes into ensuring the accuracy of the information contained in this site, Coin Community assumes no liability for errors. Copyright 2005 - 2026 Coin Community Family- all rights reserved worldwide. Use of any images or content on this website without prior written permission of Coin Community or the original lender is strictly prohibited.
Contact Us | Advertise Here | Privacy Policy / Terms of Use
|
| Coin Community Forum |
© 2005 - 2026 Coin Community Forums |
| It took 0.34 seconds to rattle this change. |
 |
|
| |
| |


