| Author |
 Replies: 13 / Views: 3,025 Replies: 13 / Views: 3,025 |
|
|
Pillar of the Community
United States
1126 Posts |
I got took by my first counterfeit coin In many years of collecting I did not get out side the area of my focus of collecting and it kept me from such troubles. Well,I will not make that mistake again I also had it pointed out to me by a very knowledgeable gentleman on e-bay. That saved me much more head aches than just being burned by the person I purchased it from. Boy did I appreciate that. Here are some pictures of it for people to learn from my mistake. Be Careful out there  Terry 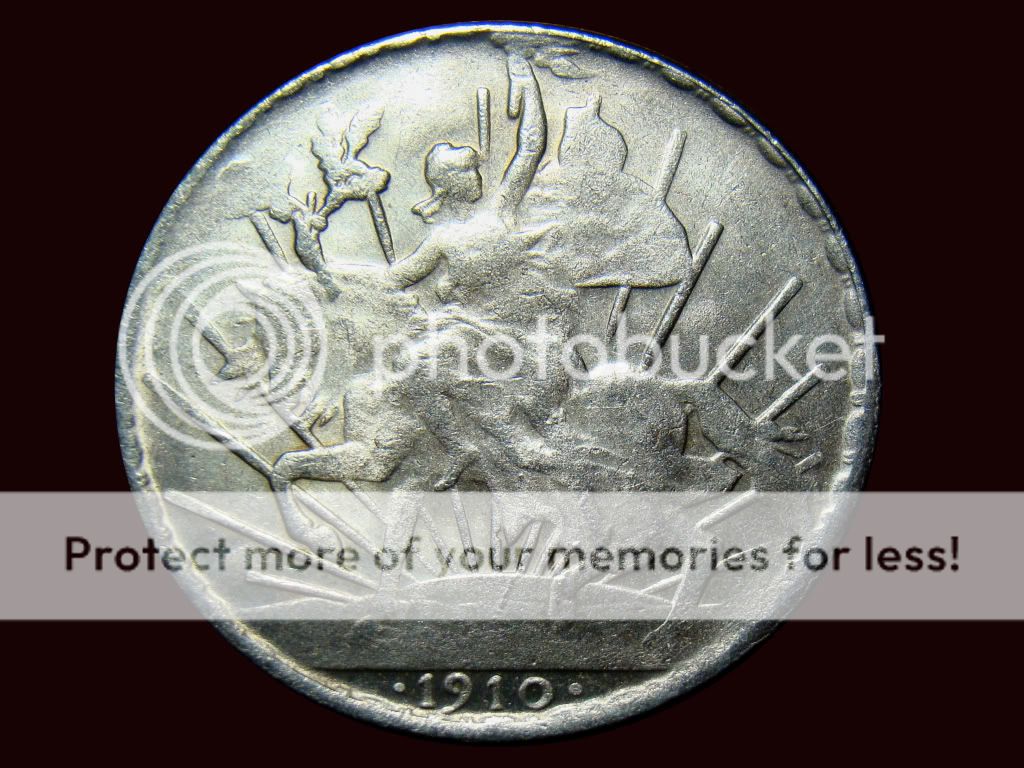  Edited by stewart
02/11/2011 1:32 pm
|
|
|
|
Valued Member
United States
85 Posts |
What are the indicators that it is counterfeit?
|
|
Pillar of the Community
 United States
1126 Posts |
Genuine Caballitos measure 39mm and weigh 27.07 grams. Each contains a lettered edge with the words INDEPENDENCIA Y LIBERTAD in recessed letters. The beaded elongated oval and small double dentilbeading beside the rims are clear with distinct separation from each other and the rim itself, even in VF grades. The riders hair, torch flame and horse tail are clear. Counterfeits have poorly defined dentil patterns which often are filled in. They have reeded edges, and few clear details. All details have rounding with poorly defined edges
Mine weighs 17.5 grams and measures 38 mm and the big one...
A magnet stuck to it
Terry
Edited by stewart
02/11/2011 1:52 pm
|
|
Valued Member
United States
228 Posts |
It seems that counterfeiting is on the rise... The (124) Not Allowed - Auto-Removed website has an article about a dealer who got taken on a purchase of Morgan dollars. Turns out they're Chinese fakes!  Just curious, do you have any idea who made the fake coin you purchased? Was it a Chinese fake? |
|
Pillar of the Community
United States
1126 Posts |
I don't have a clue who made this one
|
|
Pillar of the Community
United States
5362 Posts |
looks like a Chinese copy to me.
You indicate the edge is reeded. How were the reeds applied?
|
|
Pillar of the Community
United States
1126 Posts |
I am not sure how they did the edging but here is a quick shot of it I just took. Terry  |
|
Pillar of the Community
United States
5362 Posts |
stewart Kind of looks like a ring die could have been used based on what appears to be corner grinding. Looks like they may have done the grinding by hand because the angle of the corner grinding seems to vary. Here is a series of sketches I just made to try to illustrate what I mean by a ring die application - the process - the traces left by the process - and the finishing steps used by forgers to hide what they have done. Drawing 1 This picture shows the ring die and a stack of completed coins. The stack of coins is forced through the ring die under high pressure. The ring is tapered - larger at entrance smaller at exit point. The inner surface of the ring is grooved. The grooves start out shallow and get narrower and deeper over the cross section of the die. These grooves (hardened steel) are harder than the coin metal and they cut into the edge of the coin. This is very much like a commercial pipe threader and operates on the identical principle. The metal displaced from the groove curls up into the recess of the die and in the process of passing through the die a reed is built-up. 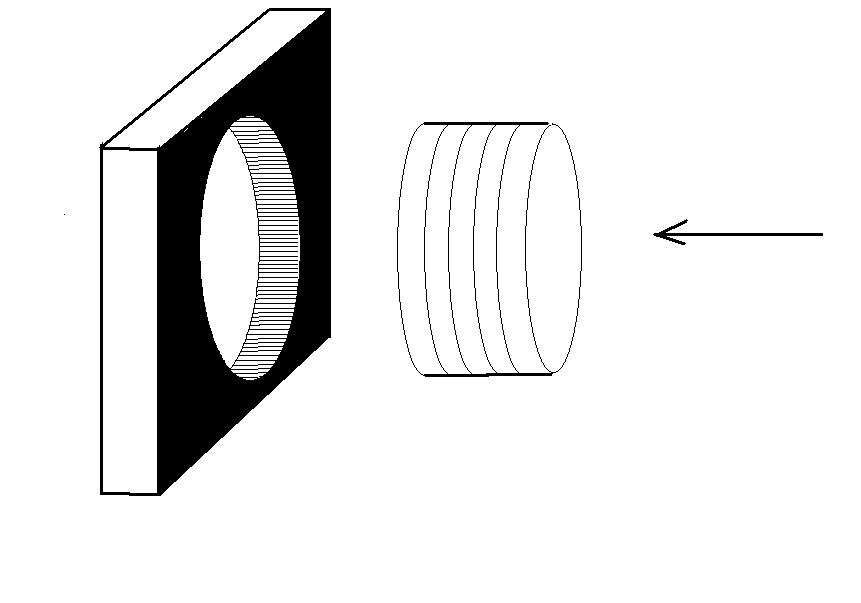 Drawing 2 Drawing 2 This drawing shows the completed reeds - of a normal collared press and a ring die. The RED lines show the spit top (actually the seam where the metal curls together) and the split ends (the area at the start and end of the reeds where there is inadequate metal). Because the collar die on a three die press has to be lowered before a completed coin is ejected - there will be scratches inside the reeds that cross the coin from face to face. The same or very similar scratches occur on ring die applications. 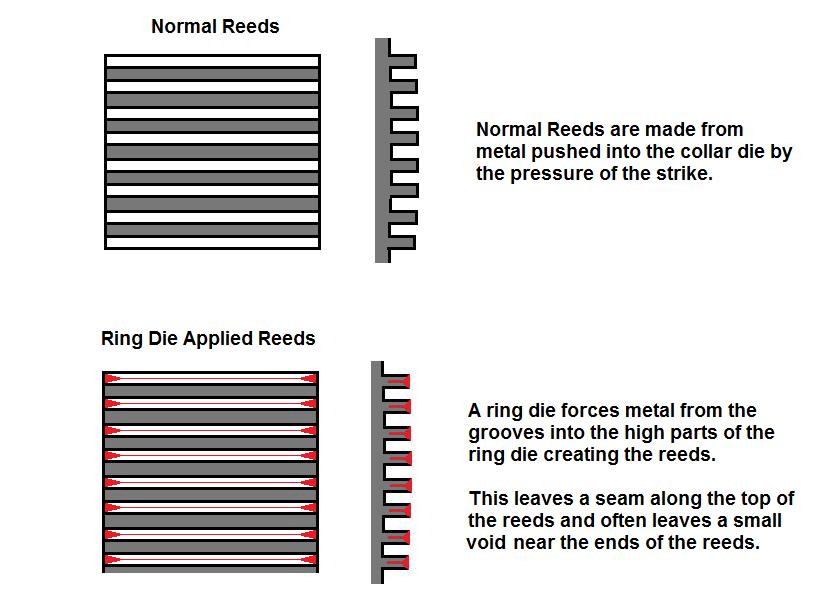 Drawing 3 Drawing 3 This drawing shows a blow up of a cross section of a reed made in a ring die. To eliminate most or all of the visible top seam (split) the forgers will grind the edge of the coin. This usually results in the tops of the reeds having parallel scratches that cross from one reed to the next and circle the coin. This is not a normal wear pattern. Grinding in this fashion can leave a trace of metal curled up at the edge of the coin on the face of the coin where the grind stone LEAVES the coin. 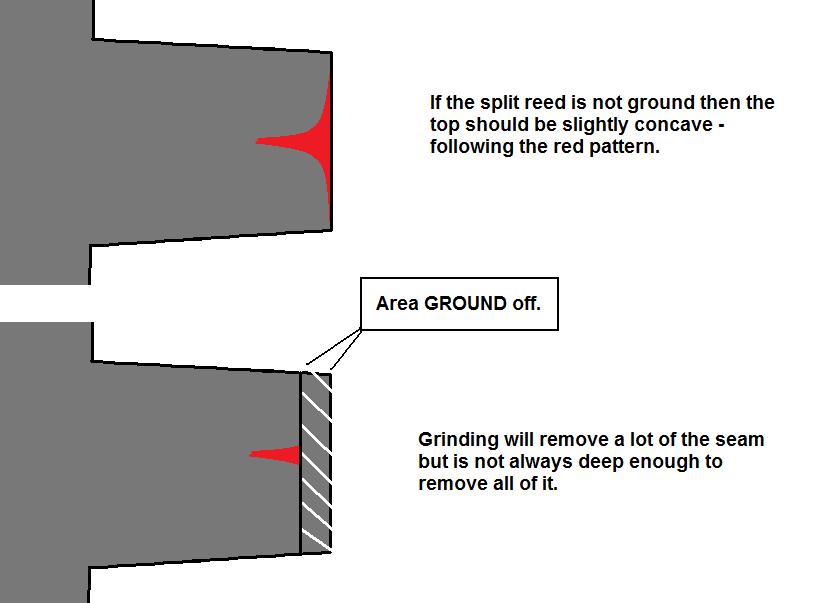 Drawing 4 Drawing 4 This drawing shows the 3 different grinds that are used to remove the traces of the ring die application. When a coin is edged with a ring die extra metal DRAGGS along and leaves a curl of metal at the edge of the coin that exits the DIE last. The First Grind #1 removes the split top and split tails on the reeds. The second grind is needed to remove the excess metal dragged along by the ring die. The 3rd grind, is needed to make both edges look the same. About 15 years ago many forgers (of cheaper items) did not do any of the grinds. But recently more and more forgers even the Chinese are adopting all THREE grinding steps. The problem is that they do it TOO FAST using too coarse a grit on the grinders. This leaves parallel scratches where they should not be. However, on a high end fake more time will be spent and the results can be very deceptive. ALWAYS EXAMINE WEAR PATTERNS. Look for mechanical wear. 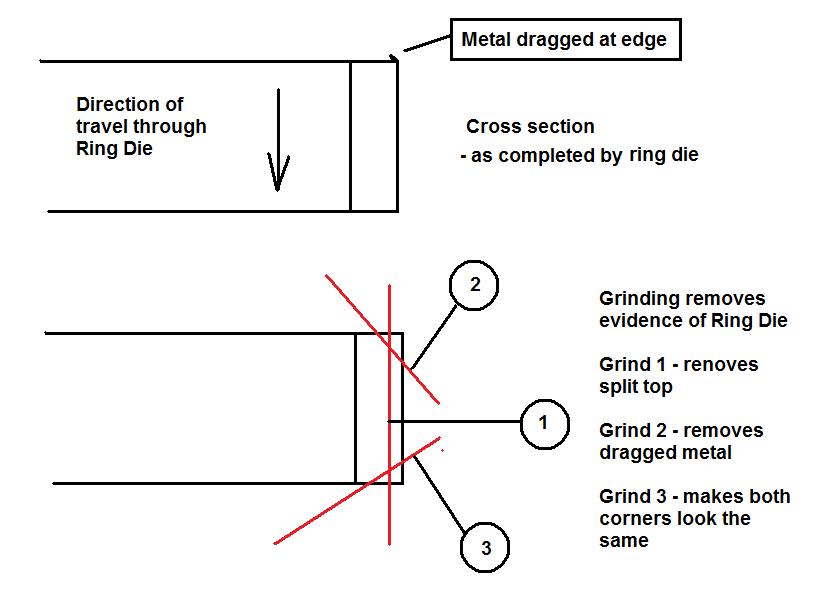 When grinds 3 and 4 are done by hand - the angle between the coin and the grinder often varies. That variation in angle means that the distance the grinder cuts into the top of the reed varies as you rotate the coin. I believe I see that happening on the picture of your coin. In person (and in focus) you should be able to see traces of this grinding.
Edited by swamperbob
02/11/2011 10:45 pm
|
|
Pillar of the Community
Philippines
1156 Posts |
Keep the fake in cold storage, it comes in handy for future reference and study. I now have five fakes in a separate album, that means I've been burned five times! but those five have made an impact and after the 5th am now more wary than ever  |
|
Valued Member
United States
426 Posts |
Wow that is a awesome overview of the ring die process, swamperbob!
I never really understood or knew too much about how they are made.
Thanks.
|
|
Pillar of the Community
United States
1126 Posts |
Swamperbob, All I can say is wow! fantastic explanation of how reeding is applied to coins  Very Cool Thank You. Nic, The gentleman that I purchased from graciously returned my money on the coin. I do have the pictures I took and a burned in memory of the experience Terry Edited by stewart
02/13/2011 07:01 am
|
|
Pillar of the Community
Australia
2830 Posts |
very interesting thread, and very informative also.
I have a question: the "magnetic silver" - any idea what it might be ?
I have a beautiful fake Australian 1937 Crown, which looks great in pics; and even in hand, except it's too light. Like yours, it weighs about 70% of the genuine article, and it reacts magnetically. Without having done much research, I wondered if it might be pure or nearly-pure nickel ... any comments on that ?
I was fortunate, I bought mine through a well-known-internet-auction-site. The vendor described it as a counterfeit, and I was the only bidder. It's a nice contrast to the real article.
Back to my question: whatever the material is, it would have to be inexpensive enough, and malleable enough for the counterfeiter's business model. Nickel ? Cobalt ? Rare-earth ?
Peter in Oz
|
|
Pillar of the Community
United States
5362 Posts |
Peter THOMAS The description you provide is of Nickel. It is a magnetic metal that strikes well. The Canadians used pure nickel for their 5 cent coins for some time. The specific gravity of Nickel is 8.90 which is in line with the coin weighing 70-80% of the correct weight. Cobalt has the same SG and it is a naturally occurring magnetic metal like iron and nickel BUT cobalt is only moderately malleable - it is DIFFICULT to strike as a coin. It can be cast however.
|
|
Pillar of the Community
Australia
2830 Posts |
thankyou for that. I ought to have added to my list of criteria - "and must look a bit silver-like".
Counterfeits are a fascinating branch of numismatics.
Peter T.
|
| |
Replies: 13 / Views: 3,025 |
|


