| Author |
 Replies: 37 / Views: 14,251 Replies: 37 / Views: 14,251 |
|
|
|
Pillar of the Community
  United States
4038 Posts |
Quote:
rmpsrpms, care to comment on the axial lighting? I had played with it a bit a few months back with my point n shoot with mixed results. I've never had good luck with axial lighting, at least not on its own. There are a number of ways to achieve it but almost all of them have negative impact on image quality. Since axial systems are usually fairly "small" in nature their illumination is highly specular, and creates a lot of hot spots on top surfaces, and by definition does not light edges well so creates excessively emphasized shadows around the design elements. And it only works for raw coins, as a slab will reflect the light directly back to the sensor and create massive glare. A better alternative may be ring lighting. It's much easier to set up, doesn't get in the way of the image path, and can be adjusted for height to give a wide range of illumination styles. If there is any interest I can take some shots with ring lights on that same coin to compare results...Ray |
|
Pillar of the Community
United States
509 Posts |
Quote:
A slab will reflect the light directly back to the sensor and create massive glare. Yes this is something like the problem I ran into although not exactly. I was getting a very narrow beam of light reflecting across the face of the coin but not something I would have called a massive glare. Almost translucent but it was obvious and distracting. I'm sure this was due in large part to my lighting and the angle in relation to the refraction from the glass but since you mentioned it, they were slabbed coins and I hadn't considered that as a factor. It makes a little more sense now regarding the one photo I was really happy with; a Kennedy RAW half dollar with high luster. It came out great as far as capturing the true luster which is what I was really interested in as opposed to high definition and detail. More than half of my coins are slabbed so I'm probably shoveling sand against the tide trying to shoot through the slab with axial lighting. Capturing the luster of the blast whites is what I'm really after. i.e., to make the coin appear in the photo as it does when held in hand -- not how it appears under a 100mm lens. I've read your earlier comments re capturing luster by placing a single low power light at 6 o'clock or 12 and I've had very good results at 12 o'clock with toned coins. Not much to speak of with the blast whites. Perhaps I could improve by using a light with lower wattage? Still being at the "Cameras for Dummies 101" level, I'm not entirely sure of what you mean by ring lights. Are these adjustable independently of the camera/lens height and would they offer the variances I might need in order to capture that elusive luster? Please don't knock yourself out on my behalf Ray and go to the trouble of doing a set-up. For now I'm just a sniffin and a snoopin. Looking for possibilities. |
|
Pillar of the Community
United States
4038 Posts |
Quote:
Still being at the "Cameras for Dummies 101" level, I'm not entirely sure of what you mean by ring lights. Are these adjustable independently of the camera/lens height and would they offer the variances I might need in order to capture that elusive luster?
Please don't knock yourself out on my behalf Ray and go to the trouble of doing a set-up. For now I'm just a sniffin and a snoopin. Looking for possibilities. No worries, I actually just bought a new ring light and this gave me the excuse to set it up. And I am glad I did, because it's giving a better presentation than the ones I have tried before. Here is what the ringlight looks like. Notice this one has 12 individual sources spaced 30-deg apart. Most ring lights are a continuous band of fiber optic. However, new ones you can buy today are usually LED-based, with 24 or 48 or more separate LEDs. Some have brightness controls, and some have the ability to turn off parts of the ring if you want to emphasize light from a certain direction. For the ones like I am showing below, you also need a fiber optic illuminator to connect them to. At this point, if you are interested in getting one, I'd recommend an LED one rather than a fiber optic one, just because they are probably longer lasting and are definitely simpler, though you need to find one with good (not too much blue-bleed) color index.  Here is the ringlight mounted to my setup:  And here is the same 57D Lincoln as before:  Now, it's not just the ringlight that's changed, this is also with a different lens. Actually, this was taken with the World's 2nd Best 1:1 Macro Lens, the Rodenstock Apo-Rodagon D 75/4 M 1:1. It's an amazing little lens, and much more economical (and available) than the Printing Nikkor. Most ringlights give continuous illumination, so the apparent size of the source is infinite, and thus don't bring out much if any luster. This one, with the 12 individual elements, seems to bring out a good amount of luster in the image! This bodes well for the new crop of LED ring lights, though it probably means it's best to pick ones that have fewer LED's rather than more. They are making them with more and more (I've seen ones with 148 LEDs!) to simulate the continuous band of fiber optic on most ring lights. This makes them less useful for coin imaging. But perhaps there are some with fewer LED's that I'll need to check out. Edited by rmpsrpms
06/05/2011 01:29 am
|
|
Moderator
United States
23522 Posts |
In the process of researching my next move in the area of coin photography, I've run across some of your postings at another location. I won't identify the place - that's your prerogative - but I have to comment on the lens comparison you'd linked there.
The 105mm f/2.8 VR Nikon Micro-Nikkor is the closest equivalent tested to my (former) personal favorite Canon 100mm Macro, and it's rightly regarded as a pretty darn good lens. I was staggered by the clear qualitative difference of the Rodenstock and Printing Nikkor - it was as if the latter two were already postprocessed with Sharpening.
The PN is beyond my means (assuming I could find one), but the Rodenstock is not. I'm going to be building a full studio this September coming, and the choice for the 1:1 lens is obvious.
|
|
Pillar of the Community
United States
4038 Posts |
SuperDave...Glad to introduce you to the 75ARD1! I too was shocked when I saw the difference between the 95PN, 105PN, and 75ARD1 vs the crop of standard, dedicated macro lenses. Bottom line is that true Apochromatic correction is a must-have for ultimate sharpness and color fidelity, and lenses need to be optimized over a narrow magnification range to operate their best.
Apo lenses have some strange qualities. When adjusting focus in and out, they simply go in and out of focus. No image distortions, no red/green shifts from chromatic aberrations, nothing unexpected. Most of the time this behavior is not noticeable, but do your critical focusing in live view at 100% magnification and it becomes much more obvious!
Another interesting observation when focusing these lenses is that apparent depth of field is reduced. When lens aberrations compromise the image, it is harder to discern when the subject is actually out of focus. With many lenses you can be significantly out of critical focus before the image appears worse than it was at critical focus. The effective circle of confusion is larger due to the blurriness of the image caused by the aberrations. But when the aberrations are fully corrected, the effective circle of confusion shrinks and critical focus is harder to achieve. For the 95PN, 105PN, and 75ARD1 I find that even at relatively small apertures, critical focus range is very narrow. Hopefully this explanation causes no "confusion" ...Ray
|
|
Bedrock of the Community
United States
10045 Posts |
Wow--I think I got all that; it makes sense about narrow critical focus. By comparison, my equipment/techniques are primitive.  |
|
Pillar of the Community
United States
4038 Posts |
DVCollector...it's actually amazing how good a result you can get with simple setups! I've been shocked by the quality of the photos being taken by point and shoots and even mobile phones.
Over time I've heard people describe certain lenses, especially high quality dedicated macro lenses, as having narrower depth of field compared with other lenses. The standard answer these posts get is that depth of field depends only on the effective magnification and effective aperture, basically telling the poster he was wrong and that "it's all physics". But then I saw the effect myself, I realized that in each case of so-called "narrow depth of field" the lens being criticized was of higher quality than the one with better DOF. The explanation based on aberrations suddenly made sense and correlated theory with observation, ie in the end it really is "all physics".
|
|
Pillar of the Community
United States
4038 Posts |
I'm still making progress with the Printing Nikkors. One big problem with them is difficulty in mounting to a camera since they have weird threads. I finally had some adapters custom-made and received them over the weekend. The adapter is 55mm outer diameter, same as the smooth parts of the 105PN, so matches pretty well. One end has female M45x0.75 threads for the lens, while the other end has M52 threads for fitting onto Nikon reversing adapters (ala BR2, etc). I found a M52-NikonF reverse adapter on ebay ($5 each) that has a wide knurled section that matches the PN well. Now I can mount the lens properly. Here is a pic of a 105PN with M45-M52 and M52-NikonF adapters in place.  Contact me for photographic equipment or visit my home page at: http://macrocoins.com |
|
Moderator
United States
23522 Posts |
Noting the extra length of the whole assembly brings a question to mind - what lens-sensor distance does a lens of this type require?
|
|
Pillar of the Community
United States
4038 Posts |
I have not measured it but I believe it needs around 100mm. The bottom lens is nearly flush with the inside-most threads on the 52mm end, so the adapter only adds a little to the length on sensor side. I need to mount this on a bellows or long helicoid to get enough extension. I don't have it pictured, but some of that extra length can be achieved by mounting the lens reversed. The topmost trim ring is removable and reveals 45x0.75mm pitch threads to mount the lens with...Ray
Contact me for photographic equipment or visit my home page at: http://macrocoins.com |
|
Moderator
United States
23522 Posts |
I haven't owned many toned coins, so never really got around to refining my axial technique. I worked a bit with one, though, and determined that optimizing the light source to the technique would provide pretty nice results. I'm thinking something close to a coherent beam of about twice the diameter of the subject, maybe a little greater. Possibly two, on goosenecks, so the angle of attack can be varied to equalize illumination over the face of the coin. Axial lighting doesn't have to be absolutely perpendicular to be effective, nor does the glass have to be at 45 degrees - to get the results below, I pulled the light source off-center and tilted the glass until I got what I wanted. This was a dark coin until I lit it properly, and then it exploded. 1853 Half Dime, in a PCGS slab: 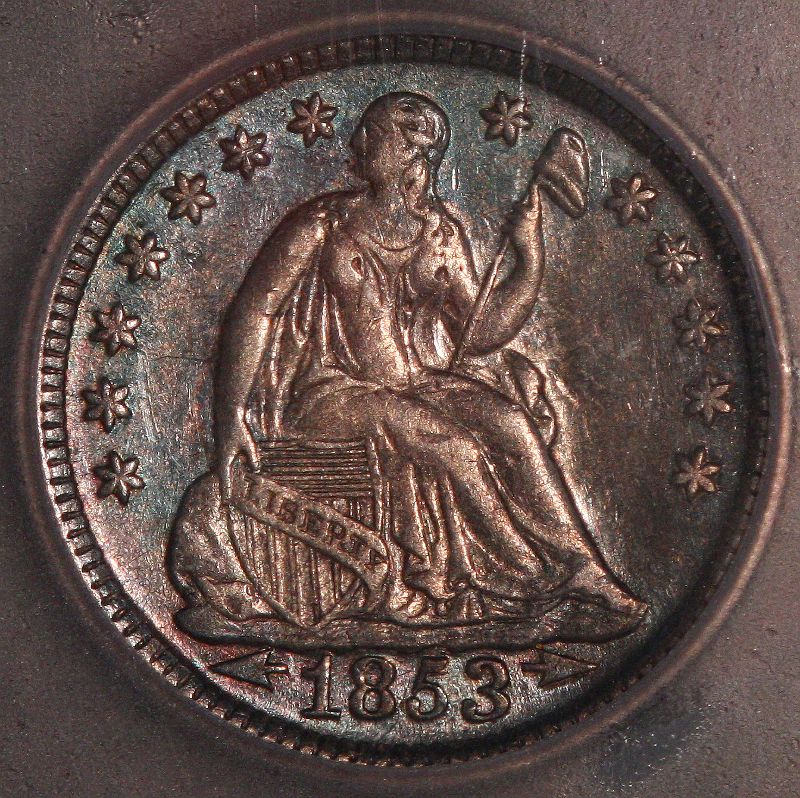 Note, I was at the focus limit of my lens to get an image as large as I wished. |
|
Pillar of the Community
United States
4038 Posts |
I assume you are all familiar with Mark Goodman, author of the book "Numismatic Photography". He has been doing a series of Macro Lens measurements and has measured a pretty big group of lenses so far. I'd love to be able to quantitatively test my lenses, but I don't have the facilities or knowledge to do it so I loaned him one of my 105mm Printing-Nikkor lenses to measure. He has just completed the measurements, and as expected, my assertion that the 105PN is the World's Best 1:1 Macro Lens was confirmed. Take a look at the measurements and review at: http://coinimaging.com/printing-nikkor_105.html...Ray Contact me for photographic equipment or visit my home page at: http://macrocoins.comEdited by rmpsrpms
07/24/2011 4:03 pm
|
|
Pillar of the Community
United States
4038 Posts |
I thought I'd share some experiments with axial lighting that I just tried. Here is a recent photo with the new RSD setup:  And here is the same coin with axial lighting:  The axial lighting brings out colors nicely and gives a "look" that is very different from the RSD setup, though it has more shadows. It's actually so different that it's tough seeing they are the same coin! Anyway, this is the best I seem to be able to do with axial lighting alone. I'm thinking of mixing axial with RSD or direct lighting. Maybe a task for tomorrow. Edited by rmpsrpms
08/18/2011 12:21 am
|
|
Moderator
United States
23522 Posts |
That's a very interesting result, highly attractive but radically different than RSD. I prefer RSD for detail and clarity, but the axial lighting has a character all its' own.
Do you, by chance, have any toned silver which is the "poster child" for axial lighting? RSD is good enough at bringing out color without the tradeoff of shadowing, that I wonder how well it would work on a nicely-toned Morgan, for instance.
|
|
Pillar of the Community
United States
4038 Posts |
Mark Goodman has updated his review page on the 105mm Printing Nikkor to include his latest comparison graphs. The graphs show that the 105PN is better than the "outstanding" level across a wide mag range. Here is the link to the updated review page: http://coinimaging.com/printing-nikkor_105.html |
| |
Replies: 37 / Views: 14,251 |


