| Author |
 Replies: 16 / Views: 660 Replies: 16 / Views: 660 |
|
Pillar of the Community
 United States
6642 Posts |
As this forum has been a tremendous help to me, I thought I would document my adventures in coin photography for the benefit of other camera rookies. I am not a proficient photographer, so hopefully this thread will help to bridge the gap between true beginner and (I hope someday) an adequate coin photographer. For two years, I have been using a very basic setup of an iPad with a clip-on magnifier, a clip-on macro lens, a DIY tiny axial box, a lampstand with a daylight LED bulb, and a LED bar flashlight wrapped in facial tissue for diffusion. Eventually, I exhausted the accuracy and picture capabilities of that very cheap setup. Marv was kind enough to gift me with a real USB microscope to examine tiny coin details. However, given that I am now acquiring more expensive variety coins which I wish to document and possibly sell, I decided to jump the shark to a camera setup. I have always admired Zurie's coin photos, so I took the pragmatic approach of simply asking him what he uses and then buying the same thing: a Nikon D90 camera body with a Nikkor 105mm AF lens. I asked a bunch of questions about lenses here before buying a 105mm lens. The upshot of those discussions is that you want the 105mm lens because it gives you some more working space from the coin, which is important for lighting. I haven't even begun working with real lighting yet, but it's apparent that mastering lighting is crucial for good pictures. I do not yet have a copy stand. I plan to build a basic one using a DIY video blueprint from YouTube--a hefty wood base, a pipe from Home Depot, and a pro-grade socket and clamp assembly. My testing setup is a workhorse with a C-clamp camera socket, and a stack of textbooks below. The socket is made for super light cameras, so I just have the camera basically hanging from the clamp and resting against the workhorse with a towel to cushion it. It took me a moment to figure out how to set the entire assembly into manual mode. For the AF 105mm, there is a selector ring on the lens barrel (which is different from the A/M selector switch that I have used on other cameras). The D90 camera body needs to be set into M as the camera mode on the selector wheel, and also have the A/M switch on the front body set to M. The manuals all warn that a mismatch between A and M on the body vs. lens can cause serious motor problems, so pay attention. For software, I am using a Linux Mint laptop with the Entangle sofware. It connects to the camera via a USB cable. The live view on the software is rudimentary, definitely not enough to fine-tune focus. There are many selector drop-downs, although some of them don't do anything. The two settings that really confounded me were f-stop and lighting profile. I kept clicking through different f-stops, which the software allowed, but infuriatingly the photos never changed. Turns out, in Manual mode you need to hand-turn the aperture selector on the lens. The camera will only respond to the software aperture setting in AutoFocus mode. Entangle will happily let you select all sorts of different f-stops, but just to repeat, that does zero in Manual lens mode. The lighting profile was also puzzling. All my pictures were turning out dim, shadowy, and bluish. Turns out that the color profile was set to Tungsten, which is some kind of artsy filter. Switching to normal Daylight made all the photos look like the preview. The final default setting that I changed was a NEF+JPEG to just taking a single JPEG photo. The Entangle software automatically offloads the image from the Nikon D90 in tethered mode and puts it in your target folder, which is convenient. For lighting, I am still waving around the white LED bar flashlight wrapped in tissues. These pictures also involve some indirect sunlight in the office. After some poking, my test photo settings were: ISO 640, shutter 1/100, aperture 5.6. This 1940 Mercury dime test photo was the result:  While the photo doesn't surpass even the images taken with my iPad setup, this is a reasonably accurate image to the coin. I am finding it challenging to get all the edges of the coins into focus, which I think might be a depth of field challenge. Possibly the coins are not perfectly square to the camera, or vice versa. My next steps will be figuring out the proper ISO/aperture/shutter combinations for acceptable photos (daylight, axial, dark room with hand light), and then onwards to lighting and the DIY copy stand. Edited by Brandmeister
01/27/2026 12:58 pm
|
|
|
|
Moderator
 United States
190950 Posts |
Thank you for sharing your experiences. I look forward to seeing how you improve you procedure!  |
|
Pillar of the Community
United States
2240 Posts |
. . To get a quick idea of a homemade copystand, here is what I was able to build... Any questions, I would be happy to help, good luck with your project... 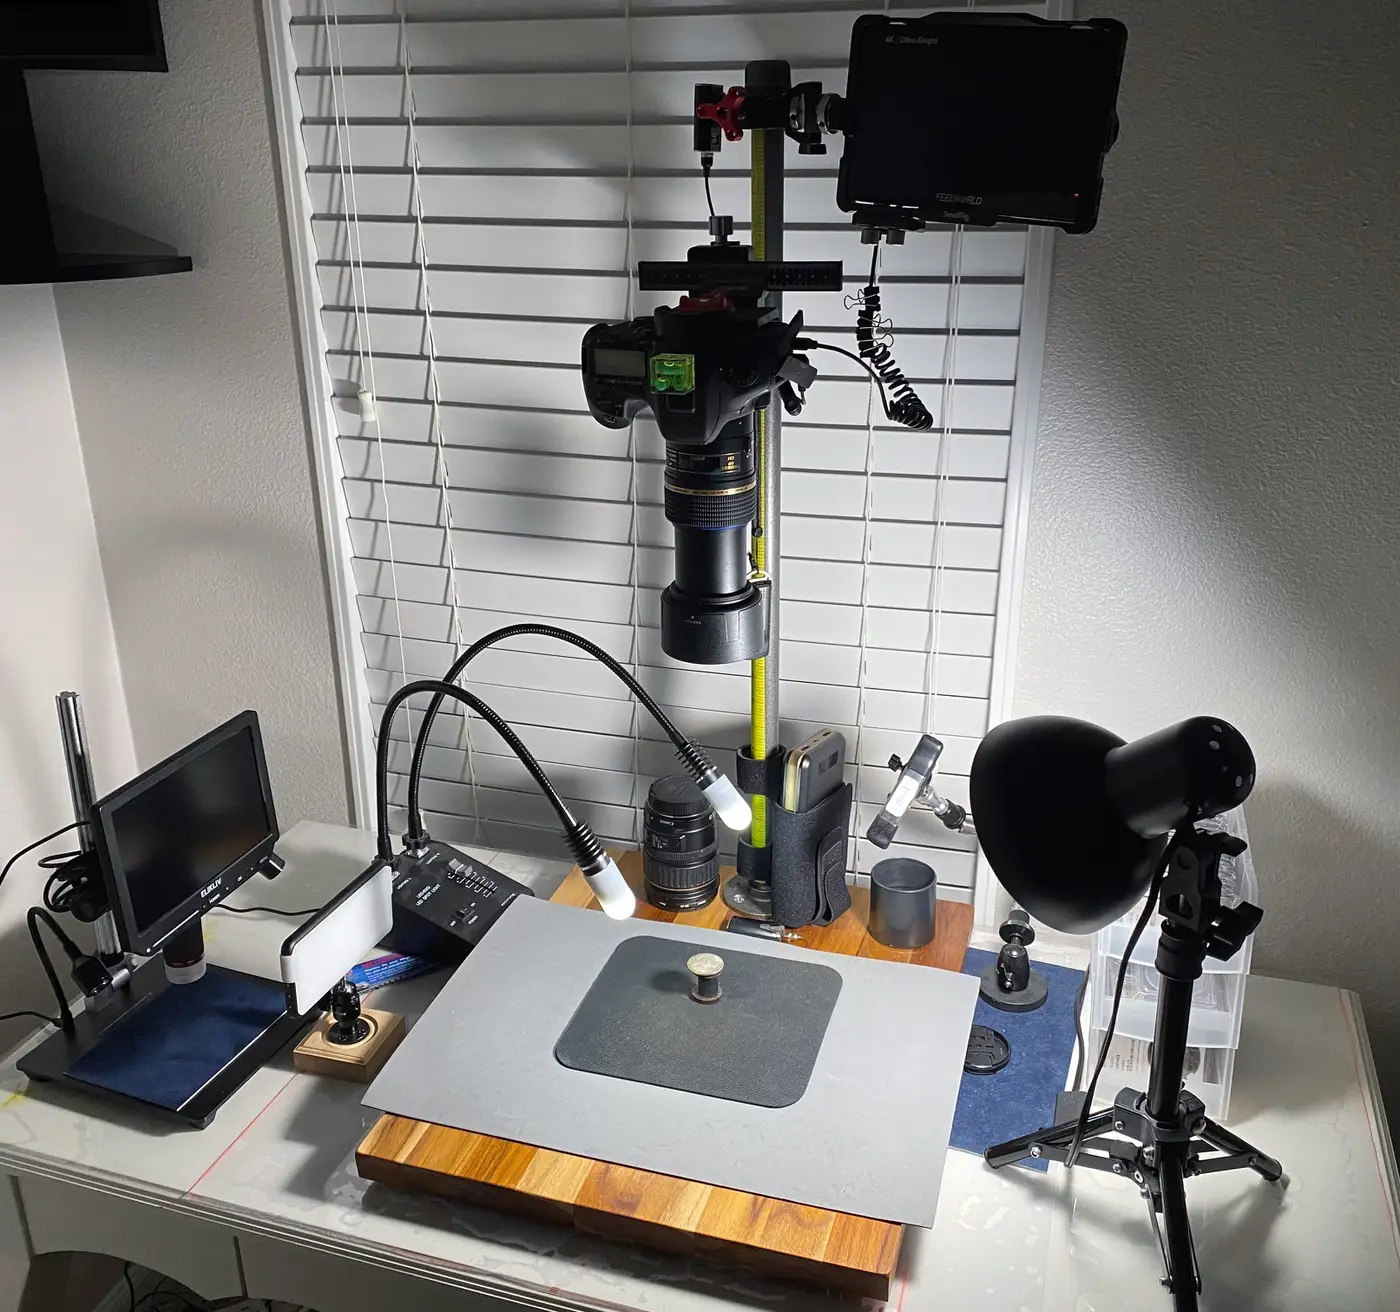
|
|
Pillar of the Community
United States
2240 Posts |
Before the copystand came inside the house, my first coin photo test. 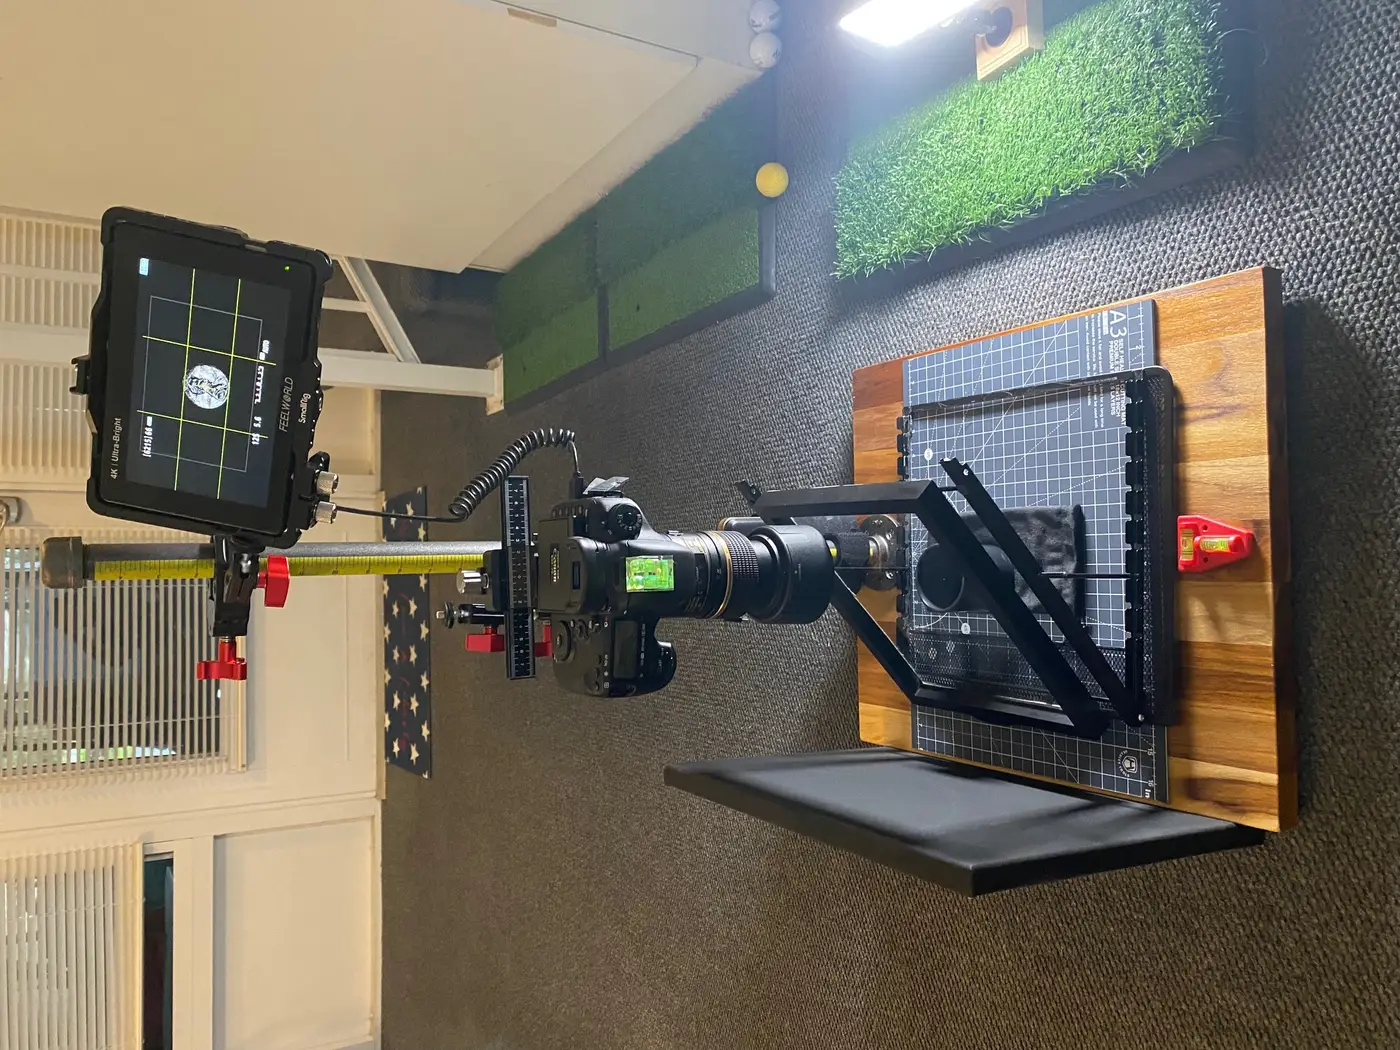  |
|
Pillar of the Community
 United States
6642 Posts |
CoinForMe, that's very similar to what I was considering. A few questions.
Is it freestanding, or do you attach it to the tabletop somehow? One of my concerns is that the higher up the camera goes on the pipe, the more tendency the whole stand has to tip.
What do you use for the camera connection to the pipe?
I am interested to see a picture taken with those two little gooseneck lights. Can you post one, or share one from a previous upload?
|
|
Pillar of the Community
United States
2240 Posts |
I just took this picture to show what the AmScope LED Dual Gooseneck lamps illuminate the coin as you requested... I use a different light source and the gooseneck as secondary lighting (to highlight, illuminate darker areas, etc.). . . . . Photo below using just the LED Dual Gooseneck lamps.. 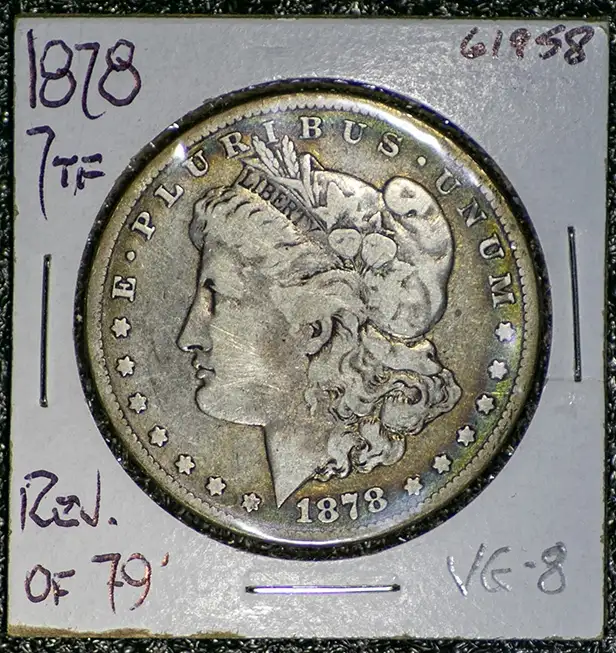 |
|
Pillar of the Community
United States
2240 Posts |
Quote:
Is it freestanding, or do you attach it to the tabletop somehow? One of my concerns is that the higher up the camera goes on the pipe, the more tendency the whole stand has to tip. This thing is solid, no way will this thing tip over... 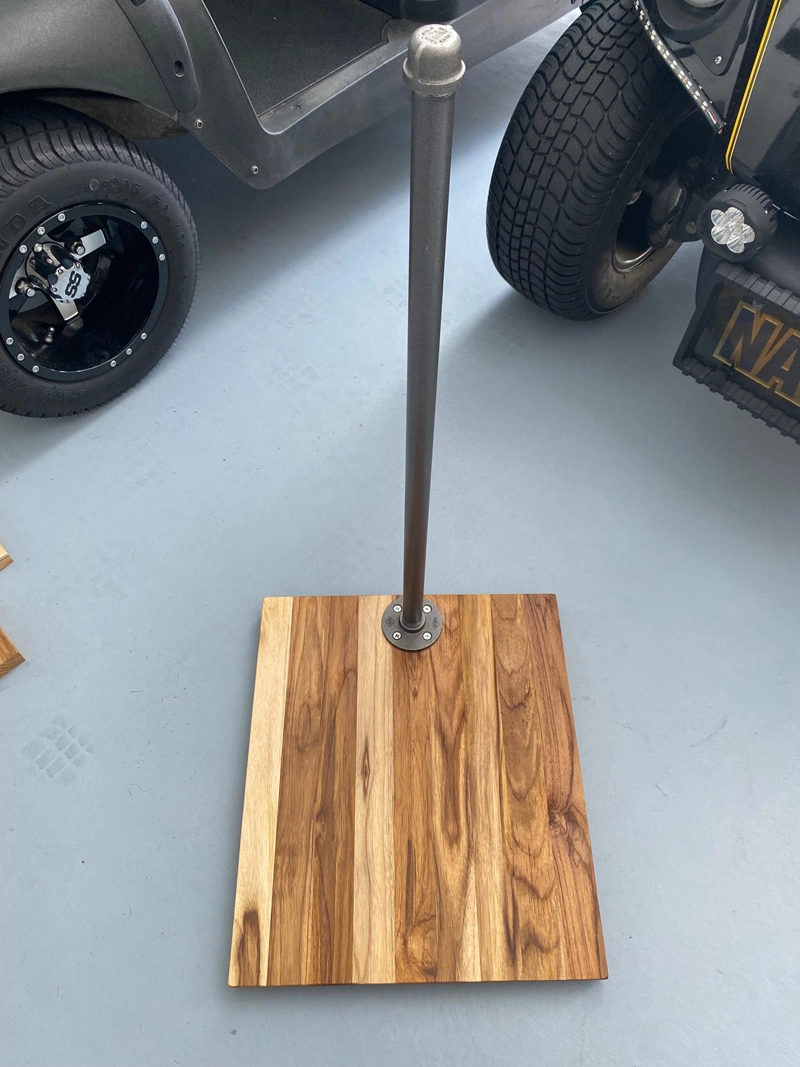 Quote:
What do you use for the camera connection to the pipe? This is what I came up with. It works very well... 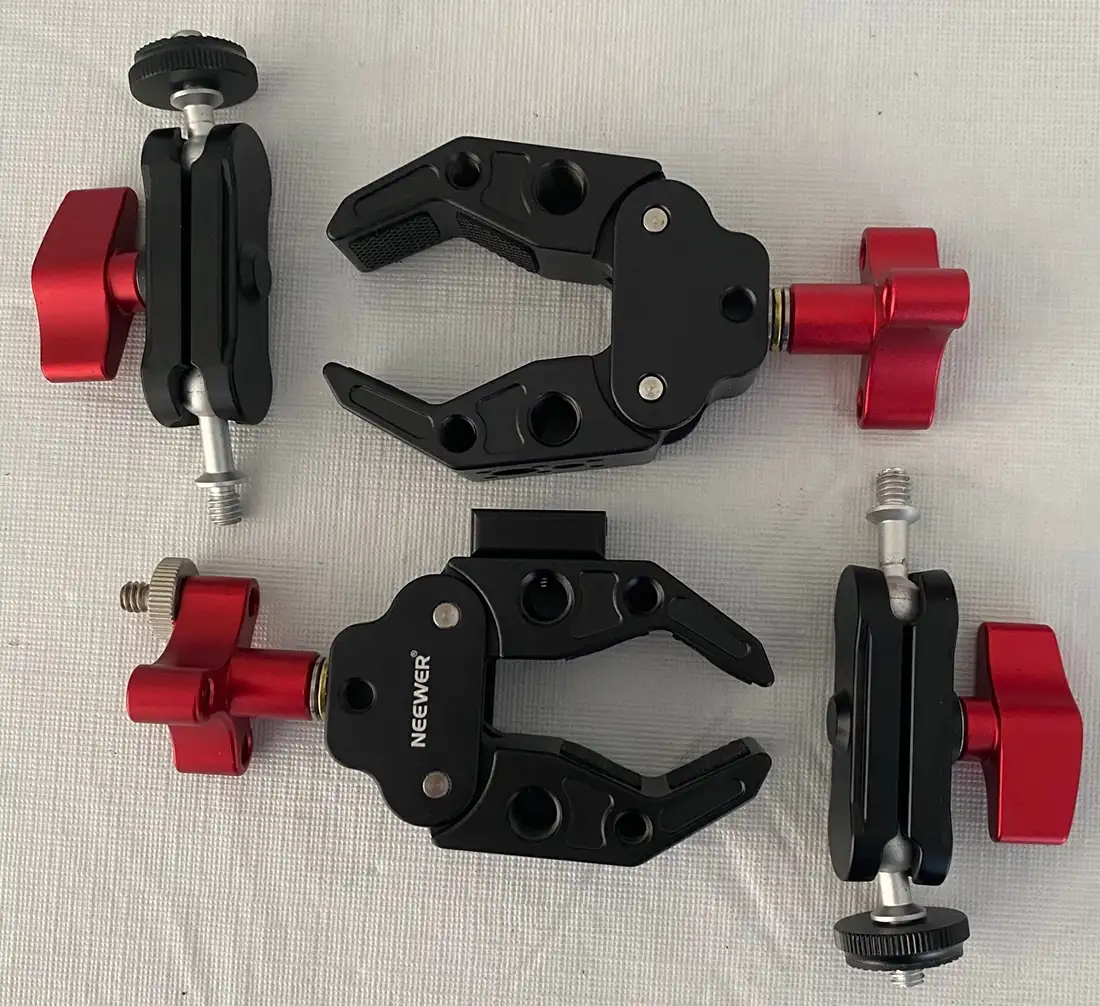 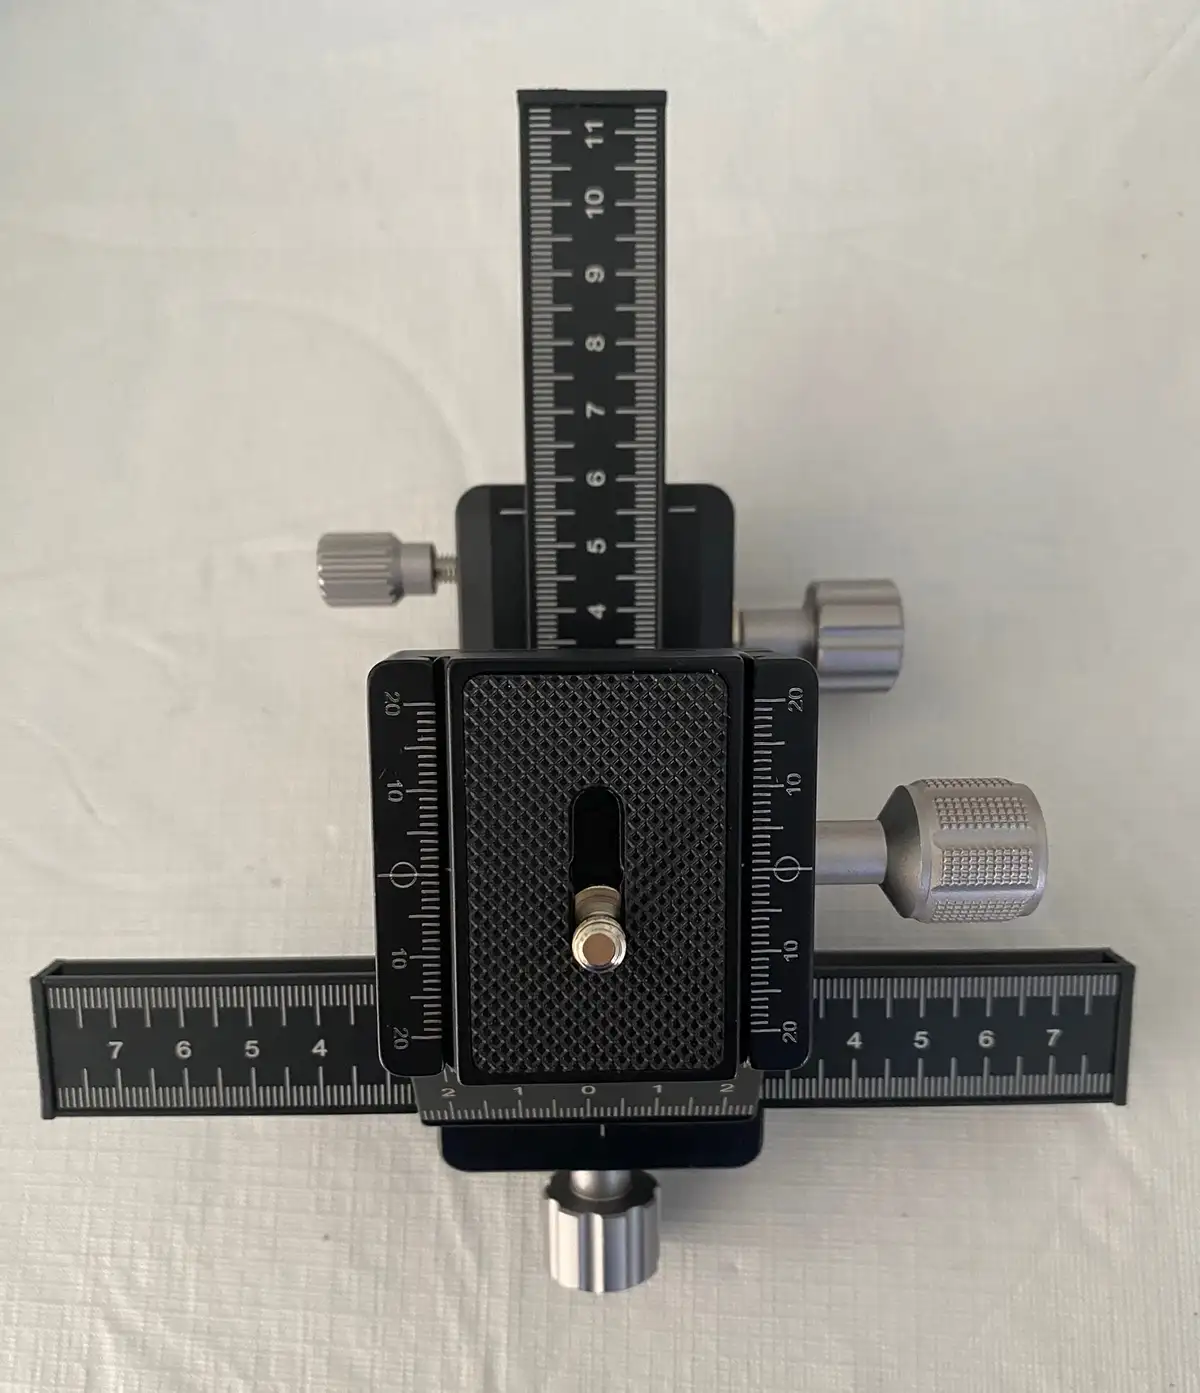 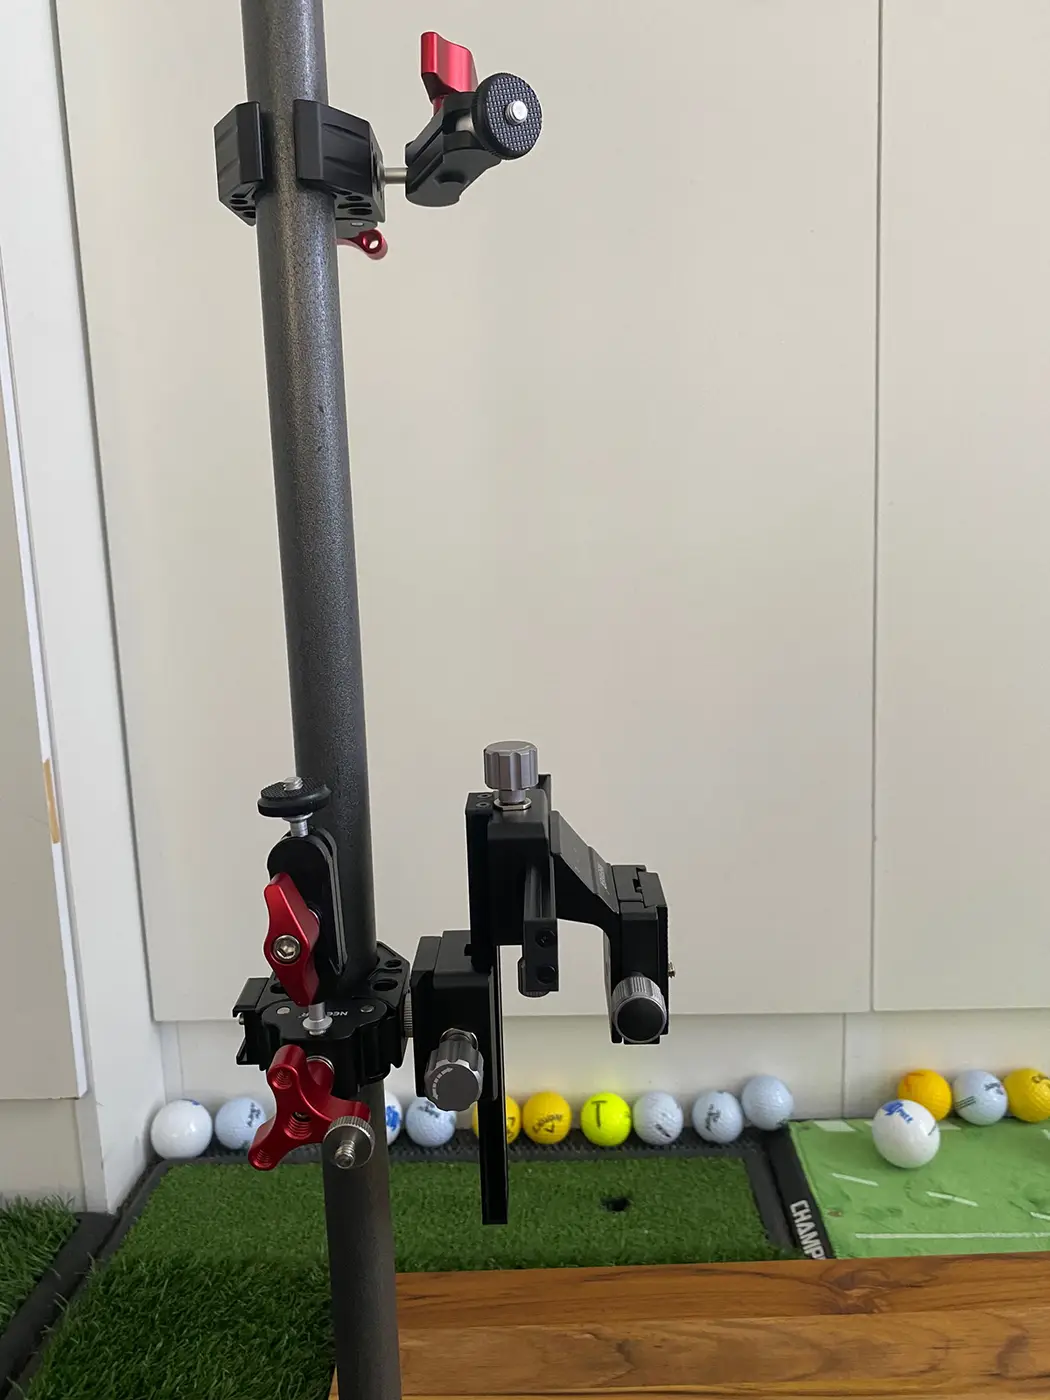 Edited by CoinForMe
01/27/2026 8:35 pm
|
|
Pillar of the Community
United States
6642 Posts |
Outstanding, thank you for all the photos of your setup! Do you make many adjustments using that sliding camera plate? I have quickly learned that I disturb my setup when trying to make manual lens adjustments for fine focus. I had been considering a simple lab jack to adjust coin position, but is there an advantage to moving the camera in tiny increments instead? I picked up a 24" x 3/4" diameter threaded pipe, flange, cap at Home Depot this afternoon. I've got the base. It is admittedly pretty huge compared to your setup, but I want to place my laptop on the working surface as well, plus control all the cabling. Will probably put in the Amazon order for clamps and a camera AC adapter tomorrow. Maybe I will add a gooseneck lamp or two, I can see that they add flexibility instead of trying to move the main lamp or use a handheld light (which works okay until I need to click the mouse with my other hand). A fresh test photo from a batch of ISO-shutter-light position experiments. Still don't have the whole coin face in focus. 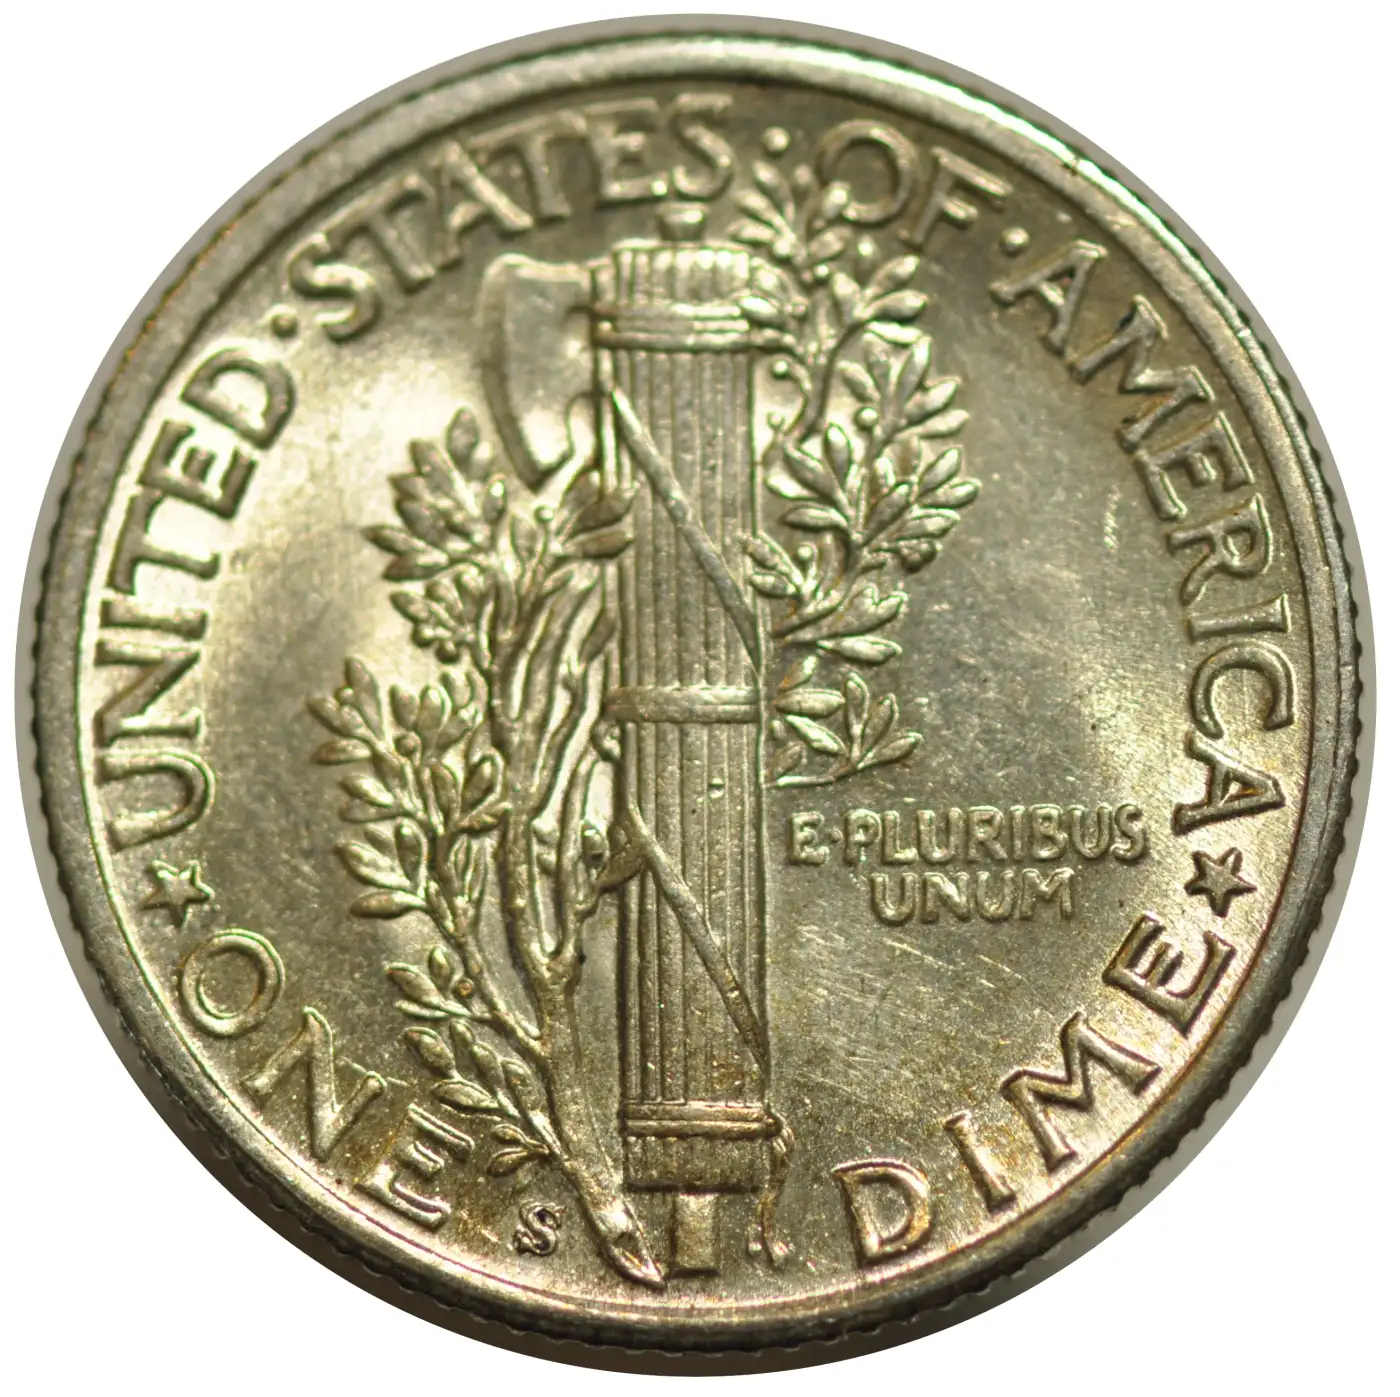 |
|
Pillar of the Community
United States
2240 Posts |
Brandmeister, Don't buy the AmScope LED dual gooseneck lamps. Honestly, you're welcome to have the one I have here for freejust buy me a bottle of water one day. Email me your address, and I'll drop it off at the post office this weekend. . . . . Note: Lighting plays a huge role in coin photography (especially micro shots). Just as important is white balancemake sure your camera is set to the correct WB, not simply Auto WB. Use a gray or white card to properly program your camera for accurate color. Looking forward to seeing your setup and results from it !
|
|
Pillar of the Community
United States
2240 Posts |
Quote:
Still don't have the whole coin face in focus. From the picture you posted, it looks like the camera is not square to the coin. Use a level to align the camera with the coin platform at all positions. The camera might be leaning somewhat. Edited by CoinForMe
01/28/2026 09:58 am
|
|
Pillar of the Community
United States
2240 Posts |
BTW, Brandmeister, that is a very nice double 'S' mint mark on that Mercury dime... One thing I have found when photographing my RAW coins is not to let my shirt color reflect on the coin's surface. Found this out when my shirt colors showed up in my coin pics.  Edited by CoinForMe
01/28/2026 10:21 am
|
|
Pillar of the Community
United States
6642 Posts |
Quote:
Use a gray or white card to properly program your camera for accurate color. I know there is a procedure for this with the standalone camera. I haven't yet figured out that process in Entangle, although a Google search will probably solve that. It does show a histogram and various color balance profiles, and I can create my own as well. Thanks for reminding me that I need a W/B/18G card in my Amazon order. =) What do you use for the background below the pedestal? The index card I have shows up as a bluish white shadow in all the pictures I crop. Quote:
From the picture you posted, it looks like the camera is not square to the coin.
Use a level to align the camera with the coin platform at all positions. A bit of tilt is practically assured. The coin pedestal was a three minute DIY with painters tape, black felt, a Pokemon card sleeve, and a drinking straw. Plus the camera was hanging from a portable work bench and propped against a towel. The image is probably very accurately capturing the imprecision of my test setup. =P Maybe this is a dumb question, but where do you lay the level on the camera? Quote: Brandmeister, Don't buy the AmScope LED dual gooseneck lamps. Honestly, you're welcome to have the one I have here for freejust buy me a bottle of water one day. Very generous, but now I'm a little unclear. Do you like and recommend the supplemental lights, or not like them? Quote:
One thing I have found when photographing my RAW coins is not to let my shirt color reflect on the coin's surface When I first built my tiny axial setup, many coins had a pink reflection on the surface. Later, I realized that it was the light bouncing off my face and into the top of the box, and I enclosed the top to the middle of the lens. =) |
|
Pillar of the Community
United States
2240 Posts |
Quote:
What do you use for the background below the pedestal? The index card I have shows up as a bluish white shadow in all the pictures I crop. . . . . I use a Black non-reflected mouse pad fabric most of the time. 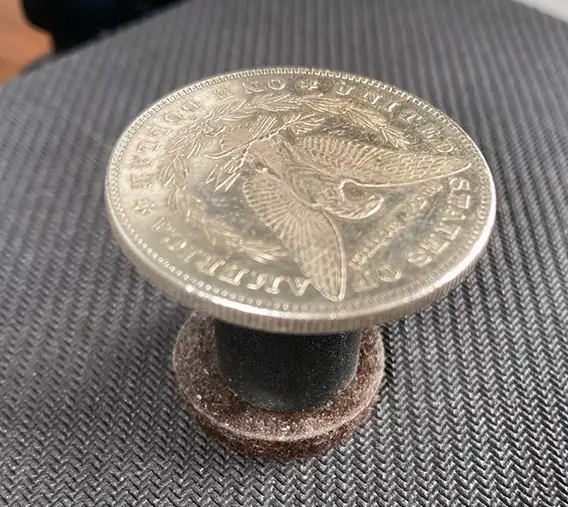 Quote:
Maybe this is a dumb question, but where do you lay the level on the camera? . . . . Cheap $1 levels 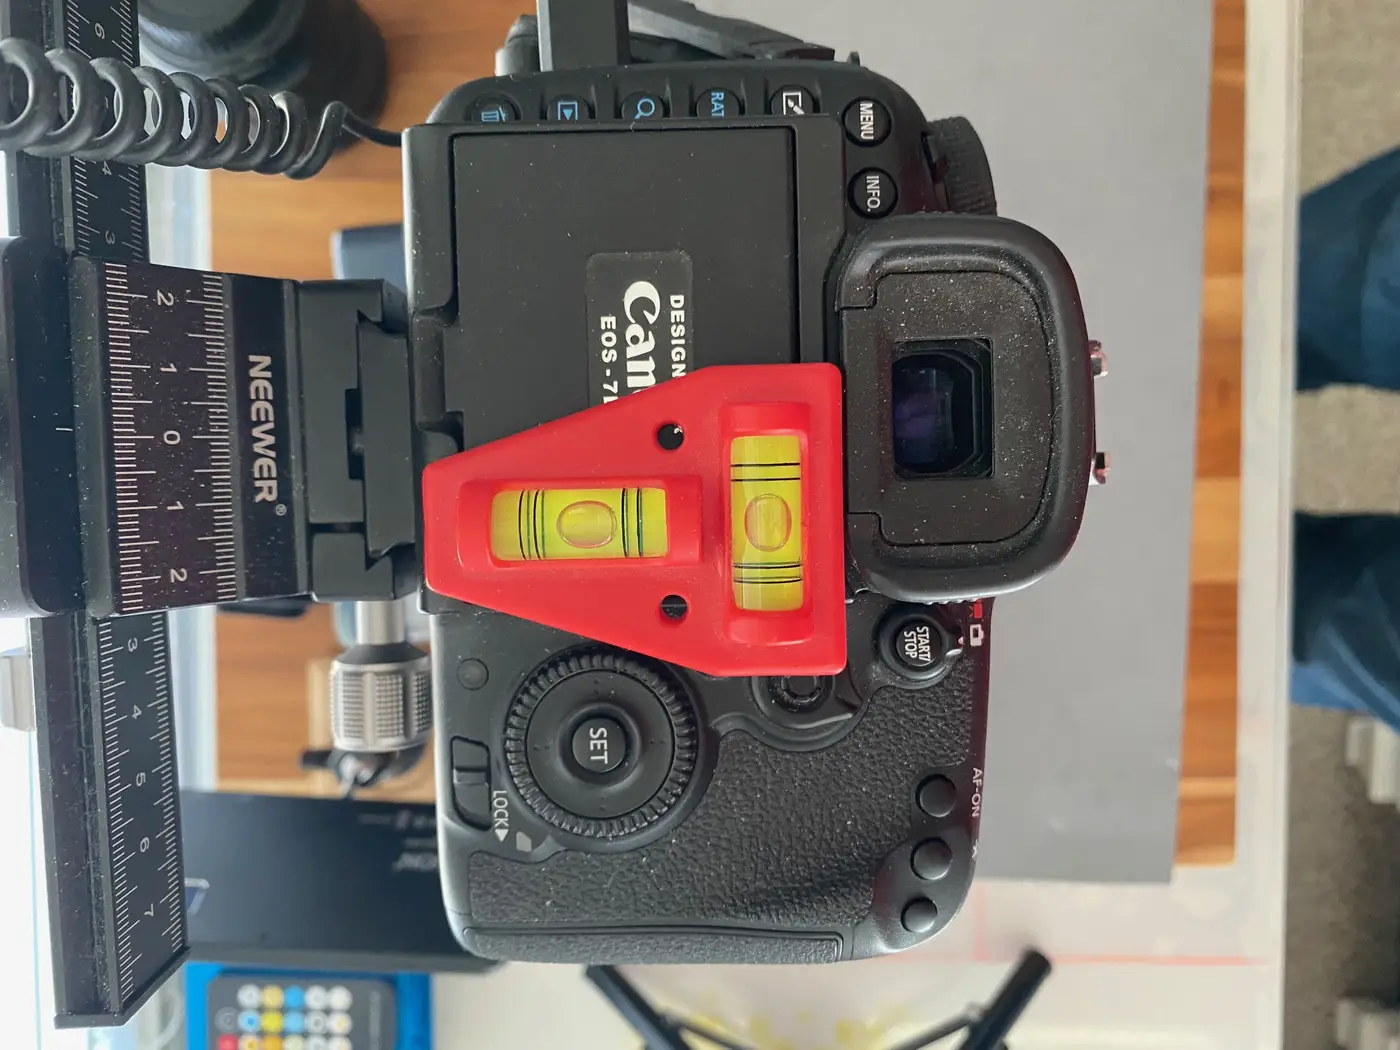 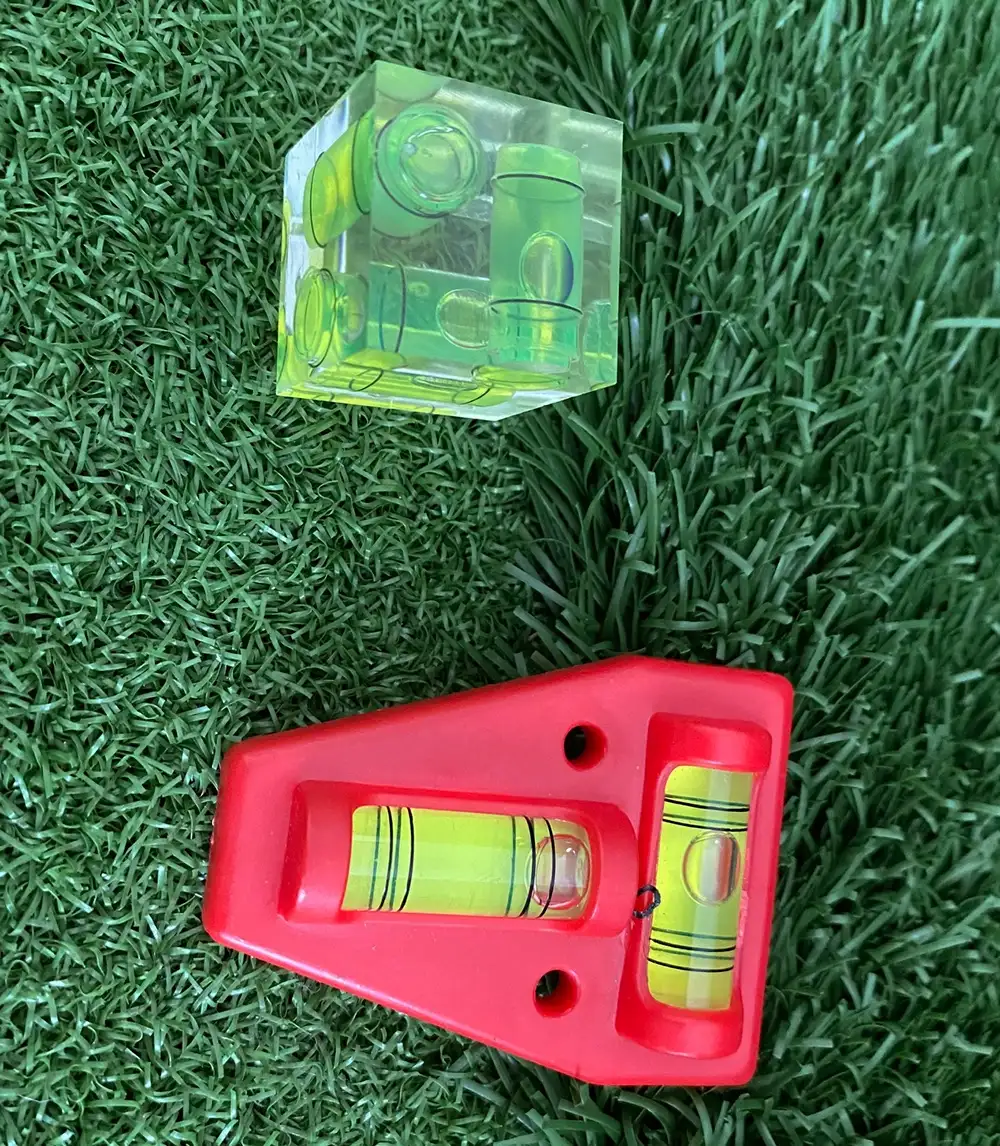 Quote:
Very generous, but now I'm a little unclear. Do you like and recommend the supplemental lights, or not like them? I do like the gooseneck lights, especially RAW coins, to pick up highlights by placing the lights at a steep angle, but most of my lighting technique comes from natural reflected (white cardboard) light from my windows, with a little help from one spotlight. Also, I wanted help from someone interested in improving their coin photography...  |
|
Pillar of the Community
United States
6642 Posts |
Quote:
most of my lighting technique comes from natural reflected (white cardboard) light from my windows That's interesting. What is the compelling reason for sunlight? Do you use reflected sunlight for its superior spectrum compared to LED lighting or another reason? It's obviously more restrictive on lighting angle, time of day, etc., although it is less expensive than artificial lights. I will happily accept your offer of a gooseneck light. Much appreciated! =) |
|
Pillar of the Community
United States
6642 Posts |
Now that I'm looking at your copy stand again, how long is that pipe? I got a 24" section. Is that going to be long enough to elevate the camera correctly above the base? I also hadn't considered clipping lights and accessories to the pipe, which requires more space above the camera.
|
|
Pillar of the Community
United States
2240 Posts |
Quote:
That's interesting. What is the compelling reason for sunlight? Do you use reflected sunlight for its superior spectrum compared to LED lighting or another reason? Not Sun Light but strong Day Light.  In the room where I placed my copystand (in the corner), there are two windows at 90 degrees to each other. I also reflect some of the daylight from those windows using a large sheet of white cardboard, sometimes black. I edit the RAW photos in Photoshop and convert them to JPG or PNG, mostly PNG, so that I can maneuver them to any background later on... |
| |
Replies: 16 / Views: 660 |


