Coin Community Family of Web Sites Join Thousands of Coin, Bullion, & Money Collectors
Royal Estate Auctions - $1 Coin AuctionsCoin, Banknote and Medal Collectors's Online Mall Join Thousands of Coin, Bullion, & Money Collectors 300,000 items to help build your collection! Royal Canadian Mint products, Canadian, Polish, American, and world coins and banknotes. Vancouvers #1 Coin and Paper Money Dealer Specializing in Modern Numismatics


Username:
Password:
Save Password
Forgot your Password?


This page may contain links that result in small commissions to keep this free site up and running.

Welcome Guest! Registering and/or logging in will remove the anchor (bottom) ads. It's Free!

Images Taken With My Kaiser Baas Digital USB Microscope

To participate in the forum you must log in or register.
First Page  Showing last 15 replies.
Author Previous TopicReplies: 20 / Views: 9,068Next Topic Page 2 of 2
Formerly nancyc
Australia
5385 Posts
 Posted 02/17/2012  3:10 pm  Show Profile   Bookmark this reply Add Nevol to your friends list

Quote:
I presume you are talking about a difference in file size (kilobytes) rather than actual image size (pixels wide x pixels high). 112kb vs 120kb is within normal variation.
Yes, file size.

Quote:
I am assuming they are saved directly as JPEG images,
Yes, again.

Quote:
Notice on your obverse picture the background is more uniform
I probably moved the external light a bit, it's just a square LED torch.

Thanks for all the info. When it comes to technicalities, I'm hopeless.

Even if I do manage to work out some technical details, by the time I want to use the knowledge, it's gone! It's a real sod to lose most of your memory.
life is a mystery to be lived not a problem to be solved
Pillar of the Community
Australia
9419 Posts
 Posted 02/17/2012  7:07 pm  Show Profile   Bookmark this reply Add triggersmob to your friends list

Quote:
Unfortunately, I've had to resize the 2 x coin images to post them here. I really wanted you to see the unaltered results


Nancy, if you don't already have one, open a Photobucket account and you can link to the images, that will enable you to show us the image you want. (or e-mail me the original and I will do it for you).

Steve
Pillar of the Community
Australia
877 Posts
 Posted 02/28/2012  01:19 am  Show Profile   Bookmark this reply Add Jeff to your friends list
Hi Nancy or anyone else interested,
Mine arrived today but I can't get it to work. Driver installs fine (either from disk supplied or Windows PnP). Device manager reports as working properly (Venus USB2.0 microscope).

Viewing software also installs fine.

LED illumination works and cab be adjusted when plugged in.

But, can't get a picture in preview window. Taking a shot opens a blank thumbnail, preview window "flashes" and reverts to grey.

Maybe your tame computer man might know something about them. Or perhaps another forum member may be well informed on USB microscope setup.
Any sensible advice would be appreciated. Kaiser Baas support page is worthless.

Jeff
Formerly nancyc
Australia
5385 Posts
 Posted 02/28/2012  06:38 am  Show Profile   Bookmark this reply Add Nevol to your friends list
For the picture to show in the preview window, make sure your mouse pointer is over the preview window.

life is a mystery to be lived not a problem to be solved
Pillar of the Community
Australia
877 Posts
 Posted 02/28/2012  4:54 pm  Show Profile   Bookmark this reply Add Jeff to your friends list
Well, managed to get it working. It won't work with a particular USB port on my computer (although everything else works there)?
So, swapping a couple of leads solved the problem.

Two first impressions;
  • An adjustable stand would be very handy
  • Inbuilt lighting is hopeless


Here is my first picture

Images-Taken-With-My-Kaiser-Baas-Digital-USB-Microscope
Need a bit of practice to get to Nancy's standard.

Jeff
Previously Ousted
Canada
398 Posts
 Posted 04/14/2012  11:12 am  Show Profile   Bookmark this reply Add coingirl to your friends list
ok, since this is supposed to be a Microscope ( or did I miss something?).
can you guys please also do some very extreme close ups and see how they turn out.?
it may be a substitute for taking simple images of coins... but how are the close ups?
I use a similar model and find it cumbersome to use, as all adjustments are extremely sensitive. if it is not dead on... blurrrrrr
and if it is in the non-macro regions.. I can use a regular camera with a macro setting for better results.
remember, the reason for a microscope is to see Micro details, the hair, and not the head.
I believe your $100 were spent for the wrong reason. just MHO
Pillar of the Community
Australia
877 Posts
 Posted 04/14/2012  4:32 pm  Show Profile   Bookmark this reply Add Jeff to your friends list

Quote:
ok, since this is supposed to be a Microscope ( or did I miss something?).
can you guys please also do some very extreme close ups and see how they turn out.?


Have a look at some of Nancyc's posts. Here are a few;

Formerly nancyc
Australia
5385 Posts
 Posted 04/15/2012  11:55 pm  Show Profile   Bookmark this reply Add Nevol to your friends list
Some new images of coins that should be familiar to you.


1c 1951D D.Chip BiE Close up
Images-Taken-With-My-Kaiser-Baas-Digital-USB-Microscope

1c 1951D D.Chip BiE
Images-Taken-With-My-Kaiser-Baas-Digital-USB-Microscope

1c 1957P Rev Cud in R Wheat Close up
Images-Taken-With-My-Kaiser-Baas-Digital-USB-Microscope

1c 1957P Rev Cud in R Wheat
Images-Taken-With-My-Kaiser-Baas-Digital-USB-Microscope

1c 1960D Rev Cud in E v2
Images-Taken-With-My-Kaiser-Baas-Digital-USB-Microscope

1c 1960D Rev Cud in E v3
Images-Taken-With-My-Kaiser-Baas-Digital-USB-Microscope

1c 1960D Rev Cud in E v1
Images-Taken-With-My-Kaiser-Baas-Digital-USB-Microscope
life is a mystery to be lived not a problem to be solved
Previously Ousted
Canada
398 Posts
 Posted 04/16/2012  12:55 pm  Show Profile   Bookmark this reply Add coingirl to your friends list
Nancy, are you using a stand or something?
or is it hand held?
I am using a 100mm macro lens and have the possibility of an additional digital enlargement of a preset 200%. it is very shake and the slightest breath shakes it.
the lens itself does an excellent job taking images of coins AND details. then I use the software, in my case ACDsee14, to enlarge the image. usually I get pretty good results.
This image can still be enlarged by multiples.
Images-Taken-With-My-Kaiser-Baas-Digital-USB-Microscope
Pillar of the Community
United States
570 Posts
 Posted 04/16/2012  1:16 pm  Show Profile   Bookmark this reply Add mmorgan22 to your friends list

Quote:
it is very shake and the slightest breath shakes it.


Coingirl, you should try using a shutter release cable and a tripod/stand of some sort. This combination will minimize the shakiness and you can actually breathe when you are taking photos . Once I got a setup like this, no more holding your breath to take photos. Just click the shutter release button. Nice photo by the way
Edited by mmorgan22
04/16/2012 1:17 pm
Previously Ousted
Canada
398 Posts
 Posted 04/16/2012  11:51 pm  Show Profile   Bookmark this reply Add coingirl to your friends list
Morgan, it is not the shutter issue. My camera is mounted on a old enlarger together with flex lights , totally adjustable.
The problem is that I use long exposure times if I do not use the lights. then it might be 3.5 at 1 sec.
any slight shake like moving a chair etc is transferred to the stand and hence to the camera. I need to make a mechanical change to fix that.
my shutter is operated by my mouse as I use the Canon software which allows that. I see on the monitor exactly what the lens sees. all camera adjustments are made with the mouse.
Photo sw I use is ACDsee 14, very reasonable priced.
Formerly nancyc
Australia
5385 Posts
 Posted 04/17/2012  02:16 am  Show Profile   Bookmark this reply Add Nevol to your friends list

Quote:
Nancy, are you using a stand or something? or is it hand held?
Neither.

I know what you mean about the sensitivity, but I have found some tricks that virtually negate all that.

The small stand that comes with the scope is, in my opinion, pretty useless and I no longer use it. I have devised a number of alternate ways of getting the scope to the height needed above the coin, and for it to be stable.

I hope you're ready for this, as it's a very LOW tech solution and a case of necessity being the mother of invention.

Firstly, I removed the scope from the stand and took off the small C shaped clamp.

Before I started the following, I practiced on a couple old plastic tumblers, to get the feel of how it would work out.

I got a number of different height translucent white Tupperware (TW) containers, and carefully cut a hole in the centre of the bottoms with a Stanley knife to accommodate the black section of the front of the scope. Take care not to cut out too much, as it needs to be a snug fit, about 29-30mm is good. The black section of the scope needs to go approx 3 - 4 mm into the cut out. A good snug fit will mean little or no movement of the scope.

These TW items are my LOW Tech Light tents, and double as my scope stands, and I find them quite stable. I have 5 different heights, and can stack two or more to get extra height if needed, but this is only necessary if I'm imaging very large coins. Sometimes, if the coin is in a 2x2 or 1½ x 1½ holder, they are inclined to be unstable, as the cardboard sticks out a bit from under the TW containers, but a little bit of patience can overcome it.

There's nothing that says the containers have to be TW, just as long as they're white and will allow light through. I'm about to cut a hole in a larger tumbler, 12cm high, 7cm diameter bottom, 9cm diameter top, and it will be able to cover a whole 2x2, so the instability will be gone. I have to get my son to make the initial hole, as I'm not strong enough to get it started.

If the coin is in a 2x2 or 1½ x 1½ holder, you may need external light as the built in LED's cause too much reflection. Sometimes I get a reasonable image by tilting the TW container to get the reflection away from the area I want to capture, and this method can be used on a bare coin, as well as ones in 2x2s.

I NEVER use the button on the side of the scope to take the picture as it causes movement and is a pain in the butt.

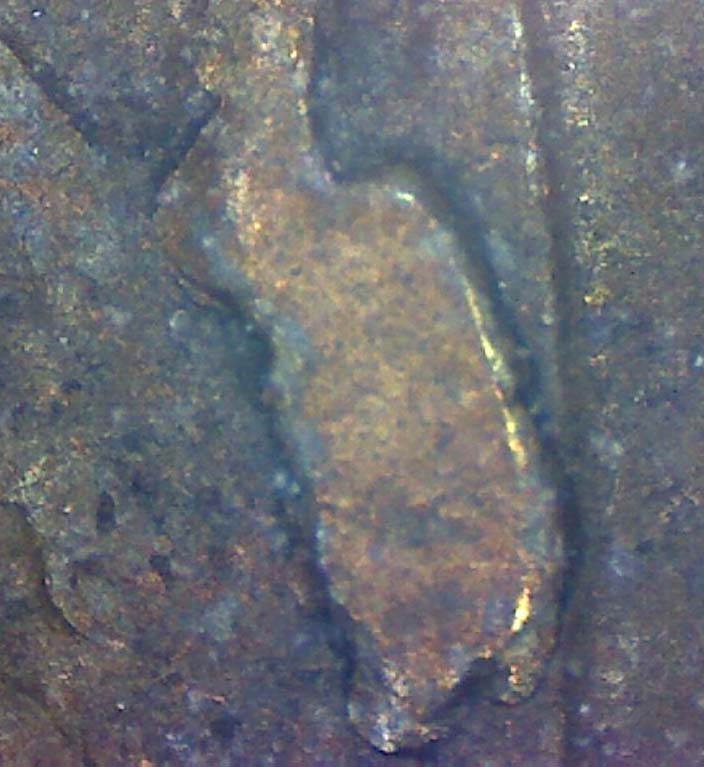
With my Scope, there are 2 ways of getting close ups. Close ups that are about 16x magnification, and the other is about 66x magnification. (I'm not too sure about those magnification figures, maths leaves me cold these days. My scope is supposed to do 20 - 200 times, but somehow, I don't think it's that good).

When you've got the scope virtually right on top the coin, get the ‘regular' focus, see image #1 (below) with the focus dial on about 35, then wind the focus dial up to about 205, and you'll have a close up like image #2 (below), but because this is so great a magnification, it IS quite sensitive to movement, but still do-able, you do need a steady hand.

You will probably need to play around for a little while, but I'm sure in the end, you'll be happy with the results. I hope your scope settings are similar to mine, as otherwise my comments will make no sense to you at all.

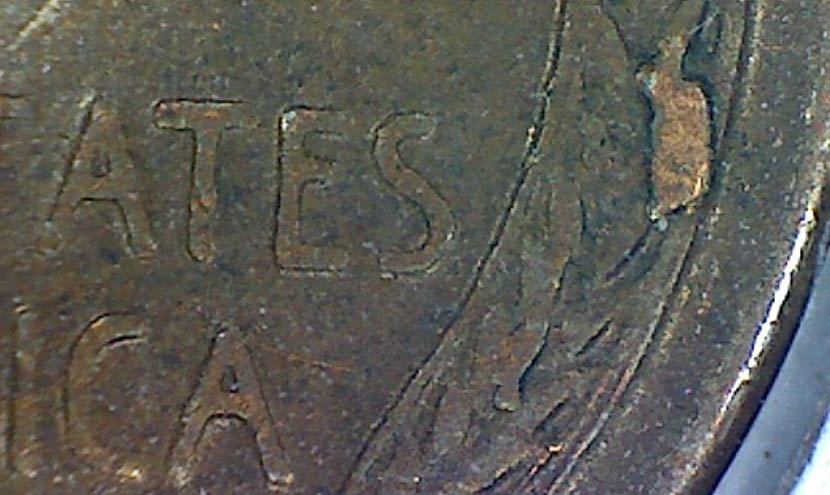
Image #1 -1c 1960D Close-up of date directly on coin; Focus Dial on 35
Images-Taken-With-My-Kaiser-Baas-Digital-USB-Microscope

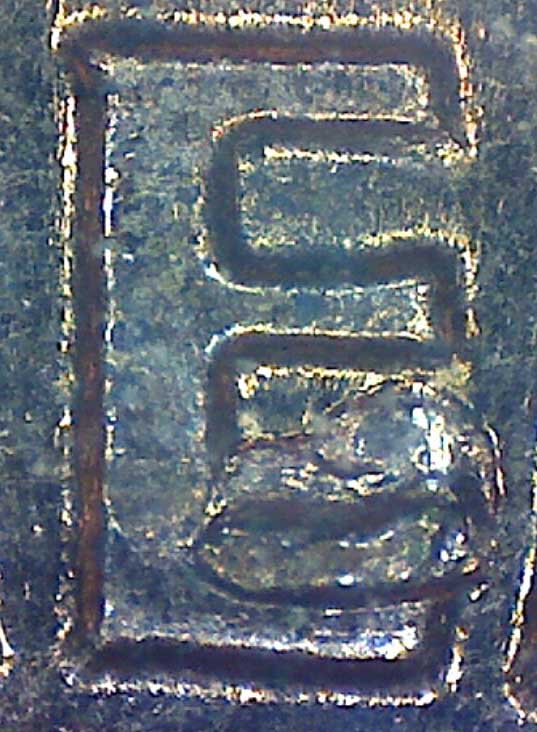
Image #2 - 1c 1960D Close-up of date directly on coin; Focus Dial on 205
Images-Taken-With-My-Kaiser-Baas-Digital-USB-Microscope

I did nothing to the images as far as size goes, I did reduce the quality, to get them under 100kb, but size wise, what you see is exactly what I got.

Good luck, let me know if this is any help to you, (or anyone else for that matter).

If you can refine the process and make it better, please let us know your tips.
life is a mystery to be lived not a problem to be solved
Pillar of the Community
Australia
877 Posts
 Posted 04/17/2012  03:24 am  Show Profile   Bookmark this reply Add Jeff to your friends list
Instead of TW type containers, try a 1 litre or 2 litre milk bottle with the bottom removed.
Semi-transparent plastic with excellent light diffusing property. The top opening is a good fit for the K-B microscope -if a little loose then wrap a little PVC electrical tape around the microscope body.
Adjust available magnification with the height -to get closer just cut more length off. Tell your friends that the row of different length bottles on your shelf is a D-I-Y pipe organ.
Formerly nancyc
Australia
5385 Posts
 Posted 04/17/2012  03:42 am  Show Profile   Bookmark this reply Add Nevol to your friends list
I did try the milk bottle, but it was too cumbersome so I came up with something more petite.
life is a mystery to be lived not a problem to be solved
Previously Ousted
Canada
398 Posts
 Posted 04/17/2012  12:35 pm  Show Profile   Bookmark this reply Add coingirl to your friends list
Nancy, looks li9e you put a lot of work in to this and you are very successful with it.
yesterday I re-assembled my scope on to an old lupe holder stand wich held a magnifying glass and was used tying flies for fishing.
the lupe was attched via a number of quasi links that could be twisted and bent.
will do a few images and post later
Page 2 of 2   Previous TopicReplies: 20 / Views: 9,068Next Topic Page 2 of 2
First Page  Showing last 15 replies.
To participate in the forum you must log in or register.


Disclaimer: While a tremendous amount of effort goes into ensuring the accuracy of the information contained in this site, Coin Community assumes no liability for errors. Copyright 2005 - 2026 Coin Community Family- all rights reserved worldwide. Use of any images or content on this website without prior written permission of Coin Community or the original lender is strictly prohibited.
Contact Us  |  Advertise Here  |  Privacy Policy / Terms of Use

Coin Community Forum © 2005 - 2026 Coin Community Forums
It took 0.42 seconds to rattle this change. Forums