| Author |
 Replies: 12 / Views: 2,440 Replies: 12 / Views: 2,440 |
|
|
Pillar of the Community

United States
4041 Posts |
Setup: Rodenstock Apo Rodagon D 75mm f4 M=1 set at f5.6 Microscope Stand Pentax Auto Bellows Nikon D7000 in Aperture Priority Mode Two Jansjo LED lights at 10:30 and 1:30, 75mm above coin surface, approx 10deg off vertical   |
|
|
|
Pillar of the Community
United States
1173 Posts |
Love this coin and photo. Nice!
|
|
Moderator
United States
23522 Posts |
That's gorgeous. What was the exposure? EXIF data was lost in translation. I'm going to move this into World Coins; it deserves a wider audience of members who can appreciate the coin. By all means, include photographic parameters in future posts of this nature, but please instead of posting them in the narrowly-focused Photography forum, drop them into the subforum appropriate for the coin. That way, the greatest number of interested members can see it (and maybe it'll stimulate a little more interest in photography  ). |
|
Pillar of the Community
 United States
4041 Posts |
Checked the EXIF of original image and it shows ISO 100, 1/250sec. For some reason I have the "remove EXIF data" box checked on the downsizing box. I'll uncheck it for next shots.
This is "sort of" a foreign coin, though it was minted by the US Mint in Philadelphia for a territory that was then under US rule after we won it from the Spanish in 1898. I find these fascinating and they are great numismatic pieces as well as very artistic.
Can anyone give history of the designs used on these US-Philippines issues? Symbolism?
This particular coin is the best nickel I've seen other than proofs. Often they show weak strikes or wear on the Eagle's breast and Boy's head and knee, but this one is full strike and free of any wear on the high points. Maybe it was from a Mint Set?
...Ray
|
|
Pillar of the Community
United States
4041 Posts |
Here's another USPI 5 Centavo...more mottled toning this time, and a 1903. Similar setup but this time using Nikon 75mm f4N EL-Nikkor:   Contact me for photographic equipment or visit my home page at: http://macrocoins.com |
|
Pillar of the Community
United States
570 Posts |
Awesome photos rmpsrpms! I have a setup similar to your after reading many of your posts. The one thing I am missing is the microscope stand. Will have to get one soon if it will help me take photos like these!
|
|
Pillar of the Community
United States
4041 Posts |
Things you need from a stand used for coin photos:
- Easy and precise height adjustability
- Extreme rigidity
- Flatness adjustability
I like to use microscope stands since they are designed for high magnification where even the slightest movements cause problems. They are perfect for coin photos, but they typically do need to be modified. Now my setups are so rigid that I'm worried more about vibrations due to the camera shutter than anything else!
...Ray
Contact me for photographic equipment or visit my home page at: http://macrocoins.com |
|
Valued Member
63 Posts |
|
|
Bedrock of the Community
United States
10045 Posts |
Excellent coin--and amazing pictures, as always!  Museums should hire you to document their collections. |
|
Pillar of the Community
United States
570 Posts |
Quote:
I like to use microscope stands since they are designed for high magnification where even the slightest movements cause problems. They are perfect for coin photos, but they typically do need to be modified. Sorry, I don't mean to highjack the thread, but I'm thinking about picking up a Bausch and Lomb stereo microscope stand. How would you modify it to fit the bellows? Edited by mmorgan22
01/11/2012 1:18 pm
|
|
Pillar of the Community
United States
4041 Posts |
I have made a few of these for people on several forums and have documented some of the stands on this thread: https://goccf.com/t/87392&whichpage=4I did not show a stand without bellows mounted, but you can see enough detail in the various pics to get an idea of what is required. Basically you need to: - remove the existing hoop mount for the microscope pod - cut a piece of metal bar stock (aluminum) to the appropriate length - drill and tap 4 holes in the bar stock to accept the hoop mount screws - Drill hole(s) for the bellows to mount - put it all back together For the Santoku stand I built for SuperDave, I did not make a custom bracket. Turns out B&L made a bracket to allow mounting of the MonoZoom7 to the A-Stand. This bracket is of course ideal for using the MZ7, but is also perfect for mounting a camera to as a copy stand, and for mounting bellows. I needed to drill holes for mounting the camera and bellows but they did not need to be tapped. You can read about Santoku in this thread: https://goccf.com/t/103741I took some pics of the "three uses" of Santoku before shipping it to SuperDave. Especially in the pic showing the MZ7 you can see some details of the mount: 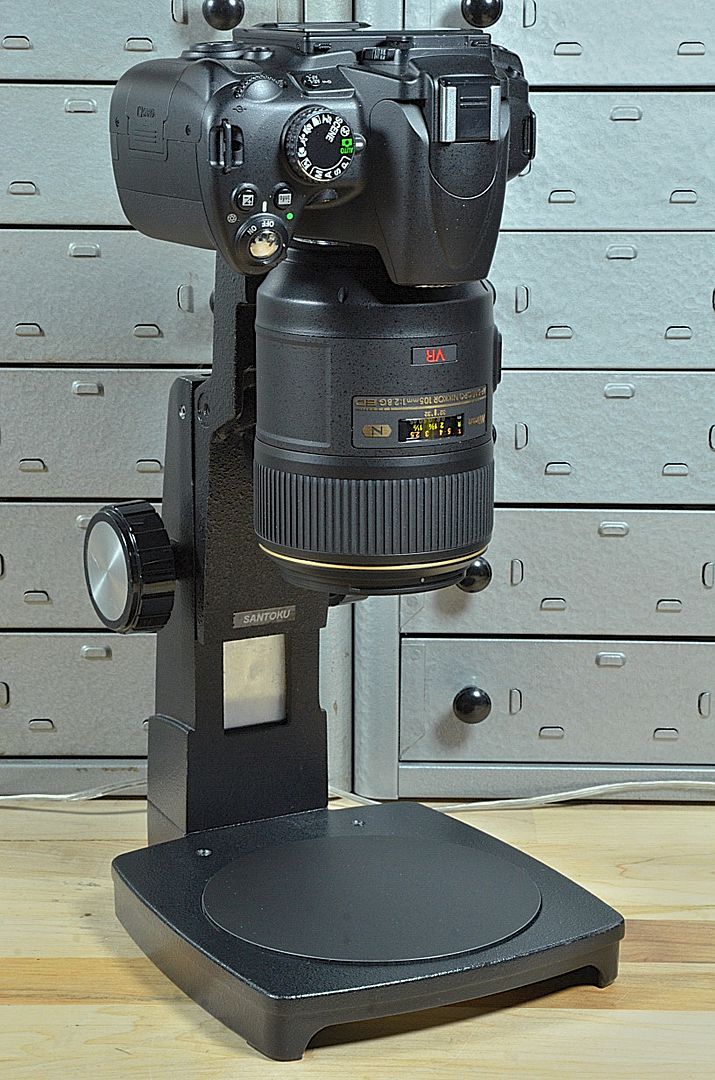   If you can find an MZ7 stand I highly recommend them. Otherwise you can use any B&L A-Stand or B-Stand and make the bellows mount. ...Ray Contact me for photographic equipment or visit my home page at: http://macrocoins.com |
|
Pillar of the Community
United States
570 Posts |
Thanks a lot for the info Ray! I will try looking for a MZ7 stand.
|
|
Pillar of the Community
United States
4041 Posts |
Note that you may have to buy an MZ7 to get the stand...not a bad thing...Ray
Contact me for photographic equipment or visit my home page at: http://macrocoins.com |
| |
Replies: 12 / Views: 2,440 |
|


