| Author |
 Replies: 15 / Views: 11,765 Replies: 15 / Views: 11,765 |
|
|
Pillar of the Community
2087 Posts |
I am asking as I suspect someone must have tried this already. I am looking at getting a copy stand. For some reason they seem hard to find at a reasonable price, the ones that seem to be best for my purposes are expensive US$400.00 +. I then had , what I am sure is not original,the idea that perhaps an enlarger stand could be converted to my purposes. Such stands are often sold cheap, usually with the enlarger. the riser of enlarger stands is strong and accurately graduated and the mechanism for raising and lowering the enlarger is equally robust. I am sure someone somewhere sometime has looked at such a conversion. So on the off chance: has any one had experience of converting an enlarger stand to a copy stand? If so what are the points to look for in slecting an enlarger stand?
|
|
|
|
Pillar of the Community
 United States
4038 Posts |
They work fine as long as you can remove the enlarger bellows and it has a provision for 1/4" mounting, which not all of them have. Also, they often have an angled rather than vertical post. This is fine for enlarging or duplication, since you want to keep the same registration corner independent of the enlarging ratio. But for coins, having the center of the field move as you focus up and down is not good IMO.
|
|
Pillar of the Community
 2087 Posts |
thanks I actually expected that I would have to add the 1/4 inch mount( or what ever it is in metric). On the angled mount I wasn't aware of that so will try to avoid such a stand.
|
|
Pillar of the Community
United States
9792 Posts |
Yep the real issue is the angled stand, you really want a straight pole more like a copy stand. It may be easy to covert the stand by removing the arm and reattaching it straight. Though some are cut angled, you might be able to flip it around the top might be flat.
Also look into used camera shops, I bought a nice one that retailed for $400-500 for only $75.00 with two lights. (unfortunately it's huge and in storage in another state at the moment).
"Buy the Book Before You Buy the Coin" - Aaron R. Feldman - "And read it" - Me 2013! ANA Life Member #3288 in good standing since 1981, ANS, Early American Coppers Member (EAC), Colonial Coin Collectors Club member (C4), Conder Token Collector Club member (CTCC), Civil War Token Society (CWTS) member, Liberty Seated Collectors Club (LSCC) & Numismatic Bibliomania Society member (NBS), USMex, Member in good standing, 2¢ variety collector. See my want page: http://goccf.com/t/140440Edited by westcoin
07/18/2013 9:25 pm
|
|
Pillar of the Community
United States
627 Posts |
I have one that I use exactly as you've described. It is not my main stand, but it's nice for my full slab shots. While the "movement" on the angle seems as though it would be an issue, it's really not a big deal. Of course, I have a bellows with a built in focus rail, so the fine focus is happening vertically. See this thread which I posted some time ago: https://goccf.com/t/110867Edited by brg5658
07/25/2013 2:48 pm
|
|
Pillar of the Community
United States
3076 Posts |
HEY HEY and YES.......it can b e done quite easily......
For the most.....when they look at enlarging stands......"THEY"
are looking at the stand and features for PRODUCING film images.....
self film developing..... A GREAT THING... however many of us have moved into the digital age.....Due to convienience..I can put my image into my computer and NOT have to wait a week for the FILM developement......to get my pic's.....SO before I get too far gone in how great this is.....
I want to address the ORIGINAL.. QUESTION.........
First off, there are many enlarger stands that are angled...which is the foremost question...... as you try "to focus" and at what range.!..
many of the Company's are THE SHAFT which they move up and down are.....angled....which leads to a problem of how good the picture can be at what hieght//// ......
how ever...I have found...there are many ways.....as I have observed within this foreum......of the dollars one can spend.......
So just a little advice here....
There is a ....company......don't think they are in buisness now....But the have an PHOTO ENLARGER, meant to develope FILM negatives which few do new...... but that's not MY POINT...
THE DURST......300 or 600 or so models,,,ARE NOT ANGLED.....
check out the Durst models not with standing the model numbers
they are CHEAP.........and durable......IF YOU Need a brand name....
you can spend more for confidence......
...... there IS NOT A COPY STAND......that has quality that thinks is worth $150.......you can buy it for HALF......FULL stand,, and.....
ALL the extras as its not listed as a copy stand...... IF YOU HAVE ANY QUESTIONS EMAIL ME.....this is really to stupid......if you just look.....
|
|
Pillar of the Community
United States
3076 Posts |
The original....Question of conversion.....AFTER reading....
the reply of others.....moments later is still the same.........IF your looking to use something to be used as a copy stand or to be used as.....a MACRO stand or some kind of bellows,,its still all the same
There are times, People don't even know the real, questions they are asking, to those of us who await to answer those questions..
|
|
Pillar of the Community
2087 Posts |
Well I bit the bullet I found a Minolta colour enlarger minus lens for sale on e-Bay.de ( this forum keeps on defaulting to dot com). It is very like some of the better Durst enlarger/copy stands( it has a vertical graduated riser, and it does not have an angled mount).
It only cost â¬14.00 Although the postage is more, even with the postage it is well with in the budget I had set. Its supposed to arrive next Friday...so when it arrives I will post photos and start looking at how I can convert it cheaply and effectively to a true copy stand.
Edited by austrokiwi
07/27/2013 3:32 pm
|
|
Pillar of the Community
2087 Posts |
The enlarger arrived today. Its huge. the baseboard and riser are exactly what I had hoped for. I have stripped off the light housing and the color filter unit. It looks like I am going to have to do some cutting with a grinder, but So far it looks far better than I had imagined. The arm operates by hooking into a sprung steel tape that acts to pull the arm up the riser. A lever operated brake stops it from moving upwards. This is better than I had imagined as I had been warned ( and heard of people damaging lenses) of the arm dropping( through poor handling) to far. The default with this particular stand is up!! I will post photos tomorrow. I anticipate it will take about a week to convert it properly.
|
|
Pillar of the Community
United States
3076 Posts |
in the end, the real deal is how you can mount the camera, and that the post is 90 degree's perpendicular to the table, you will notice, despite the BIG box that the enlarger is, somehow it needs to be attached to the "mast" or the shaft in which the camera or enlarger could move up or down....
For the price I think its a great gamble and learning experience.
Good lick and let us know what you found out....Gene
|
|
Pillar of the Community
2087 Posts |
Here are the some of the photos of the conversion process. The specs on the enlarger stand: 1989 Minolta Color Enlarger II. Height 92cm (36 inches) Baseboard dimensions: 54cm by 48cm (21 inches by 19 inches) Enlarger as unpacked:  Enlarger striped down but with bellows still intact.  At this point I realized that once I removed the actual bellows the bellows extension set up could be remounted on top of the horizontal arm ( made out of cast aluminum: 3mm thick). Now as yet I am not sure if this is a good idea but by using the bellows mechanism I can obtain fine control over raising and lowering the camera. the reason that it may not be a good idea is the possibility that the set up will be less stable( more vibration) however it is made out of solid metal and look cool so I will try it.....and if it proves to allow to much vibration I will remove it and mount the Tripod head to the main arm directly. 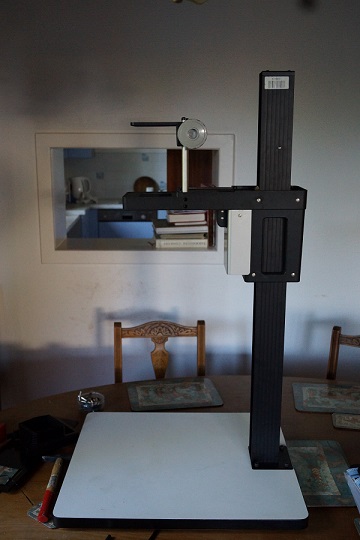 The following views from above showing the reversed bellows mount. These shots also shows where I am going to have to cut( hopefully its obvious) 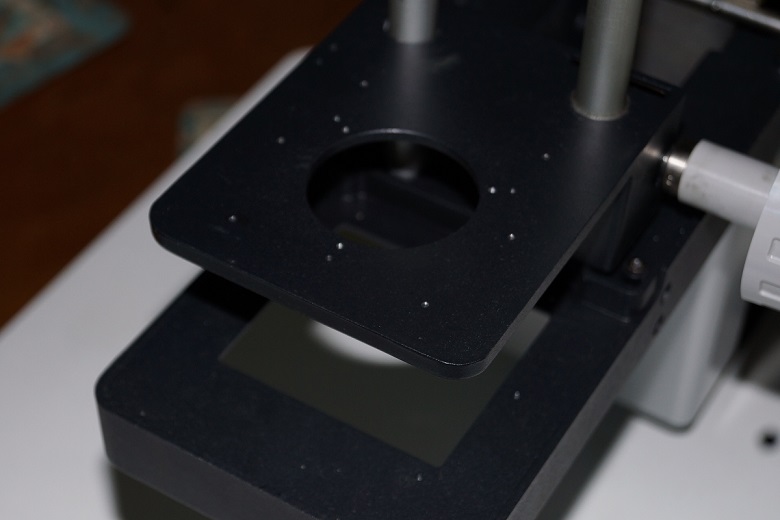 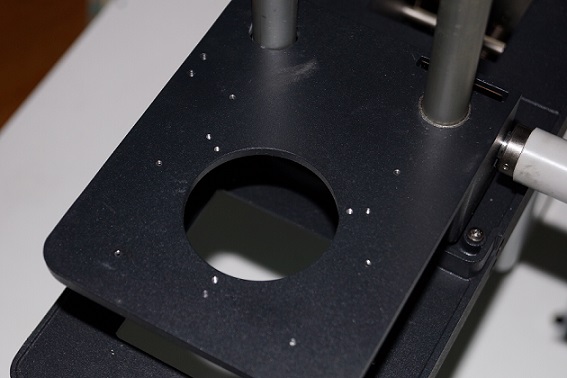 The final picture is of the back of the riser and shows the Steel tape spring that pulls the horizontal arm up the riser. Now I noticed that with out the enlarger equipment on the arm there was a tendency for the arm to slowly creep up the riser. Fortunately I discovered it was a mistake in how someone had last mounted the arm and I fixed that....but what this showed me was that Arm was designed to hold a lot of weight so I am considering mounting LED lights ( on extension arms) from that arm 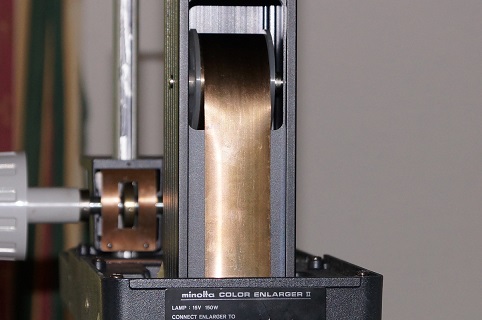 So far the only expense has been the cost of the enlarger (â¬14.00 + postage â¬40.00) I anticipate good tripod head with quick-release plate will cost around â¬30-â¬50.00) So I expect to finish this project around â¬130.00 ( about US$160 rough conversion) Edited by austrokiwi
08/03/2013 04:12 am
|
|
Pillar of the Community
United States
9792 Posts |
Nice looking so far, great project. I'd check local camera shops for used enlargers. They were so prevalent back around 2005 at our shop we were finding one or two left at our door every week. They mostly went to the trash as we couldn't sell them. Never thought about keeping one myself for a macro station.
"Buy the Book Before You Buy the Coin" - Aaron R. Feldman - "And read it" - Me 2013! ANA Life Member #3288 in good standing since 1981, ANS, Early American Coppers Member (EAC), Colonial Coin Collectors Club member (C4), Conder Token Collector Club member (CTCC), Civil War Token Society (CWTS) member, Liberty Seated Collectors Club (LSCC) & Numismatic Bibliomania Society member (NBS), USMex, Member in good standing, 2¢ variety collector. See my want page: http://goccf.com/t/140440 |
|
Pillar of the Community
2087 Posts |
Surgery is complete and I now have a copy stand. But there is still some finishing work. I cut the top( originally bottom) of the bellows mechanism and then fitted a camera mounting screw to the resultant platform. That then allowed me to attach a tripod head with quick release plate. Then I had to cut the main arm. It was obvious where to cut as the arm included the bottom support for the negative tray. it was that bottom support that had to be removed. I had a quick try out with my camera. Using the bellows mechanism was a good idea as it enables me to focus more finely by moving the camera up and down. The worry about more vibration doesn't seem to be a problem. I had mused about adding lighting fixtures to the arm. Now its almost complete I can see that is just not going to work. The final things that need to be done: there is a top piece that I need to cut to size and refit on top of the arm. This will stop dust collecting in the Lever brake mechanism. The last of course: painting,the cut aluminum just looks ugly. Now doing a comparison a new Kaiser copy-stand of equivalent quality would cost me around â¬460.00 (US$610.00) my costs: to date( need to add on paint later. â¬54.00 for the color enlarger( includes postage) â¬20.00 for Dremmel cutting disks ( got 10 used 1). Tripod head cost nothing as I used one from an old tripod I had( may still change it for a ball head) Camera mounting screw cost nothing I took it off a useless desk top tripod. 2 washers(â¬0.24.) So excluding paint total cost = â¬74.24 (US$98.58) So it came in cheaper than anticipated.  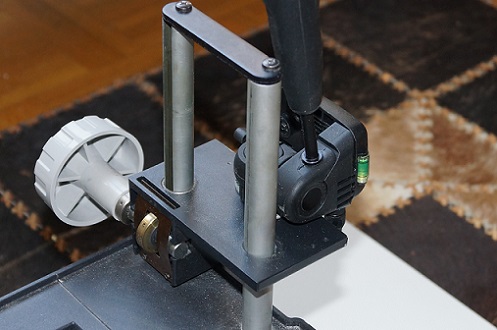 Edit: here is an ebay sale of the same enlarger I used. IMHO given the likely postage costs the seller is asking a bit too much...although I have seen some sellers asking US$200.00 for the same model in worse condition http://www.ebay.com/itm/Minolta-Col...em27d5fc79e9Edited by austrokiwi
08/04/2013 10:10 am
|
|
Moderator
United States
23522 Posts |
I am having a wonderful  with this. Thank you very much for sharing the process - it will become a reference guide for anyone doing it in the future. |
|
Pillar of the Community
2087 Posts |
Here is the final photo of the stand with camera attached. Should any one want to do the same here are some final comments. Tools used: Fine (small) electricians/jewelers screw drivers: some of the enlarger mounting screws that you need to take off seem better placed in a wrist watch) Power drill: Used to drill out the riveted ends of four aluminum posts. These posts were the support for the enlargers light source. electric screw driver Dremmel and 2.5 cutting blades( 1 suitable for aluminum and 1.5 for steel) The aluminum support arm cut easily. however the steel top plate went through 1.5 steel cutting disks. An angle grinder might have been a better choice for the steel top plate. Fine metal file and 300 grade wet and dry paper for finishing the cut surfaces. Automotive matt black paint..don't use a brush. Use either a paint roller or better use a spray can Be carefully reassembling the finished product some of the fixing screws are aluminum and a power screw driver can damage the screws' drive head. I would recommend you do it by hand( from my experience). I have no idea what other enlargers would work but I can say the Minolta Color enlarger II is an easy conversion. I also think you could do it much cheaper than I did (postage was by far the largest cost element). Probably hunting pawn shops and second hand camera stores could save heaps! if I take out the postage costs the final cost was about US$60.00. A big thank you to those who made comment early on in the thread. Getting an enlarger with a perpendicular riser was the most important advice that was given. I have seen some Minolta color enlargers for sale with out the base plate, IMHO opinion avoid those ones as from what I have experienced reproducing a base plate would make the project much harder. Final note: if any one else tries it please post how it worked for you.  Edited by austrokiwi
08/06/2013 04:58 am
|
|
Pillar of the Community
2087 Posts |
I have spent four months using this copy stand and it has been modified further: The tripod head I was using to mount the camera was just too cheap. It was replaced with a Manifrotto ball head. I then obtained a Minolta III bellows. Using a cheap focusing rail and a Manifrotto clamp I attached this to the moveable platform on the left side ( see photo). The clamp was multipurpose and allowed me to mount a 5600K LED lamp. Early on in the apation of the enlarger stand I had thrown out the idea of attaching lights to the platform. However I revisited the idea as mounting the LED light actually produced better lighting and got it out of the way ( so to speak). A simple ball head had come with the clamp and the LED light is mounted on that ball head. I can adjust the angle of the LED light easily( in the photo the light is pointed directly down). I have been trying out the bellows set up..however the cheap modern focusing rail is not good. I am now hunting for a bellows focusing rail that will allow the fine control that is needed. The lesson learned here where ever possible buy a bellows with a focusing rail. The following photo was taken with my daughter's camera( mine was on the bellows) Its not a great picture but it gives an idea of the almost completely fine tuned set up.  Picture with the camera mounted to the main Manifrotto Ball head( Gives much better perspective:  Edited by austrokiwi
10/05/2013 10:33 am
|
| |
Replies: 15 / Views: 11,765 |
|


