| Author |
 Replies: 14 / Views: 2,883 Replies: 14 / Views: 2,883 |
|
|
New Member
United States
21 Posts |
Hello everyone, I've been gathering tips from previous posts for a while and am beginning to order supplies for my coin photography set-up but since I am new at this I'd like to double-check the validity of my set-up before I spend the money.
For regular coin photos:
T2i > EOS-M42 adaptor > Vivatar bellows > M42-M39 adaptor > 75ARD1
For 4x magnification:
T2i > EOS-M42 adapter > M42 extensions > M42 focusing helicoid > M42-RMS adapter > RMS 4x objective
Both of these set-ups would use a copy stand and the camera would be tethered to my computer. I would use CombineZP for coins that require photo-overlap focusing.
Is there anything that I could be doing better or any advice that you could give me on this set-up. Thanks for your time. I'm excited to get everything together and begin photography.
|
|
|
|
Moderator
 United States
23522 Posts |
I don't even know you, but I already like you.  1) A 75ARD should already be M42; no adapter. I imagine it was also available in M39, so look closely. Keep in mind, any number of very much cheaper lenses will come so close to duplicating the rather expensive Rodenstock's result that one will not be able to see the difference in an image posted here. Those of us who are fanatics about this part of the hobby are seeking the last few percentage points of quality, and it may be that (depending on your intended usage) you won't need to drop the $300 or so you can reasonably expect to pay for a used 75ARD. Have a look at rmpsrpms' "Cheap lens shootout" thread to see some very capable, very cheap lenses. 2) The Vivitar bellows is good, but not the only appropriate one for your needs. You could perhaps ask here when you find something interesting, or when rmpsrpms reads this he'll probably have ideas for you. And keep in mind, the bellows will provide magnification but not focus (necessarily); you'll want a copystand with pretty fine adjustment. 2) You may wish to hold off on the higher mag objective for the moment. A 75ARD - even the one maximized for 1x, which is the one you want - is still pretty happy at 2x. That, in combination with the enormous (in terms of megapixels) sensor of a T2i, might just provide enough magnification for your intended purposes. 3) You haven't mentioned it, but I trust your already-proven research skills to have provided you a good idea of what you want for lighting. Within the next week-and-a-half I'll be writing and posting a tutorial on tethered shooting with Canon's bespoke software, and I'm hoping to lean on one of the other fans for something similar on the subject of Z-stacking. Welcome to the club. |
|
Pillar of the Community
United States
4038 Posts |
Sunshine...it's nice to see that what we've been writing about here is being read and understood, and it looks like you've put a good amount of thought into this. I have a few more comments to add to what SD has said... - If you have the disposable funds, by all means go for the 75ARD1 with variable aperture. If funds are tight, you could go with the fixed aperture 75ARD1 rather than variable, though this may result in you doing a bit more focus stacking than you are probably intending to do. Or, you could go with another 75mm lens like the Nikon or an EL-Cheapo (see my ongoing thread for suggestions) and even buy several EL-Cheapos of different focal lengths to test your system for what works best for you. - You spec M42 on either side of the Vivitar bellows but that will depend on which bellows you get. If you get the regular Vivitar Bellows that is part of their "system" with macro stand, focus rail, etc as options, then you will need to get T-Mount adapters rather than M42. T-mount is 42mm diameter but with a 0.5mm pitch, while M42 has 0.75mm pitch. If you get the Vivitar Triple Track bellows, it comes in different options (including both M42 and T-mount) so be sure you know what you're getting. There are many bellows options so once you find something you like post again and we'll give you advice. - For the high mag setup, I am a big fan of the tapered adapter provided by the seller jinfinance on ebay. He's an excellent resource for these things, and often has odd adapters no one else has, or will even make you one for a good price. The cone type has the advantage of offering both thread adaptation and extension. Keep in mind the required extension includes the camera register distance, which is something like 44mm for your Canon. FYI, I worked with a guy over on CU forum to put together a similar setup, and it works well for him for variety shots. Ray Contact me for photographic equipment or visit my home page at: http://macrocoins.com |
|
New Member
 United States
21 Posts |
I think I'm pretty set on buying a 75ARD1. The photos I'll take will partly be for my own enjoyment and partly be used to archive some of my grandfather's old collection. I figure it'll pay for itself eventually since I wont have to pay TPGs to take pictures for me. As far as bellows goes I'm looking at something like this: http://www.ebay.com/itm/Vivitar-Mac...em565a640c35I'm worried a little bit about fine focus adjustment for both of the set-ups I described above. Would a bellows like this one be used to help focus or does it not serve that purpose? If the instrument of fine focus is the copy stand then could you suggest some that do the job well? Got a couple of jansjo for lighting. Is two enough or should I get a third? Thank you both for your quick replies. You guys are pretty awesome. -Grant |
|
Pillar of the Community
United States
4038 Posts |
That Triple Track Bellows (TTB) is excellent. I like to use them for "short" setups where the height of the bellows needs to be approx the same height as the camera. The only disadvantage it has is lack of a focusing rail, so as you have noted it will need a copy stand with focus adjust, or a separate focusing rail. Some of the guys here (and on other forums as well) use modified microscope stands to mount their bellows. I've built a bunch of these from Bausch & Lomb "A" stands, removing the mounting hoop for the StereoZoom pod and replacing it with a 1/4" aluminum bar to mount the bellows on. However, the TTB is a bit too short, resulting in the optical center of the bellows to be significantly offset from the physical center of the stand, uncomfortably close to the upright. A similar problem occurs when I mount a bellows that is too "tall" for the modified A-stand, such as the Canon Auto Bellows, the Nikon PB4 or PB6, etc. These all end up offset far away from the upright, uncomfortably close to the edge of the stage plate. The best bellows for use with the modified A-Stand are the Pentax Auto Bellows and a modified version of the Vivitar Bellows System Bellows. Both of these place the optical center very close to the physical center of the stand. An alternative is to use a different bellows mount. B&L made a special mount that works with their MonoZoom7 microscope pod rather than StereoZoom, and this mount is "just right" for mounting either the MonoZoom7, a short bellows like the TTB, or a camera directly to the mount. I have built just one of these (custom-configured for SD), and gave it the name "Santoku" to honor its 3 uses.
If you get another type of copy stand that has a reasonably-fine vertical adjustment capability, you can mount the TTB directly to it and all should work well as long as the copy stand has some "reach" to its physical center. Most any stand designed for direct camera mounting will work well. You could also get a focus rail with a fine-adjust capability, and mount it to a coarse-adjust copy stand or to a tripod, and it should work well, though typically tripods are not as stable as copy stands so vibration is more difficult to control.
Hope this helps...
Ray
Contact me for photographic equipment or visit my home page at: http://macrocoins.com |
|
Moderator
United States
23522 Posts |
Here's Santoku, as built by Ray using the Vivitar Triple Track. The only shortcoming is that the fine focus adjustment is a tiny bit too coarse for Z-stacking, but that's easily rectified by field-engineered methods to effectively increase the diameter of the adjustment knob. The mechanism itself is more than capable of sufficient resolution. 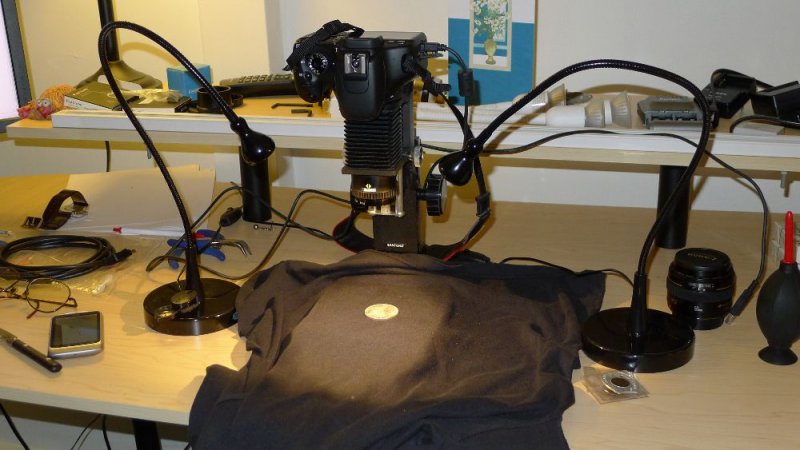 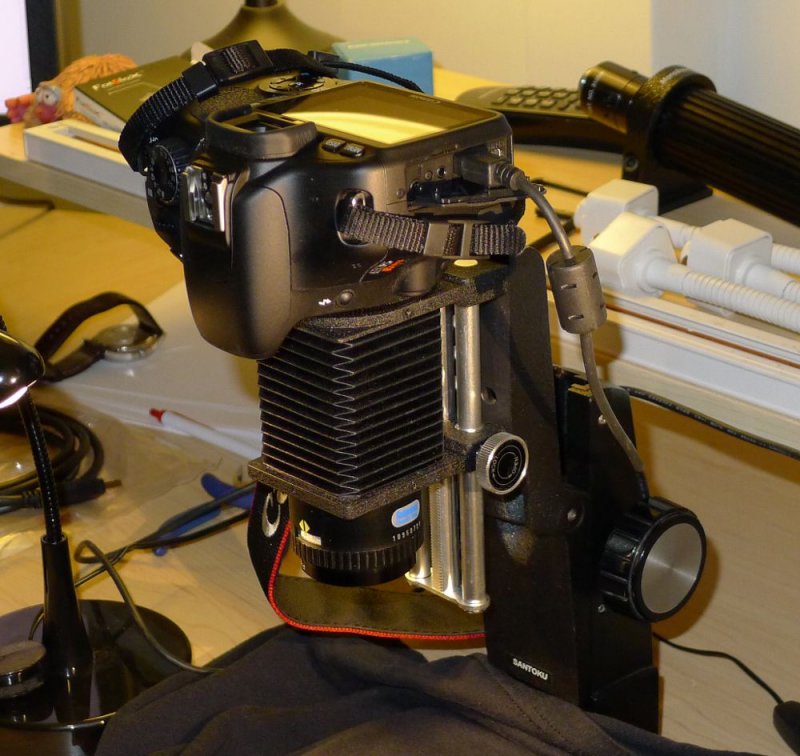 With a point-and-shoot mounted, an LX-5 I tested for CCF, to show the various mounting options:  Full configuration, as I shoot with it:   If there is any light bleed from the monitors, I'm unable to see it in the images. |
|
New Member
United States
21 Posts |
Love the pics. They are very helpful. I've order most things I believe I'll need and I think that I'll probably try to find a copy stand that has a good fine focus adjustment. I've been looking at some Kaiser copy stands and they look pretty good to me. When everything comes together I'll take my own pics and reply on this thread again but that might not be until mid September.
Oh, one more question. As far as background goes do you always prefer a black background or do you use different backgrounds for different types of coins? It looks like you use just a black shirt as background in the photos above.
|
|
Pillar of the Community
United States
9792 Posts |
Great set-up plans, my 75ARD1 was a 39mm thread and I needed an adapter to make it an M42 to fit on my Pentak Auto Bellows II mount.
"Buy the Book Before You Buy the Coin" - Aaron R. Feldman - "And read it" - Me 2013! ANA Life Member #3288 in good standing since 1981, ANS, Early American Coppers Member (EAC), Colonial Coin Collectors Club member (C4), Conder Token Collector Club member (CTCC), Civil War Token Society (CWTS) member, Liberty Seated Collectors Club (LSCC) & Numismatic Bibliomania Society member (NBS), USMex, Member in good standing, 2¢ variety collector. See my want page: http://goccf.com/t/140440 |
|
Moderator
United States
23522 Posts |
Quote:
As far as background goes do you always prefer a black background or do you use different backgrounds for different types of coins? It looks like you use just a black shirt as background in the photos above. Black, white or grey. No color. I lean towards black only to minimize the chance of light being reflected back up into the lens, which is apparently irrelevant because I get decent results with white too. However you like the presentation is how you should shoot it. |
|
Pillar of the Community
2087 Posts |
Good set up thanks for posting the photos
|
|
New Member
United States
21 Posts |
Just got everything together. Here's the first coin that I've shot so far. Comments and questions? 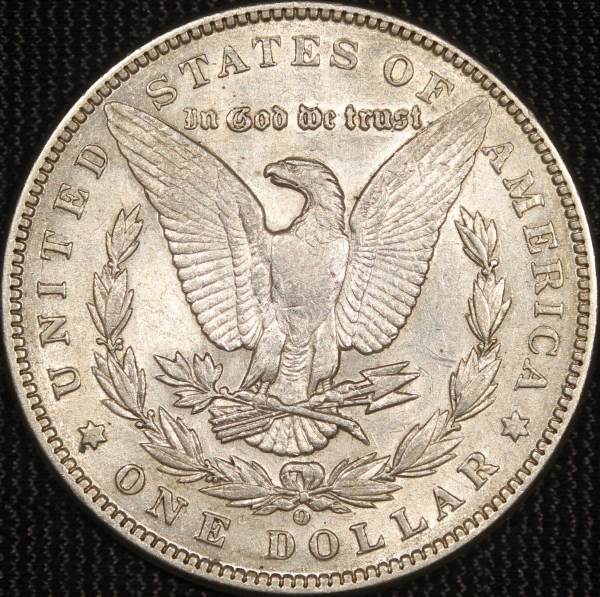 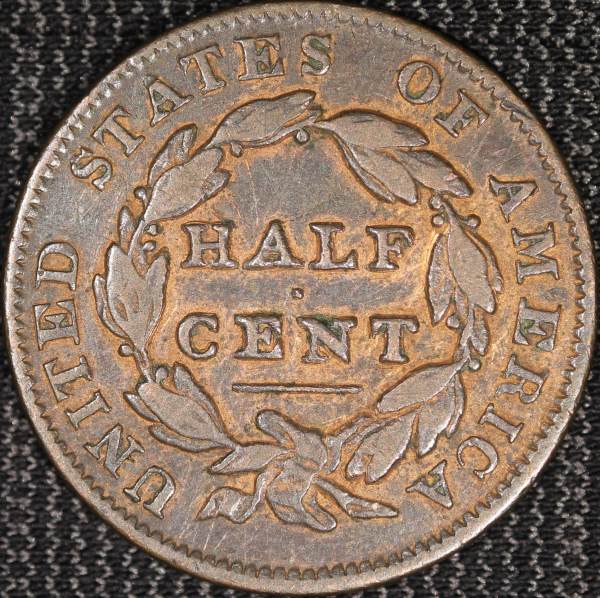 |
|
Moderator
United States
23522 Posts |
Looks like a very solid effort. I wonder if it's a bit overexposed to be showing the color/character of the coin fully, but you'd have to be the judge of that. What were the camera settings for this shot, and did you fill the sensor with it?
|
|
New Member
United States
12 Posts |
I don't us any background during photography. I set the coin on a cheap light box from ebay. The coin rests on a glass, while a small light projects upward...around the coin. The advantage is being able to not have to crop the edge of the reeding. This also works great for irregular shapes!like Medals or cobs.... See pic. 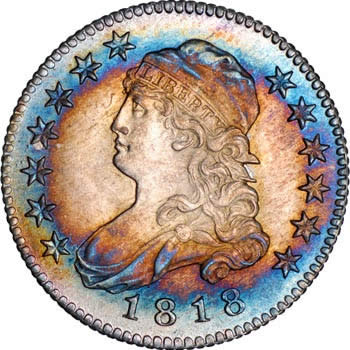 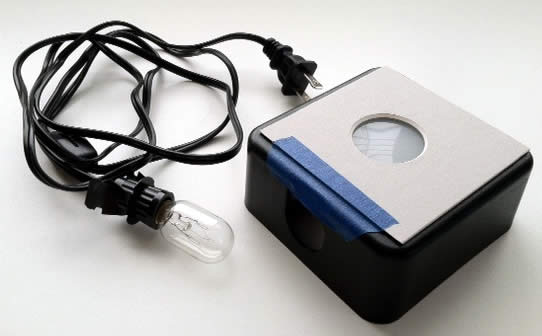 |
|
Pillar of the Community
United States
5825 Posts |
Two things I do just to help make sure with respect to vibration;
1. I set my DLSR to delay exposure for a few seconds so things will settle.
2. I use a remote wireless shutter release, again for vibration control.
There is a third thing I tried but it appears to be more trouble than it's worth.
I can fix the mirror up out of the way before taking an image.
Supposed the vibration of the mirror flipping up can affect your focus.
IMO that will only be significant on extreme close-ups of fine details.
I abandoned that technique.
|
|
Pillar of the Community
United States
4038 Posts |
Quote:
Just got everything together. Here's the first coin that I've shot so far. Comments and questions? Sunshine, did you ever take any more pics? Would love to see them... Contact me for photographic equipment or visit my home page at: http://macrocoins.com |
| |
Replies: 14 / Views: 2,883 |
|


