| Author |
 Replies: 14 / Views: 2,283 Replies: 14 / Views: 2,283 |
|
|
Pillar of the Community
United States
5964 Posts |
Questions, answers, and comments are more than welcome concerning taking great pictures and editing them. This is extremely important in order to have coins accurately evaluated.
I can help with taking pictures, but need help with editing them.
Would someone tell me if there is a particular order in which editing should be done? Is there an ideal size? What is "horizontal"? Is there something about editing that a novice should know?
|
|
|
|
Pillar of the Community
United States
5825 Posts |
For editing (or "adjusting") pictures I recommend looking into Photoshop Elements.
|
|
Moderator
 United States
23522 Posts |
Few quick thoughts: 1) Need to know what you're using for equipment, and a couple sample shots to see where we can help you improve. 2) Processing happens in this order for me: Crop to just the coin (always), Sharpening (optional but usually used), Color adjustments (as necessary), sizing to posting size (always), Contrast (usually). Others might advise flipping Sharpen and Color. 3) Aim for a final image size (if possible) of 800 pixels in diammeter and a filesize about 200-225kb. This is doable even with dSLR-size images. The coin should be oriented vertically for ease of viewing. 4) Use a monochromatic background, no color. Black and gray work best. 5) Each shot you keep should have 3 copies - the untouched original (always Save As), the fully-processed fullsize copy, and the posting-size copy. Always keep the original untouched. I am unqualified to recommend graphics programs, as I've been working with them for 30 years and don't know what's best for non-professional needs. I use the Gimp which is free, extremely powerful and not at all user-friendly unless you're an expert. So ask questions. Spam us with questions. What do you need to know next?  |
|
Pillar of the Community
United States
4038 Posts |
I view the image coming out of the camera a "raw material" because it always needs some sort of editing to make it publishable. Always. Once you accept this you will make changes to the way you work in order to make the in-camera image as editable as possible.
Many folks use RAW processing to accomplish this, but RAW on its own is not enough. You MUST make sure that the image is not over-exposed, or even RAW processing will be futile. This is why I recommend moderate under-exposure to ensure capturing the highlights in full detail.
Just as important is to ensure the Red color channel does not compress, since the luminance is mostly in Green and the camera will push Red to saturation even while it significantly under-exposes Green. I'm particularly sensitive to this since most of my photography is of Cents, which have strong Red. Over-exposing on Red changes the overall color of the coin, which is obviously undesirable. Turning down Saturation helps with this, keeping Reds or Blues from being over-exposed.
Overall under-exposure and reduced saturation pushes down the blacks even further, but they can be recovered with RAW techniques. If you prefer shooting jpg (as I do) then minimizing the in-camera contrast can ensure the dynamic range of the image is well-compressed and that the darker areas are not pushed to black during jpg conversion.
What you end up with is an image that is easy to adjust for publishing, ie good "raw material" for post-processing and publishing.
|
|
Pillar of the Community
 United States
5964 Posts |
 This is what I have been after, detail. I really appreciate your help. Edited by CoinMasters
03/26/2015 01:45 am
|
|
Moderator
United States
23522 Posts |
We still don't know what equipment you have to teach you. Are you planning on purchashing new gear, or going to use what you have?
|
|
Pillar of the Community
United States
5964 Posts |
I have a Nikon coolplix S6800. I shoot through the top of a 45 degreed glass into a wooden box that has a neutral colored piece of cardboard on the bottom of it - while shining a led light horizontally at the underside of the glass. I never edited any of my previous pics, in my nx2 software or the camera. I recently discovered that I can magnify the pics either before or after I send them to my computer [not sure which is best], thus enabling me to show detail at the forum. As I am a dinosoar, with computer tech, I am happy with that. I created this thread at Coop's recommendation so that all can post on it and learn. I will continue to monitor and offer assistance as I know others like yourself will.
|
|
Moderator
United States
23522 Posts |
OK, that's enough info for me to feel like I can be helpful. First, there's a limit to how much magnification your camera can give you. You cannot enlarge an image without losing detail; it violates the laws of physics. You can usually fudge a little in without wrecking the image, but if you're looking to do mint mark details you are not getting there with this camera. It lacks the ability to shoot a large-enough image, and I don't believe there's any sort of add-on lens which can mount to it. So the threshold is fairly low; this camera is designed for trips to the park in your pocket, not macro shooting. That said, it's 16MP and has a minimum focusing distance of 2cm. If you can figure out lighting at that distance, you might be surprised at the results. The possibility exists that your images are larger than you think. The computer is unlikely to show you the image full-size. As you've mentioned being a bit of a dinosaur, I have to ask if you're familiar with image sizes and how all that works. As far as processing goes, never do anything in the camera that you can do at the computer. The computer is a far stronger tool, the camera kinda crude by comparison. So let the camera do as little as possible. It's been a very_long_time since I've magnified an image, so I don't know where it would fit in the postprocessing workflow. Think I'd try doing that first, before any further step. I think magnifying Sharpening and Contrast would screw up their effect. Your axial lighting setup is preventing you from getting the camera anywhere near enough to the coin to use its' capabilities. On the other hand, lighting becomes more difficult the closer you are to the coin. |
|
Pillar of the Community
United States
5964 Posts |
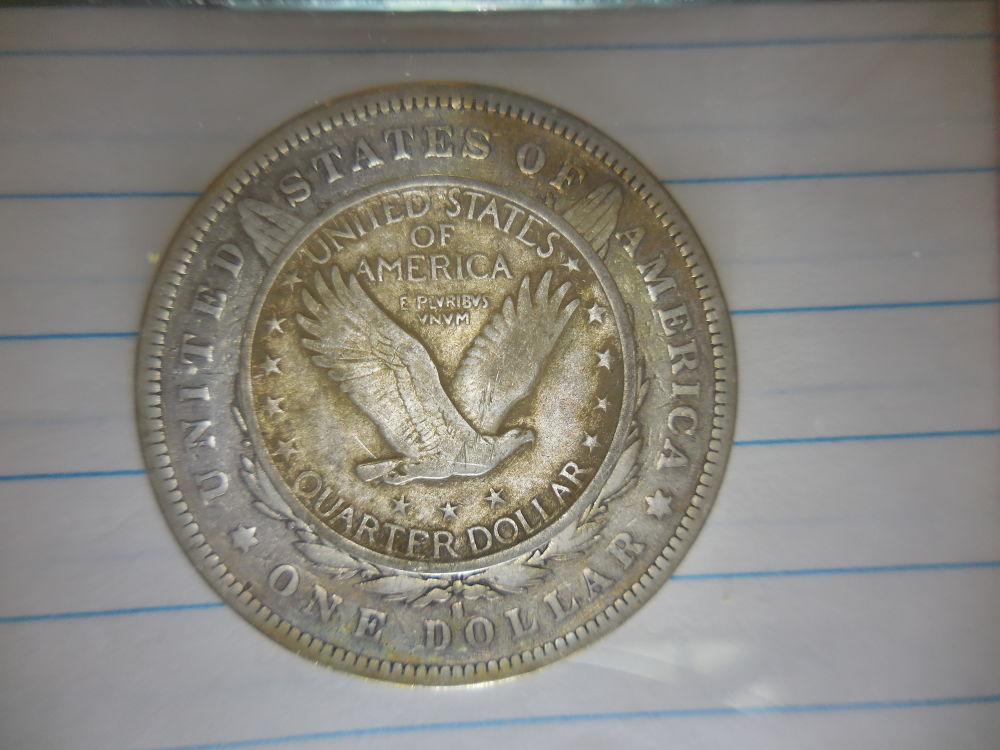
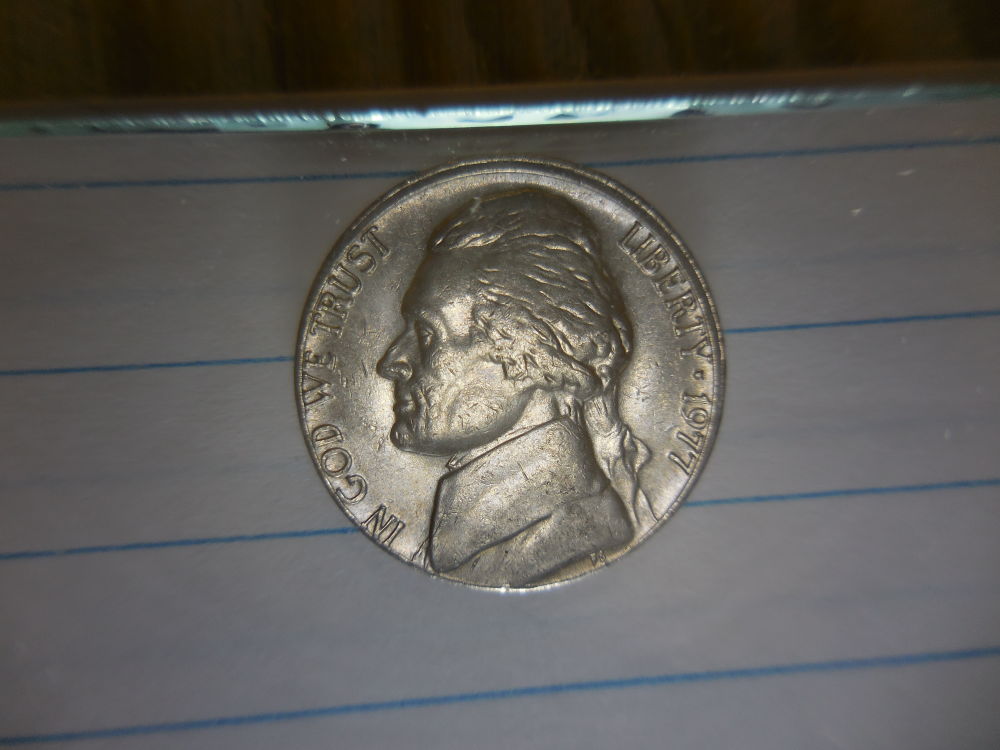
Thanks SsuperDdave, In photography, I have nowhere to go but up. I went into the nx2 software and got the following info about the camera: image size 4608x3456,,focal length 4.5mm,,digital zoom ratio 1.00,, converter:,, focus mode: af-s,, vr:on,, In addition, I got the image settings as follows: white balance,, noise reduction-off,, active d lighting,, and skin softening-off. I know very little about most of that stuff.
I do know: I have the camera set to macro mode, I place the coin towards the bottom of the glass so I can get the lense about 1 inch from the coin. I know nothing about image sizes.
I tried magnification on the camera on the image above, and it looks exactly like looking at the coin with a loupe. However, It did lose detail outside of the "focus box". So I crop it and take another pic without magnification to show the whole coin.
I will post some non-edited and non-magnified pics here.
They may have gone through the free image resizer.
Edited by CoinMasters
03/26/2015 11:03 pm
|
|
Pillar of the Community
United States
5964 Posts |
|
|
Pillar of the Community
United States
5964 Posts |
|
|
Pillar of the Community
United States
5964 Posts |
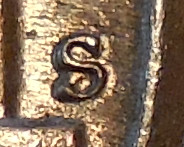
Quote:
Your axial lighting setup is preventing you from getting the camera anywhere near enough to the coin to use its' capabilities. On the other hand, lighting becomes more difficult the closer you are to the coin. I raised the glass just enough to slide only the mintmark under it. This enabled me to get the lense super close to the coin and still have light. I hope this helps others like myself with inexpensive cameras. 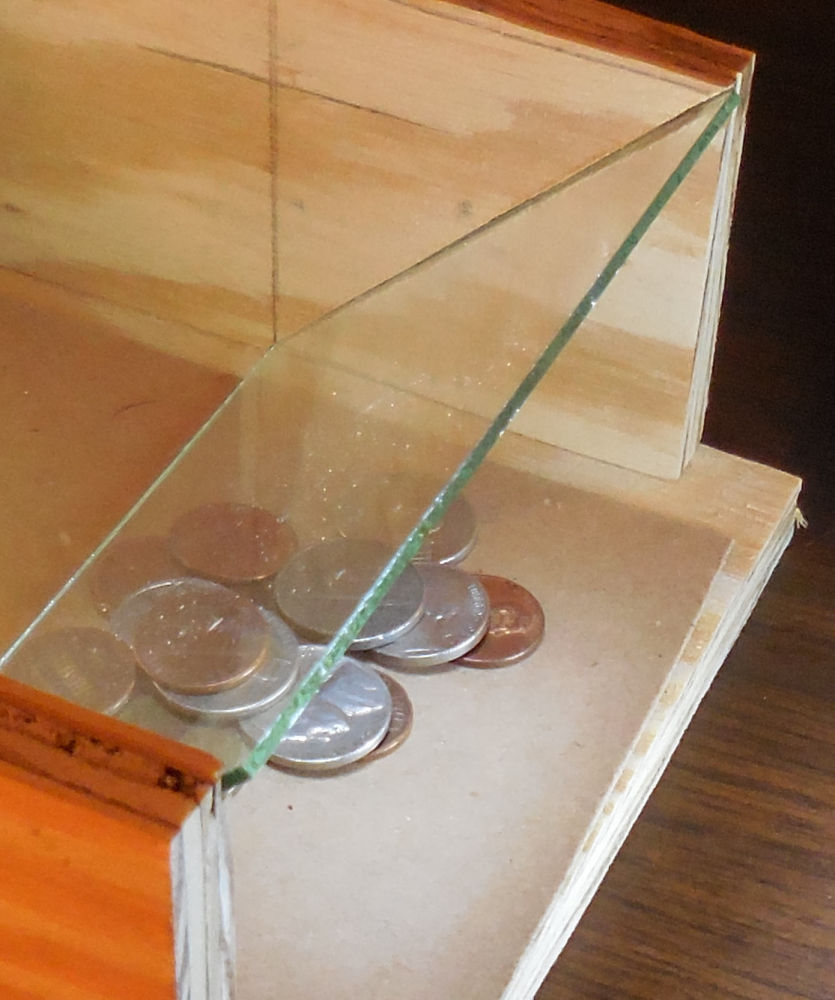  Edited by CoinMasters
04/02/2015 09:12 am
|
|
Pillar of the Community
United States
5964 Posts |
It puts the lense much closer to the coin, and still provides light.
Edited by CoinMasters
04/02/2015 09:10 am
|
|
Moderator
United States
23522 Posts |
I still do not understand why you are limiting yourself with axial lighting. Without expensive beamsplitter glass you only get 25-30% of the light you're using - the rest is lost - and it forces your camera into low-light settings. It's a huge compromise in capability only useful for toning and Proofs.
|
|
Pillar of the Community
United States
5964 Posts |
I have no aspirations of being a master photographer, SsuperDdave . ( I feel like I'm stuttering when I type your name). My only interest in photography was to get me to the point where I could present discernible coins here. I have listened to everything you have told me. Being limited as I am, I have applied what I have learned from you, and others. This has brought me to a point now where I am satisfied with my pictures and grateful for your help.
|
| |
Replies: 14 / Views: 2,283 |
|