Coin Community Family of Web Sites Join Thousands of Coin, Bullion, & Money Collectors
Royal Estate Auctions - $1 Coin AuctionsVancouvers #1 Coin and Paper Money Dealer 300,000 items to help build your collection! Specializing in Modern Numismatics Coin, Banknote and Medal Collectors's Online Mall Royal Canadian Mint products, Canadian, Polish, American, and world coins and banknotes. Join Thousands of Coin, Bullion, & Money Collectors


Username:
Password:
Save Password
Forgot your Password?


This page may contain links that result in small commissions to keep this free site up and running.

Welcome Guest! Registering and/or logging in will remove the anchor (bottom) ads. It's Free!

My Process For "Re-Flipping" Lots Of Coins In 2x2 Cardboard

To participate in the forum you must log in or register.
Author Previous TopicReplies: 26 / Views: 8,661Next Topic
Page: of 2
New Member
United States
13 Posts
 Posted 07/19/2015  3:48 pm  Show Profile   Bookmark this reply Add Baltika to your friends list Get a Link to this Reply
@llewellin

I should have realized that you weren't stapling at 45 degrees with 3 staples. I haven't done the actual math on this, but I think that you could lay out a jig to do the 30 degree staples.

I did a quick sketch...assuming you want ~1/4" from edge to the 6 o'clock staple

The jig would utilize 6 posts (1/8" dowels). One each at points A, B, C, D and two somewhere along line Q.

Posts A, B, C, D are all ~ 1 3/16" from the origin (labeled X).
A at 180 degrees, B at 150 degrees, C at 30 degrees and D at 0 degrees.
Point S is the stapler head and is 3/4" from X.
Line Q is 1" from X and the two posts on line Q are positioned based on the width of your stapler.

To use the jig:
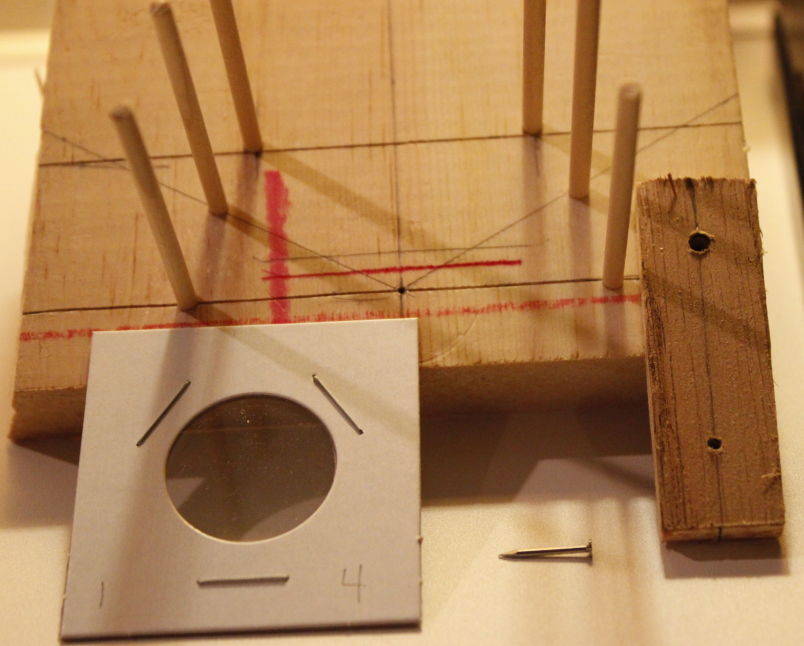
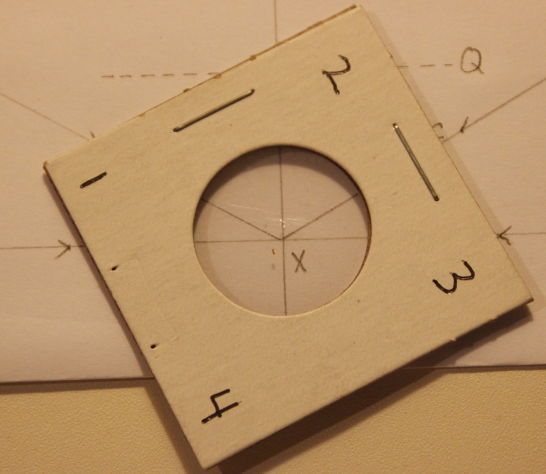
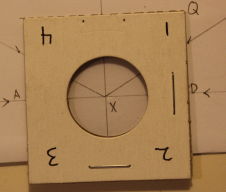
Label the 4 corners of a 2x2 as corners 1, 2, 3, 4 -starting with 1 in the lower left corner, clockwise around
for the 10 o'clock staple, put corner 1 on posts A and B and the side resting on D.
for the 2 o'clock staple, put corner 4 on posts C and D and the side resting on A.
for the 6 o'clock staple, put side 1-4 against the posts on line Y

If someone ends up building this, double check the measurements before you start working on this. The exact placement of the points probably needs to change slightly based on posts with actual diameters instead of just points. Of course, it's probably close enough to not matter too much...


My-Process-For-

My-Process-For-

My-Process-For-

My-Process-For-
New Member
United States
13 Posts
 Posted 07/19/2015  3:58 pm  Show Profile   Bookmark this reply Add Baltika to your friends list Get a Link to this Reply
@sel_69l

Do you have any pictures of the 8 staple dollars?

That's also interesting information about the polypropylene pages not holding the 2x2 holders well - so you curve clinch them. I'm ordering a box of 100 polypropylene pages soon, and will stop flattening the staples until I get the pages - that could save a lot of time and a could determine whether investing in a flat clinch stapler makes sense for me.

Thanks for the info!
Bedrock of the Community
Earle42's Avatar
United States
10038 Posts
 Posted 07/19/2015  5:51 pm  Show Profile   Bookmark this reply Add Earle42 to your friends list Get a Link to this Reply
This is a great idea.

Thanks for sharing it. I can envision a set screw protruding from the front to move the stapler back a bit depending on the coin. Half dollar and dollar holders have less "white space" and the staple for a smaller coin would end up in mylar.

This definitely would make things look great. I wish I had thought of it years ago.

How much squash could a Sasquatch squash if a Sasquatch would squash squash?
Download and read: Grading the graders
Costly TPG ineptitude and No FG Kennedy halves
https://ln5.sync.com/dl/7ca91bdd0/w...i3b-rbj9fir2
New Member
United States
13 Posts
 Posted 07/19/2015  6:54 pm  Show Profile   Bookmark this reply Add Baltika to your friends list Get a Link to this Reply
@Earle42

You envision a set screw sticking out of the front...of what? The stapler, or the jig? :)

For this setup to be functional:
Since the fences/posts are fixed, the position of the stapler needs to be adjustable
For the stapler position to be adjustable, the sides of the stapler need to be parallel
Some kind of set screw for the front (this is not clear in my head), or a stop block behind the stapler would make sense to adjust the point "S".

In my head, I'd make the seat for the stapler long enough so that the point "S" and the line "Y" intersect. Then I'd make stop blocks of certain sizes to put behind the stapler, pushing the stapler (and point "S") closer to the user. Large dollars might get 1/16" blocks, quarters might get 1/4"...

Of course I'd never use just 3 staples on a 2x2...so this setup is all just academic for me. If anyone actually makes it, I'd love to see a picture though.
Bedrock of the Community
Earle42's Avatar
United States
10038 Posts
 Posted 07/19/2015  7:23 pm  Show Profile   Bookmark this reply Add Earle42 to your friends list Get a Link to this Reply
I mean a set screw coming out of the front of the jig - parallel to the surface its sitting on - to push the stapler backwards away from the front area where the stapler contacts the inside front edge of the jig.
How much squash could a Sasquatch squash if a Sasquatch would squash squash?
Download and read: Grading the graders
Costly TPG ineptitude and No FG Kennedy halves
https://ln5.sync.com/dl/7ca91bdd0/w...i3b-rbj9fir2
New Member
United States
13 Posts
 Posted 07/21/2015  10:31 pm  Show Profile   Bookmark this reply Add Baltika to your friends list Get a Link to this Reply
@llewellin @Earle42

I ended up making the jig, just to prove to myself that it would work.
Took about 30 minutes. My inner OCD child is sated for the time being.

Make a jig for the hole placement. 2" piece of scrap, it pivots on a wire nail with a 1/8" hole about 1 1/4" from the pivot
Layout the two 30 degree angles with a protractor.
Tack the hole placement jig in place and use it to drill the 4 angled holes
Measure up 1" and drill two holes just barely wider than your stapler
With the 6 dowels in place, you're ready to find the right stapler position (in my case the dark red line indicates the front of the stapler position)

My-Process-For-
Bedrock of the Community
Earle42's Avatar
United States
10038 Posts
 Posted 07/22/2015  12:12 am  Show Profile   Bookmark this reply Add Earle42 to your friends list Get a Link to this Reply
Here is a simplistic pic of what I was referring to, Looking down on the top of the jig with the stapler's top part opened all the way so its bottom is exposed:


My-Process-For-
How much squash could a Sasquatch squash if a Sasquatch would squash squash?
Download and read: Grading the graders
Costly TPG ineptitude and No FG Kennedy halves
https://ln5.sync.com/dl/7ca91bdd0/w...i3b-rbj9fir2
New Member
United States
13 Posts
 Posted 07/26/2015  10:45 pm  Show Profile   Bookmark this reply Add Baltika to your friends list Get a Link to this Reply
@sel_69l


Quote:
Polypropylene and Mylar album pockets do not hold the 2x2's so well as the PVC album pages; the 2x2's can fall out if the album is not handled carefully.
The solution to this problem is to curve clinch the staples, thus effectively increasing the thickness of the 2x2's. Such an approach provides a reasonably effective way of stopping the 2x2's from falling out of the album.


The pages that I ended up with are the 20 pocket polypropylene from BCW and they do not have the problem with my 2x2's wanting to fall out if not handled correctly. I do know that my 2x2's are not really 2"x2", they're really 2" x 1 15/16". If I turn my 2x2 sideways, it is rather loose in the pocket and would be apt to fall out if not handled correctly.

Perhaps the 2x1.9375 is a common "design"/"flaw" and switching the orientation of the 2x2 would allow you to start flat clinching again? Assuming that you *want* to flat clinch or the added step of crimping with pliers.
Moderator
Learn More...
jbuck's Avatar
United States
189120 Posts
 Posted 07/27/2015  09:43 am  Show Profile   Bookmark this reply Add jbuck to your friends list Get a Link to this Reply
I noticed the same thing. The 2x2s I have bought over the last few years are not square and inserting them "wide" makes for a more secure fit in the pocket.
New Member
Malyucov's Avatar
Ukraine
6 Posts
 Posted 01/12/2023  06:10 am  Show Profile   Bookmark this reply Add Malyucov to your friends list Get a Link to this Reply
Hi. Greetings from Ukraine. I have made 3D printed stapler jigs for all sizes PCCB cardboard holders. Do you like tis?
My-Process-For-
Moderator
Learn More...
jbuck's Avatar
United States
189120 Posts
 Posted 01/12/2023  10:56 am  Show Profile   Bookmark this reply Add jbuck to your friends list Get a Link to this Reply
Looks impressive! A nice way to get consistent staple locations.
  Previous TopicReplies: 26 / Views: 8,661Next Topic
Page: of 2

To participate in the forum you must log in or register.


Disclaimer: While a tremendous amount of effort goes into ensuring the accuracy of the information contained in this site, Coin Community assumes no liability for errors. Copyright 2005 - 2026 Coin Community Family- all rights reserved worldwide. Use of any images or content on this website without prior written permission of Coin Community or the original lender is strictly prohibited.
Contact Us  |  Advertise Here  |  Privacy Policy / Terms of Use

Coin Community Forum © 2005 - 2026 Coin Community Forums
It took 0.36 seconds to rattle this change. Forums