| Author |
 Replies: 55 / Views: 7,108 Replies: 55 / Views: 7,108 |
|
|
|
Valued Member
 United States
397 Posts |
Ray, I know you accustomed with my setup. This is probably asking a great deal. But what is the best method or beginning adjustments to make. It took me about an hour and 45 minutes to take these two pics. There are two adjustments to make on the main stand, the lower with the large grey knobs and the upper. Then there are two adjustments on the bellows, lower and upper. I'm basically getting the coin close to fitting the screen with the large grey knob and then the top. Then I start working with the to adjustments on the bellows. I do understand most of this is just going to take practice, lots of practice. I'm just hoping you have a tip or two to make the learn curve somewhat smoother. You also mentioned in an email about remembering where I started with different size coins. I guess maybe I can take some measurements and write them down? Rocky I believe the camera may have been out of alignment. The pictures are no longer rotating on me. Let me know what you think about these two. As always thanks so much....Jim 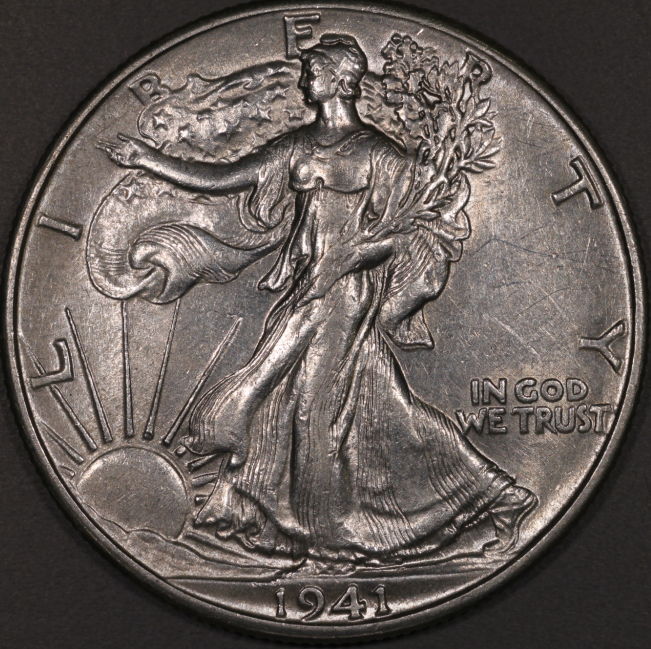 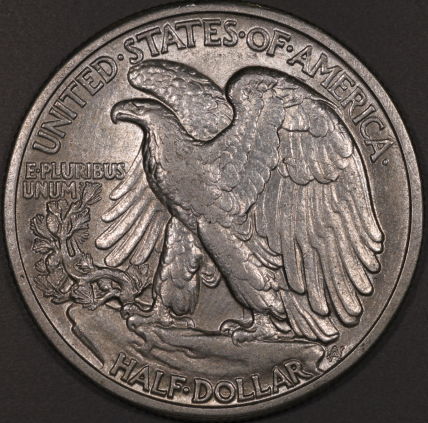 |
|
Pillar of the Community
Canada
9157 Posts |
Pics look good but you are the one that can tell if they are the same as the original, dull or luster.
Ray will be by to tell you what's what.
|
|
Pillar of the Community
United States
9395 Posts |
Pics look good to me, but I'm certainly no expert at coin photography.
|
|
Pillar of the Community
 United States
4037 Posts |
Jim,
There are really just two things to adjust:
Bellows extension. This is the distance between the camera mount and the lens mount. Bigger extension gives higher magnification.
Working distance. You can adjust it either with the grey stand knobs, or the bellows rail. Both do the same thing. I recommend mainly using the grey stand knobs unless you have to go higher than they can go, then use the bellows rail to get the extra height needed.
Best thing is to get the coin in focus, then make small adjustments until it fills the screen correctly. If the coin is too small on the screen, extend bellows a little bit by either raising the camera mount, or lowering the lens mount, or both, but just a little. Then move the grey knobs til the coin is in focus again. Iterate until the coin is properly framed in the screen, and in focus. This is then your starting point for the next coin, or just keep it the same if the next coin is the same size.
There is really no simple way to go about this, just move things around til they are in focus and framed properly. It can help to write things down, but once you do it a few times you will be able to dial it in very quickly.
Ray
Contact me for photographic equipment or visit my home page at: http://macrocoins.comEdited by rmpsrpms
11/24/2015 8:56 pm
|
|
Pillar of the Community
Canada
2784 Posts |
jim you are bang on, the focus is great. your images are really good. nice coin your editing is really good. I find when it comes to editing. it is what each one of us like to see. I touched your coin just a bite. see I like a look like this. but as others have said keep your coin close to what it actually looks like. especially if you are going to sell them. about 3 to 4 weeks from now I am starting through my whole collection.  |
|
Valued Member
United States
397 Posts |
Thanks mcshilling, the actual coin has much more luster.
|
|
Valued Member
United States
397 Posts |
Ray I thought your answer would be something like that. I am starting me a notebook of measurements, so that I can start close. I will get that down eventually. I guess the next place I need to go is editing. Rocky's comments touch on that. He touched it up and made an improvement. The actual coin has much more luster than the pictures display. I said editing some of it maybe lighting. As many post as I have read it seems to always come back to lighting. You and rocky posted a few tips in Ham's thread about using the histagram when editing. I'm going to read Ham's tread and try a few of those editing tips. I'll post a few more pics tomorrow...Jim
|
|
Valued Member
United States
397 Posts |
Quote:
I touched your coin just a bite. see I like a look like this. but as others have said keep your coin close to what it actually looks like. That coin has much more luster than my pics display. Any ideas to making the coin look brighter either when shooting the coin or editing? Jim |
|
Pillar of the Community
United States
4037 Posts |
Jim...your lighting on the WLH looks almost axial, with a lot of diffusion. As a start to figure out best lighting, try moving the lights from very close to the coin (75mm away) up to very far away (same level as the lens) in several steps, shooting a shot at each step. My preference for Cents is approx 100-125mm away from the coin so for Dollars it would be perhaps 150-200mm.
Three things affect luster:
- Size of the light. Smaller = more luster. Diffusion makes the light look bigger. But Jansjos need a little diffusion, so keep some on them. Lights farther away look smaller, so produce more luster.
- Angle of light to horizontal. Best luster is 45-60 degrees or so.
- Relative angles between lights. Best angle is 90-degrees, ie lights at clock positions that are 3 hours apart, like 10:30 and 1:30. This creates an X pattern to the luster bars. Some folks prefer 10:00 and 2:00, but each coin type requires fine-tuning of the clock positions for best luster presentation and to put the luster bars in aesthetically pleasing orientations.
...Ray
|
|
Valued Member
United States
397 Posts |
Just want to say thanks everyone for your patience and help.
I wish everyone a safe an enjoyable Thanksgiving,
Jim
|
|
Valued Member
United States
67 Posts |
I have to think this coin is brighter than shown. How are you metering the coin, or are you doing some sort of "auto" mode? My guess is that you're letting the camera meter, and it's forcing the image to 18% gray.
|
|
Valued Member
United States
397 Posts |
Quote:
I have to think this coin is brighter than shown. How are you metering the coin, or are you doing some sort of "auto" mode? My guess is that you're letting the camera meter, and it's forcing the image to 18% gray. DaveM I have the camera set on AV. Other than that I don't have a clue what you mean by metering the coin. |
|
Valued Member
United States
397 Posts |
Would someone explain to me how to shoot a zoomed in shot of one of the details...Jim
|
|
Pillar of the Community
 United States
5828 Posts |
Smoke! PLEASE please please please PLEASE DONT clean any more coins!
Thanks.
|
|
Valued Member
United States
67 Posts |
Quote:
DaveM I have the camera set on AV. Other than that I don't have a clue what you mean by metering the coin.
Metering is the process of measuring the amount of light reflecting off the surface of your image, and then using that to set the camera's f-stop, shutter speed and ISO to create the image. By default, in all the automatic modes (like AV), your camera assumes the light in the image is "middle gray" or what is often called 18% gray, and that's how it adjusts the shooting parameters. In essence, if you use those parameters, and don't use any exposure compensation, you are telling the camera "you are pointing at something 18% gray, set the camera accordingly". Now if you were shooting a coin that actually was 18% gray (which is about pewter colored), then by coincidence it would all work out fine. But since you've told the camera that silver coin is actually 18% gray, it is darkening the image to make it that color. If you were shooting an old copper coin, the opposite would happen, it would brighten the coin to be 18% gray. So unless you only have pewter coins, what do you do? You can: - use exposure compensation, and adjust until it looks good - adjust later in photoshop or similar tool - you can actually meter against a known 18% gray object (they make "gray cards" for this purpose), and manually set the camera settings for that gray light, then shoot the coin. The last option is the "correct" way to do it, but the others will work. My point here is not to make you "do it right", just to explain why this coin is pewter colored in the image you're showing. Edited by Dave M
11/27/2015 7:37 pm
|
| |
Replies: 55 / Views: 7,108 |


