| Author |
 Replies: 15 / Views: 1,219 Replies: 15 / Views: 1,219 |
|
|
Valued Member
United States
405 Posts |
Earlier this week I posted a couple of photos of some KHDs that I had found which I suspected to be DDOs since they exhibited notching using my digital microscope. This was initially confirmed by a couple folks, but earlier today, CC came in and shook up the pot stating boldly that there was in fact no notching on the coin, and that the notching shown in the images was due to the way the coin was lit during the photo. Here are links to the old threads: https://goccf.com/t/32403https://goccf.com/t/32391https://goccf.com/t/32409Always the open minded one, I got home this afternoon and rephotographed the coins specifically lighting them with a single diffused source and from a side angle. Lo and behold, the notching seems to have disappeared completely. See for yourself. http://crhfinds.blogspot.com/2008/0...y-light.htmlThoughts? |
|
|
|
Pillar of the Community
United States
3507 Posts |
My thoughts are simple.
When I do photos, I have to move the light around to best highlight the doubling. The lighting doesn't make or break the coin. The lighting either enhances the photo or it creates shadows that can make the doubling seem to disappear.
It is a function of the photography and not the coin itself.
Your coin still has the notches and even in the poorly lit version of the picture, I can see the shapes of the serifs of the lettering that would correspond to the slight difference of shape that we would see on a coin that is a doubled die variety.
By the use of lighting, I can take a coin that is a known doubled die and make the doubling virtually disappear.
Trust your eyes and not the camera.
Also, the doubling is weakest on the IN GOD on this particular coin anyway. Try WE TRUST, the same way and I'll bet you will still see the shape that corresponds to the notching. It is also important to be completely familiar with what the normal shape of the lettering is on a series of coins. That is sometimes being familiar with them on a year to year basis.
Many Eisenhower Doubled die varieties,for example are picked up not always by the expected notches but by the fact that the lettering looks wider and "mushier" than they should normally be.
I m 99.99999% sure that your coins are DDOs despite the question of lighting in your pictures.
Thanks,
Bill
Thanks,
Bill
Edited by foundinrolls
07/04/2008 1:39 pm
|
|
Pillar of the Community
United States
3507 Posts |
Hi, This is your coin, the 1973 D Kennedy DDO. I rotated the picture, cropped it and marked the notches with arrows. I used lines to indicate where the bottom right of IN has letters that are not the correct shape and indicate die doubling. So even if you cant see the notches in a particular picture, the shape of the letters tell me what I need to know.  Thanks, Bill |
|
Pillar of the Community
United States
1984 Posts |
Very nice work, Bill. I appreciate the illumination.
|
|
Pillar of the Community
United States
7629 Posts |
I don't remember "boldly" stating anything. I said the lighting did not lend to being able to see doubling - simply put.
Ring lights are not good light sources for trying to photograph coins under a microscope because they provide multiple light sources on the coin. Multiple light sources simply means light from many directions, not necessarily that there was "outside light" getting through to the coin.
With fewer directions of light to discern in a photo, notching and other attributes of anomalous coins show far better.
Perhaps before jumping down my throat over something I did not say, it might help to back up and read the statements made. I never said you did not have hub doubling. I never said you had outside light getting under your scope. What I did say was that the light used was not the right kind of light for showing doubling, and that changing the light would help your photos.
Edited by coppercoins
07/04/2008 01:05 am
|
|
Valued Member
 United States
405 Posts |
Bill - playing around with lighting I can definitely confirm with you that the doubling DOES existing on the 73D, but I'm having trouble reproducing the 71D and 73's as easily. You mentioned that one of the coins had doubling more visible on the "WE TRUST". Which one was that?
I'm having troubling trying to fully diffuse my light source properly but once I do, I'll take some hopefully better photos. The second set of photos I took were with the microscope's LEDs off and using an external lamp off to one side of the coin.
|
|
Pillar of the Community
United States
7629 Posts |
Now...what would help you with your light source... If you have five or six LED lights in a ring shining down on the subject and don't have a better choice of lighting, try blocking the three or so in the back half (bottom of the field of view), and diffusing the others with some milky colored plastic, like from a shopping bag. The direct and harsh light provided by the LED emitters is too pinpointed and too direct to cast the shadows necessary to show doubling well. If you can adjust the light so that it comes from one direction, it is far easier to turn the coin so that the shadow from the light falls inside the crack of your notches, showing the doubling far better than any other light or combination of lights. Still, though, I would go with something different altogether. LED is just the wrong kind of light to use on coins. I have been through the gambit of scopes, cameras, and lighting. My comments here are not for my health, I know how to do it and am quite successful with it. I am simply trying to help you and others with my posts. I have been through helping and teaching three other people at great length how to photograph coins under a microscope, and have taught numismatic photography at the ANA Summer Seminar two years running. One of the people I helped at length with photographing coins under a microscope bought a ring light adapter for his light box thinking it would be a good source for doubling. It turned out to be a horrible choice. I thought it might just be his method, so I had him send the fixture to me, and even I couldn't use it without heavily modifying it. Ring lights, and circular lights that shine down from multiple directions are a horrible source for lighting the notching and separation lines on hub doubled coins. The best lighting solution is a single slightly diffused light source that fits underneath the optics of the scope and is positioned just out of and to the top of the field of view. It needs to shine brightly enough to light the coin, but not so brightly as to cause hot spots in the photo. Most importantly it needs to light the top of the devices and the field of the coin casting a high angle shadow downward onto the subject. As you have already found, side lighting is a very bad choice for doubling as well. That form of lighting only works with any success with showing the amount of contrast on cameo proof coins in macro shots...it doesn't work well for anything in micro shots. |
|
Pillar of the Community
United States
7629 Posts |
This is what my microscope and light look like. It's a 180 watt halogen light with dual light guides (reostat controlled brightness) with a milky white coin tube chopped into a hollow cylinder. The light guides fit nicely into the coin tube and become the bulbs inside the little light shade. It diffuses the light perfectly. 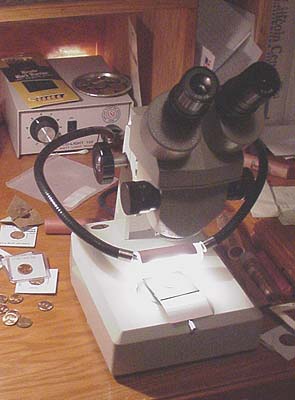 |
|
Pillar of the Community
United States
7629 Posts |
I usually use the light at 40-60 watts, or about 20 percent of its overall capacity. There's never a need to turn it all the way up to 180 watts.
I use a bent piece of chip board as a slightly curved ramp to tilt the coin slightly toward the light in some cases where sitting flat doesn't provide the light needed. This helps especially for proof coins.
The small blue square is a simple piece of matte board cut into a 2 inch square and used as the table top for the coin. The microscope base is glass, which will scratch coins easily.
|
|
Pillar of the Community
United States
7629 Posts |
You can see here that the photos achieved with this setup turn out with full detail, show the doubling perfectly, and are of publishable quality...all with rather minimal expense. The image to the left is the image that was taken at the time the photo of the setup was taken on the right. 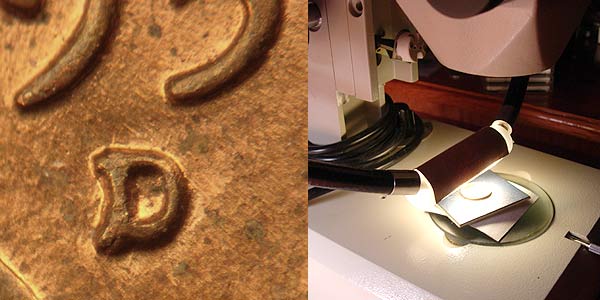 Edited by coppercoins
07/04/2008 01:32 am
|
|
Pillar of the Community
United States
7629 Posts |
A better shot of the setup itself. The tube of coins is attached to one of the guides to show the rigidity of the guides. They are a bendable conduit of sorts with a plastic sheathing. They house the fiber optics that carry the light from the box to the scope. The two guides are wrapped around the base of the scope and pointed toward one another, then the tube is placed around the two guide ends...simple, effective, and works like a champ. Took me about a week to figure this out, and I've been using it exactly like this (even with the same tube throughout) for the past six years. 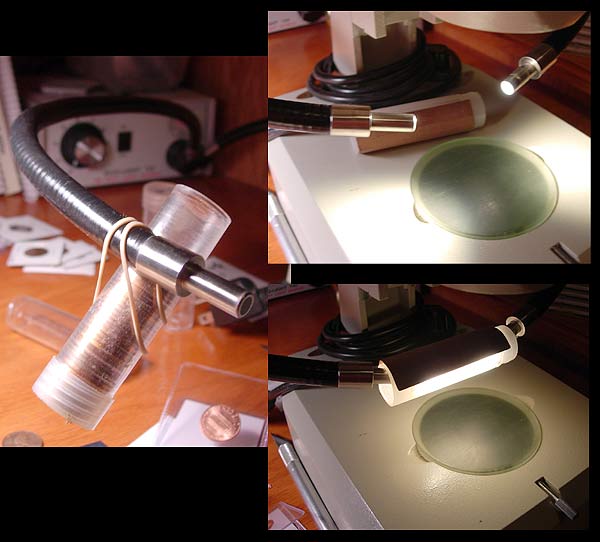 |
|
Valued Member
United States
405 Posts |
CC - I apologize if I came across as trying to jump down your throat - that was not my intention! I was just trying to 'promote' the thread a bit and add some drama to it for fun.
|
|
Valued Member
United States
405 Posts |
Additionally, thanks for the lighting and photographing tips. I had actually been looking around on the web a bit for information related to this and was going to post on the CONECA forums later if I hadn't found anything in order to get some guidelines. Most of the stuff I found was about photographing coins for publication purposes, but not for variety inspection at magnified levels.
I'll try the suggestion of blocking half the lights and diffusing the others and see what kind of effect that has. After I posted those comparison photos, I later was able to setup diffusing of the LEDs but I still get the effects of having light coming from multiple directions so it only helps reduce the hotspots.
|
|
Valued Member
United States
405 Posts |
Ok, here is the best I think I'll be able to get. I was only able to really reproduce the notching with the lighted half of the ring at the upper left corner of the coin, falling onto the letters parallel to the notch direction. Is that normal / expected for this type of notching? http://crhfinds.blogspot.com/2008/0...graphed.html |
|
Pillar of the Community
United States
3507 Posts |
Not that I need to, but before I read the posts on Chuck's equipment (It is really going to be fascinating to me as I truly get a kick out of the photography aspect of this hobby) , I want to go on record as agreeing with Chuck as his posts prior to this thread indicated that the issue was lighting. Nothing more. Based upon the previous pictures and the lighting, Chuck was not able to render a good opinion.
I know that I will ask people to create new pictures a half dozen times or more if a thread does not have a picture that is adequate to use for a determination. Speaking for myself, but I suspect Chuck thinks this way as well (I don't want this to be construed as speaking for Chuck but I see similar thought processes) ....
Keeping in mind that I am offering opinions based upon photos on a forum, some of which are great (the photos) and some that probably should have been better before they were posted, I try to be careful with my wording. That attempt to be careful will sometimes work depending upon how late at night it is:-) Most of the time though, I try to be careful with what I suggest. I know that before I stick my foot in my mouth and my reputation, (whatever that might be) on the line, I want to see a good picture first. All our experiences are different and I may see something that others may not. That goes both ways. I learn some new things from the people here as well.
The point is that I try to be careful with what I say so that something else is not read into it. Occasionally, I see more read into a post than was there in the first place. The readers of the forum also need to be careful not to "read between the lines" so to speak.
Anyway...I'm gonna go back up and take a look at Chuck's stuff. I am going to become very envious, then I will go off into a corner and whine to myself about not having the probably great equipment that he has:-)
Have a Happy 4th!
|
|
Pillar of the Community
United States
3507 Posts |
I am fascinated by the setup. I was intrigued by the use of a milky white plastic to diffuse the light. I suspect that those of us who get into photography, by the process of elimination might come to the same conclusions. My milky white "diffuser of light" is the small case that my CF card (camera memory card)came in:-) This is for Chuck....You may like this idea or you may not have a use for it , but... As well as taking pictures of small portions of coins, I also have to take shots of the coins in their entirety. Something I use in place of the chip board depending upon the denomination of the coin are the 3X3 inch paint chips that you can get from Wal-mart for free. I have hundreds of them in a wide range of colors and shooting against those backgrounds can enhance the photo of the coins if the entire coin is being shot. One that I find extremely useful is a snow white paint chip. I have several photo programs that can automatically adjust color based upon the white portion of the picture. I was right though,,,,I am sorry to say that I'm very envious of the setup:-) Very Nice! Thanks, Bill Edited by foundinrolls
07/04/2008 2:17 pm
|
| |
Replies: 15 / Views: 1,219 |
|


