|
This page may contain links that result in small commissions to keep this free site up and running.

Welcome Guest! Registering and/or logging in will remove the anchor (bottom) ads. It's Free!
To participate in the forum you must log in or register. | Author |
 Replies: 55 / Views: 7,338 Replies: 55 / Views: 7,338 |
|
New Member
Australia
42 Posts |
Hi guys! A good friend on FaceBook pointed me to this direction, I've been trying to self-teach numismatic photography for a few years now and I'd love to get your thoughts on improvement. Gear: Canon EOS 550D (which has an APC-S sensor) Sigma 150mm f/2.8 APO EX DG Macro HSM (no optical stabilization) "Mostly" sturdy copy stand (converted from an old enlarger, I use Canon's software to shoot from my hocked up laptop though) A couple of PAR30 lights, 150watts - extremely hot! I've been told that I have good enough gear and there's no need to upgrade to say a Canon 5D Mark IV or to the newer Sigma with optical stabilization - or even Canon - do you agree with that? If not then what should I be using instead? I always look at my pictures and feel that they're either not sharp enough or way over exposed or something else, my question here really is: How can I improve? Is it my lighting / settings / hardware / something else? I rarely do any manipulation in Photoshop other than cropping and pasting in a template, and "sometimes" the occasional auto-contrast or auto-tone. Also I tend to stick to ISO 100 and f6 to f11 ... are there any "magical" numbers or sweet spots for my lens that I should know about? Any rules of thumb or tips? I've attached some photos here but would really appreciate an honest opinion:  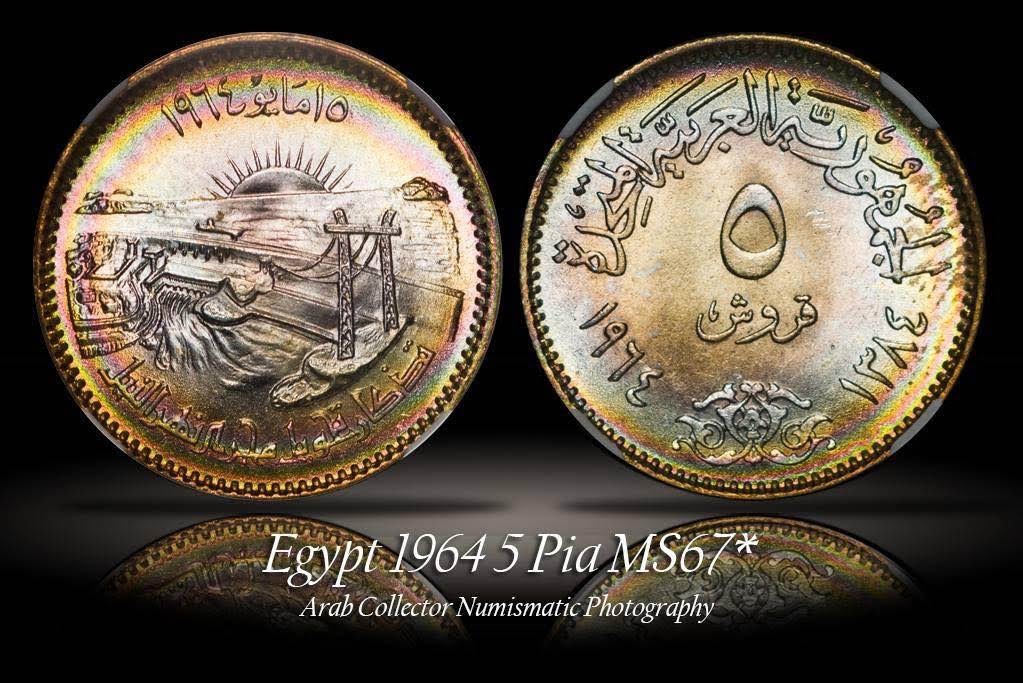 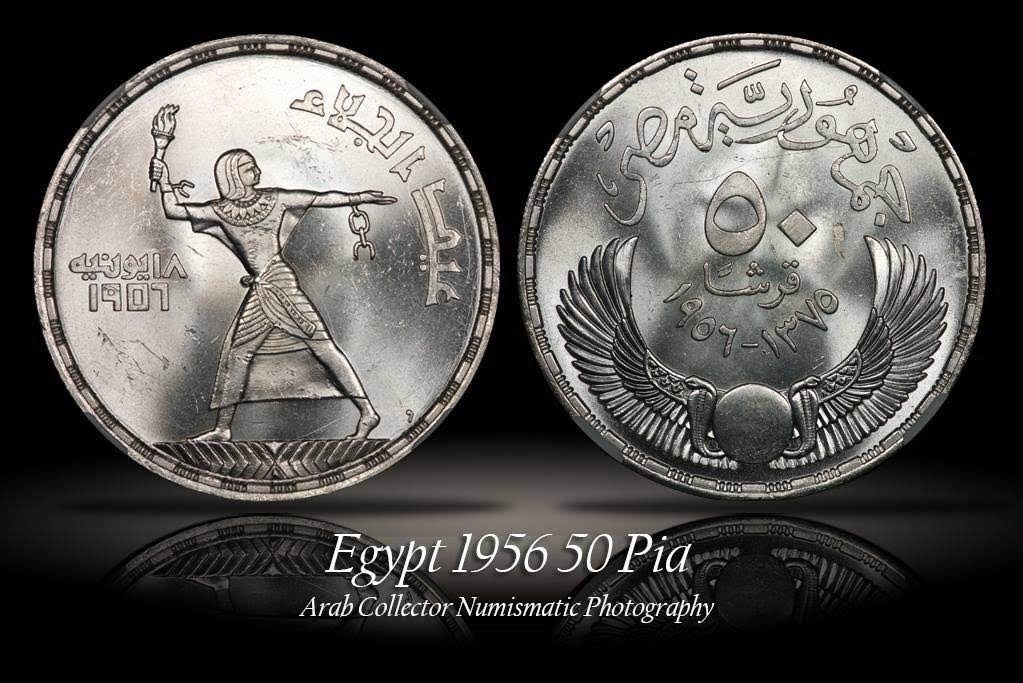 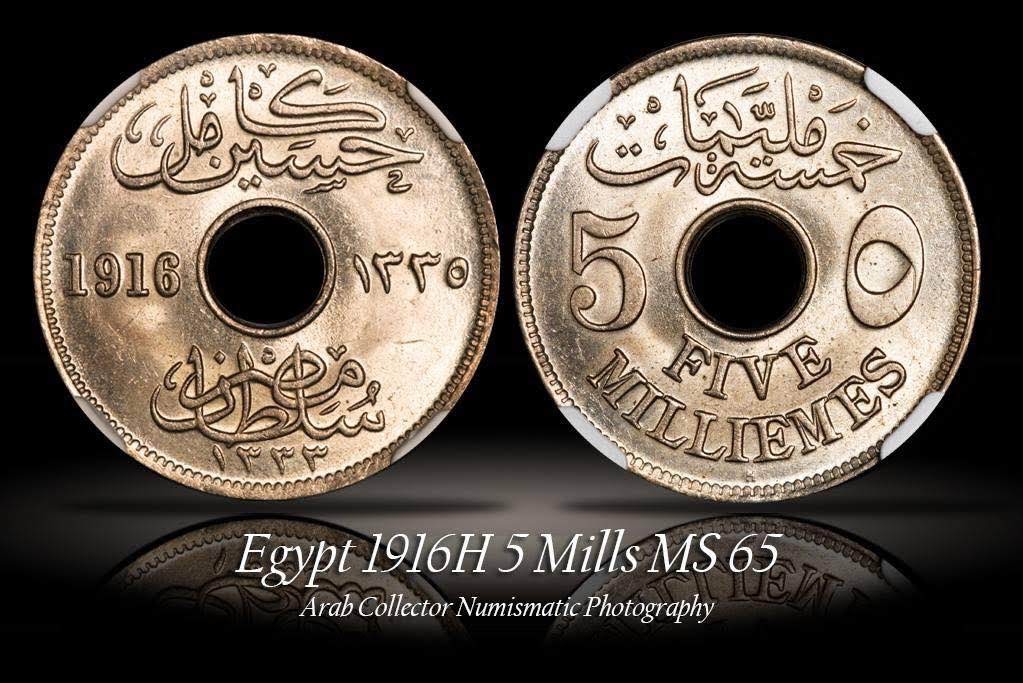 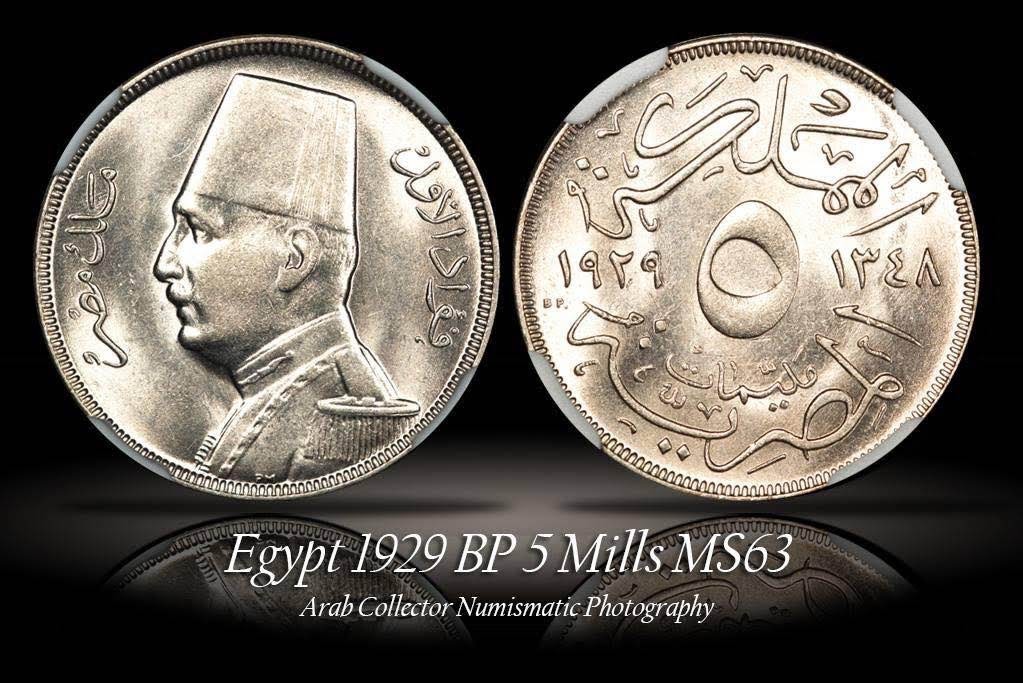 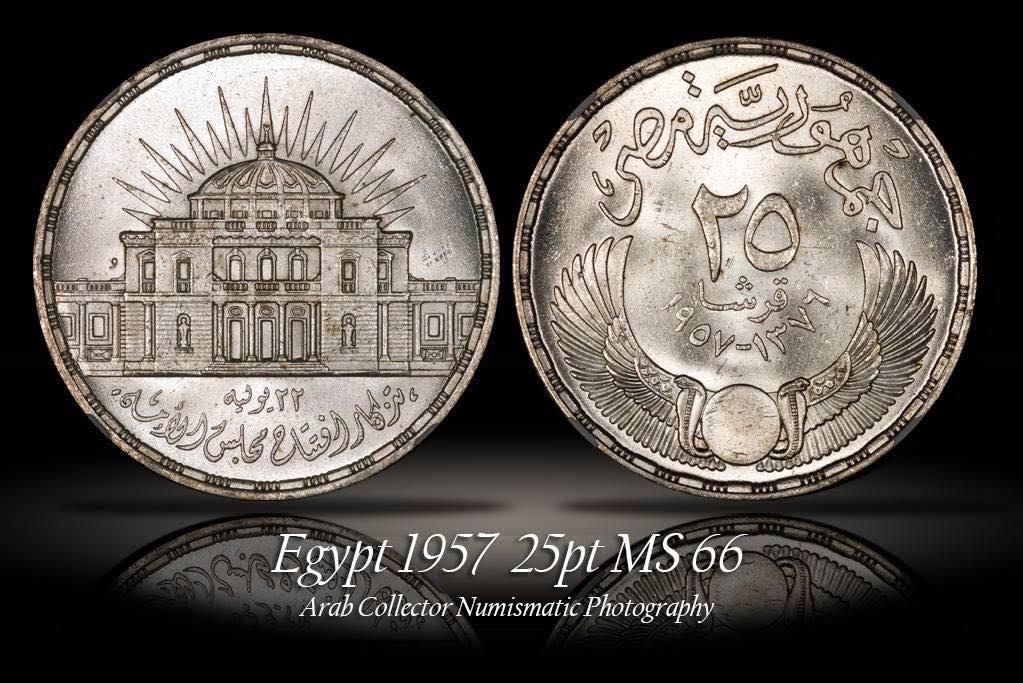 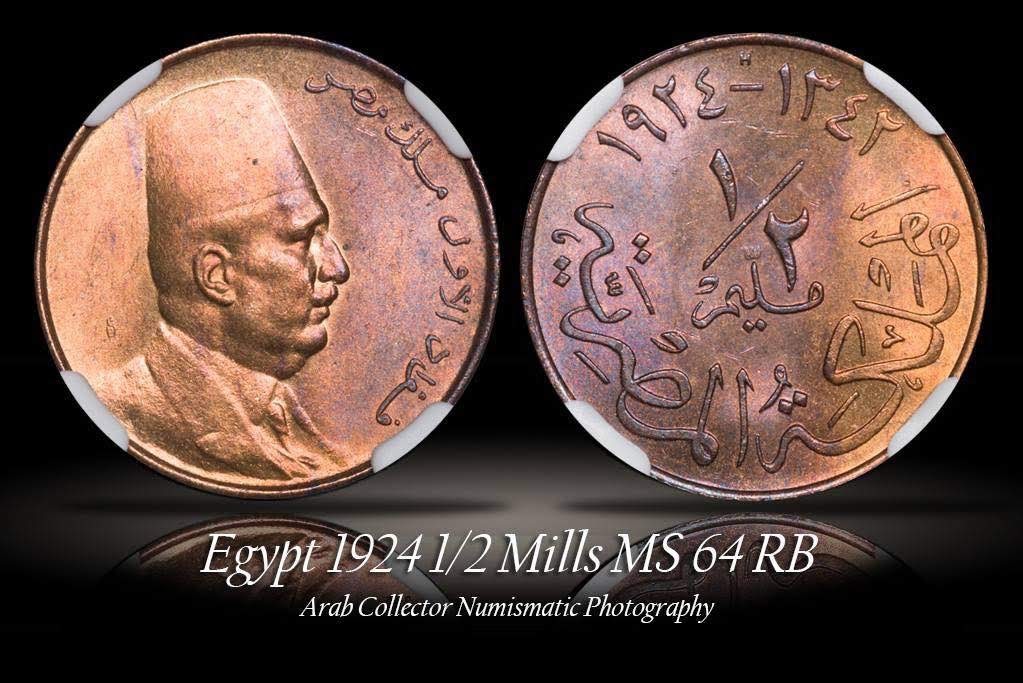 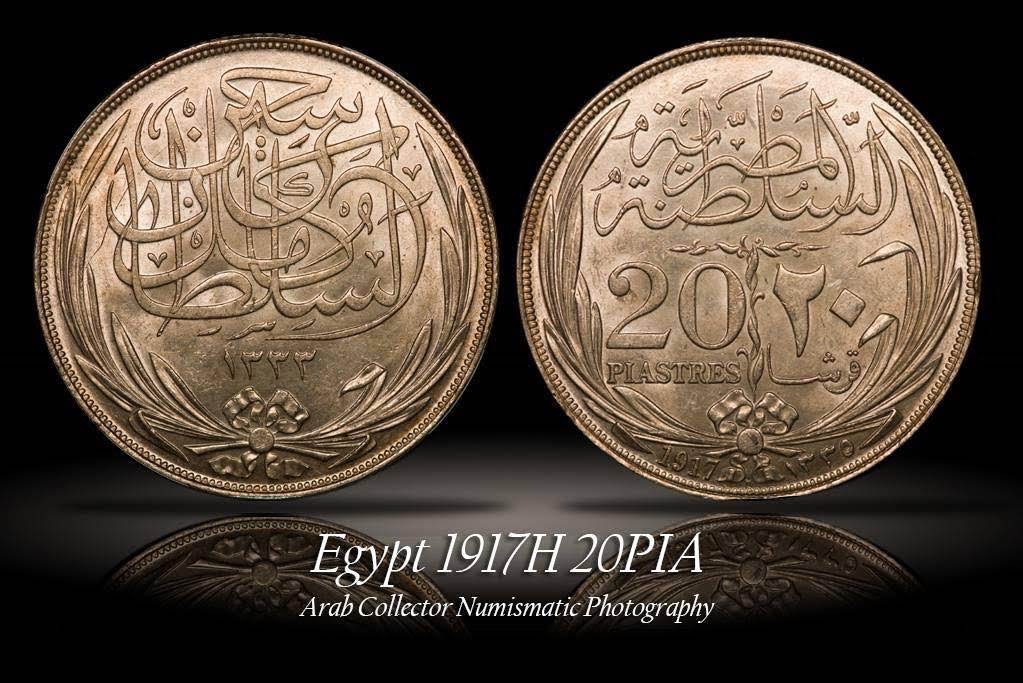 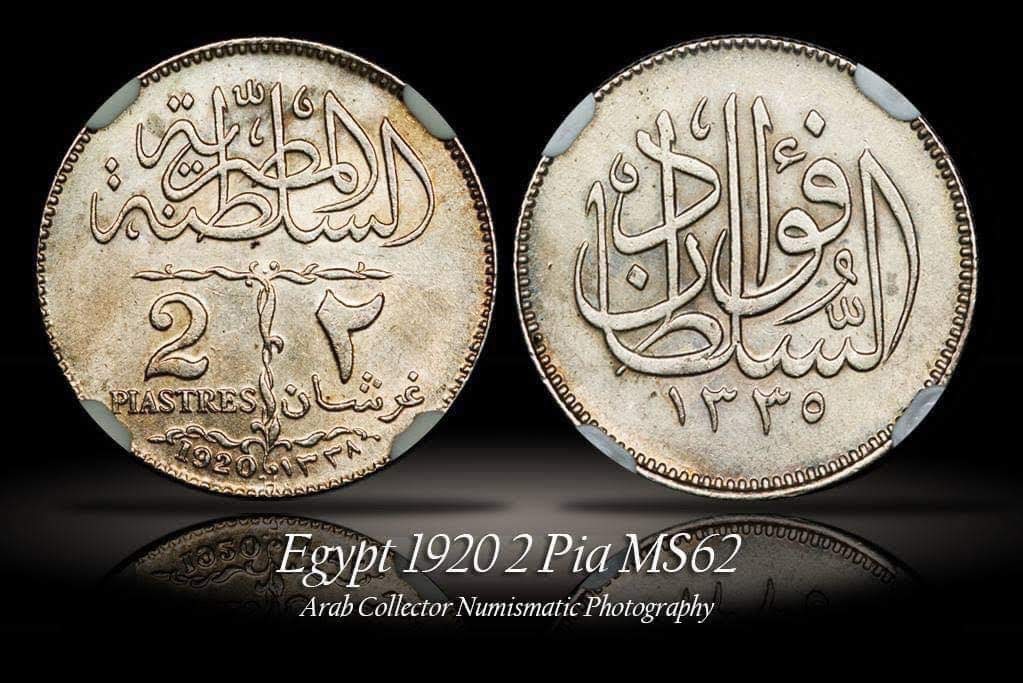 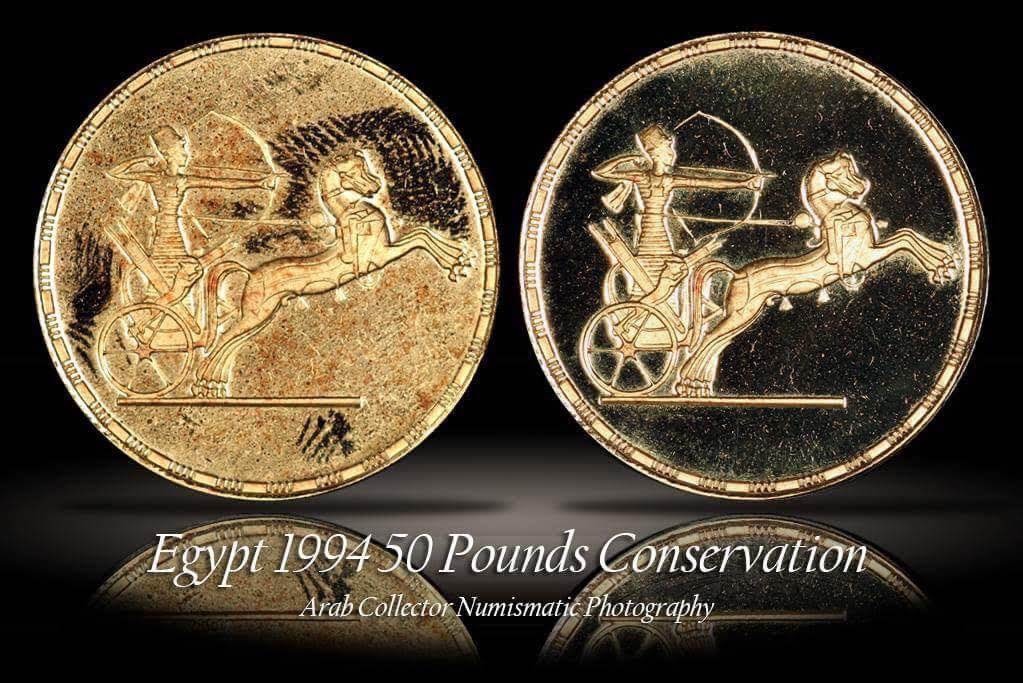 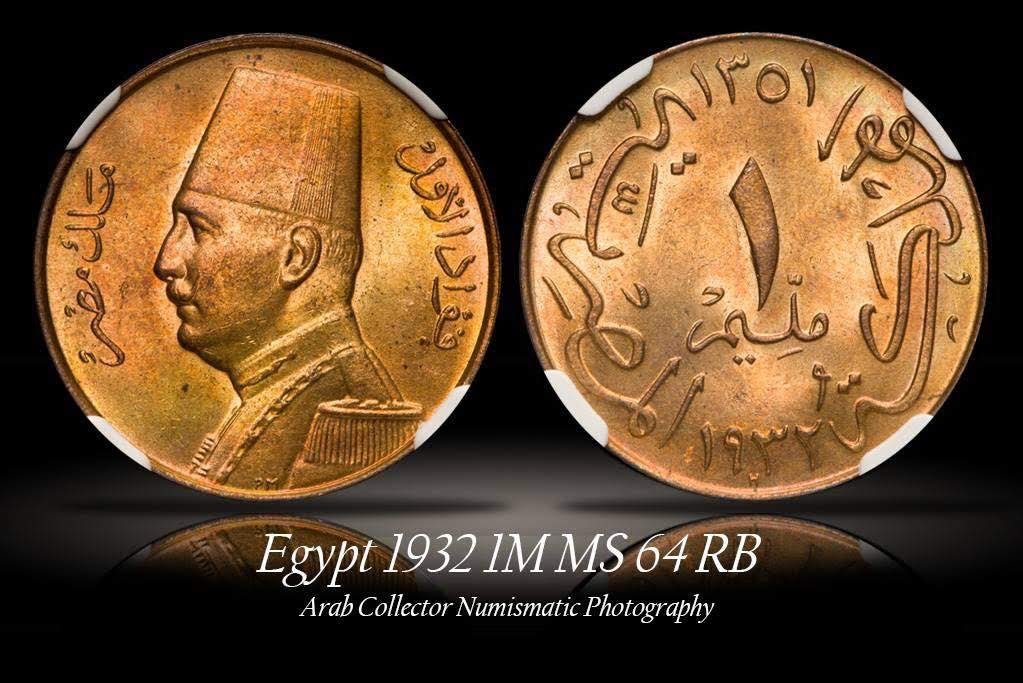 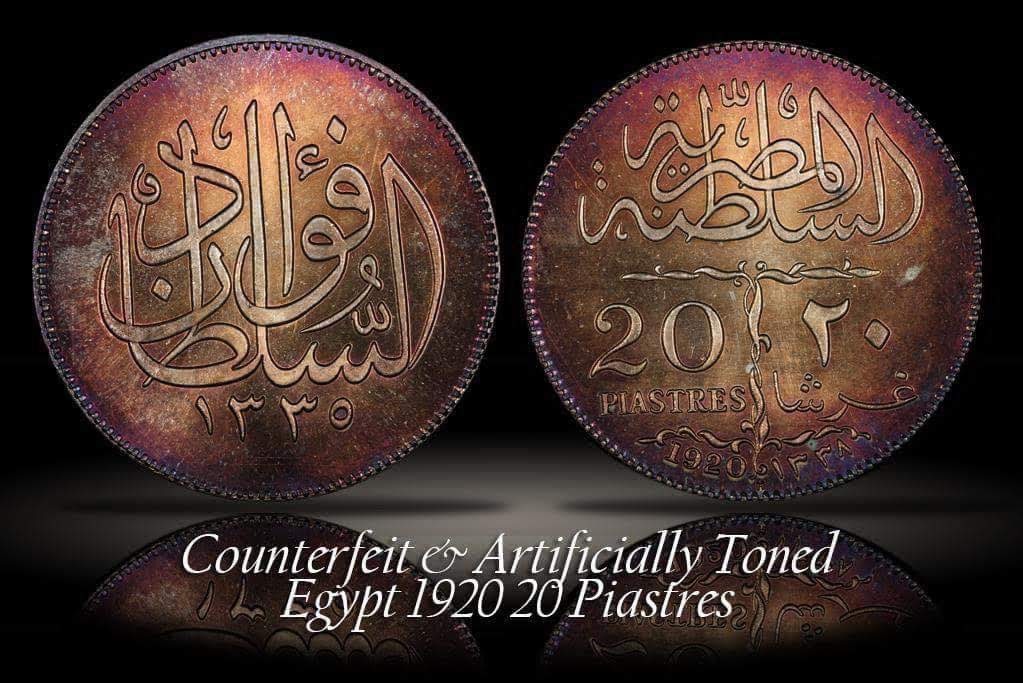 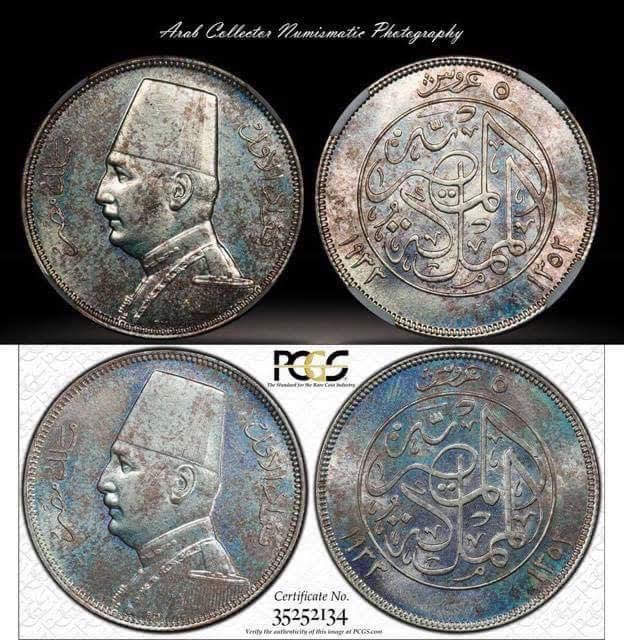 |
|
|
|
Pillar of the Community
United States
768 Posts |
|
|
Pillar of the Community
 United States
8941 Posts |
Good god. Those are nice photos, (and coins).
|
|
Bedrock of the Community
United States
12477 Posts |
In general, those pics are excellent.  I see a couple with blown out highlights (pics 5 & 6). I also see too much directional lighting visible on others (pics 3 & 8 especially). I hope this helps. In Memory of Crazyb0 12-26-1951 to 7-27-2020
In Memory of Tootallious 3-31-1964 to 4-15-2020
In Memory of T-BOP 10-12-1949 to 1-19-2024
|
|
Pillar of the Community
United States
789 Posts |
If you are selling the pics then yeah, maybe you would want to buy better equipment. (Disclaimer, my photography skills are at a solid zero).
I really like the 1964 coin that I presume is the Aswan High Dam.
|
|
Pillar of the Community
United States
664 Posts |
I'm still working on better photos myself but your photos are Great. Keep up the good work.  to the CCF. Edited by carwash
09/09/2019 10:18 am
|
|
Pillar of the Community
 United States
4041 Posts |
Hi Moheb1979...welcome to the forum! Your pics look overall pretty good. You have a good handle on lighting and color. I do see what you mean regarding sharpness, but most likely that is an aspect of technique and not your equipment, which should be able to produce world-class photos. If you want, we can go back and forth and see if we can improve your results. To start, please disclose a few things about your setup and technique:
Camera mode (Av, M, etc)
Shutter release method (button on camera, remote trigger, tethering in Live View, etc)
Picture Style (Standard, Faithful, etc)
Picture Style subsettings (sharpness, saturation, etc)
Image format (raw, jpg fine, etc)
Post-processing (levels, sharpness, saturation, etc)
Regarding the aperture sweet spot for you lens, again we can go back and forth on how to do an aperture sweep and interpret the results. But first lets start with the basic questions above.
Contact me for photographic equipment or visit my home page at: http://macrocoins.com |
|
New Member
 Australia
42 Posts |
Thank you all so much for your kind words, believe me - the photos sorta look ok at 50% but once I go to 100% on my screen anybody can tell that it's really blurry!
@rmpsrpms Thank you so so much for the excellent questions! That's exactly what I'm after! I'll go home and check all my settings and respond here and hopefully we can indeed generate "world class" photos!
But just to be clear, you don't think I should upgrade my camera or lens just yet or I really shouldn't at all and what I have now is enough for numismatic photography?
|
|
Pillar of the Community
United States
9395 Posts |
Photos look great.
I usually use ISO 100 (there's plenty of light), f/8 (maybe f/5.6 for really large coins), and an APSC T6s (760D?) Canon DSLR.
I'm guessing that there wouldn't be that much improvement going from a 24MP APSC to a 30MP or 36MP full-frame sensor. Maybe you could pick up a bit more detail with a 50MP full-frame sensor or a 100+ MP medium format camera, with an appropriate lens, and maybe focus stacking for the smaller coins.
On the other hand, If your 100% crop images are already blurry with the APS-C camera, the cause of this blur needs to be fixed first. Note -- some of the fuzzyness problems I had were caused when I switched to the latest version of GIMP and reduced the TIFF files to jpg prior to upload.
|
|
Pillar of the Community
United States
4041 Posts |
Correct, you won't benefit much from an equipment upgrade, except possibly your copy stand if the one you are using is rickety. If it's sturdy, then you are likely OK. I use the same camera as you (we call it T2i in the US), though I had the AA filter removed from it. Problem is that to get a camera without AA filter, with EFSC, and good tethering ability, you don't have a lot of choices. The AA filter removal did give a marginal improvement in sharpness, but I also use a Rebel XS, and with proper technique I can get essentially the same quality from it as from the T2i.
|
|
New Member
Australia
42 Posts |
Rmpsrpms Alrighty here's my settings - once again thank you so much for taking the time! (You can tell that I don't have a clue about most of what these even mean, so apologies for the 101 class!)
- Camera mode: M
- Shutter release method: Usually tethered, sometimes remote controlled
- Picture style: Standard
- Picture style sub-settings:
- Standard 3.0.0.0
- Portrait 2.0.0.0
- Landscape 4.0.0.0
- Neutral 0.0.0.0
- Faithful 7.0.0.0
- Monochrome 3.0.N.N
- Image format: RAW
- Post processing: Very very limited, I just check in photoshop the CR2 file "auto" suggestion" and after it's converted I have a look at the auto tone, contrast and color but I usually don't go for those
- I usually go for an aperture of between f5.6 to f11 (is there a formula where some numbers are better for certain sized coins vs others for larger coins?)
- Shutter speed: Could be anything from 1/60 to 1/500
- ISO: I try to stick to 100 or so
From the menus in the camera:
- AF mode: One shot
- Exposure comp./AEB setting is just at 0
- Auto lighting optimizer: off
- Metering mode: Evaluative metering
- Custom white balance (I usually measure this before each photo session)
- WB Shift/BKT: 0.0/+-0
- Color space: sRGB
Custom functions menu:
- Exposure: 1/3-stop
- ISO expansion: off
- Long exposure noise reduction: off
- High ISO noise reduction: disabled
- Highlight tone priority: disabled
- Mirror lockup: disabled
-
|
|
New Member
Australia
42 Posts |
I've also attached a photo of my setup 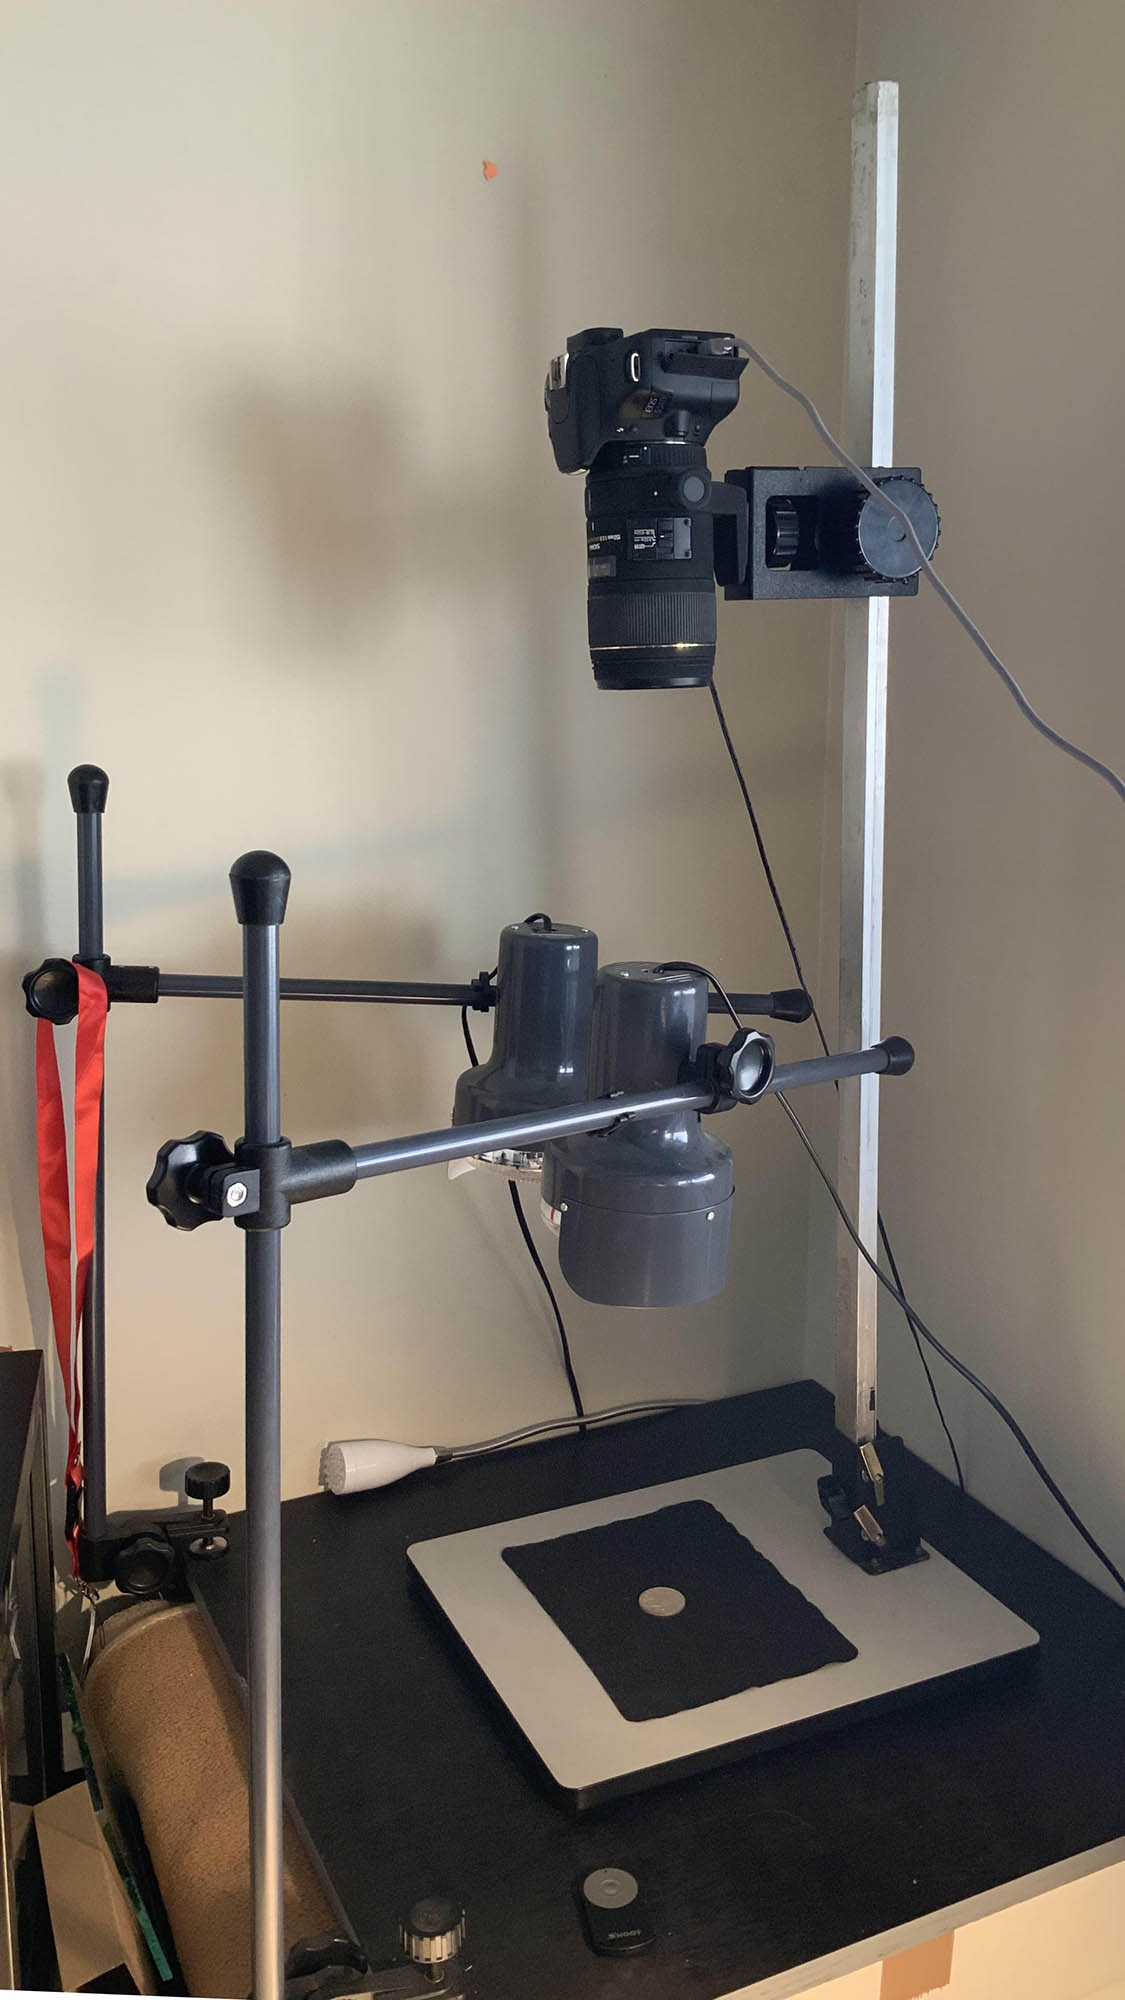 |
|
Pillar of the Community
United States
4041 Posts |
I'll address items inline below:
Rmpsrpms Alrighty here's my settings - once again thank you so much for taking the time! (You can tell that I don't have a clue about most of what these even mean, so apologies for the 101 class!)
RP>>no worries, if we do well you'll know it all much better at the end...
- Camera mode: M
RP>> I highly recommend using Av (aperture priority) mode rather than tethered. This can reduce the work by minimizing the number of shots required to get correct exposure. When using Av mode, exposure compensation becomes active, and you can program the camera to slightly under-expose the shots to avoid blown highlights
- Shutter release method: Usually tethered, sometimes remote controlled
RP>> I further recommend using tethered Live View. This enables EFSC, and eliminates shutter vibration which might be causing some of your un-sharpness
- Picture style: Standard
- Picture style sub-settings:
- Standard 3.0.0.0
- Portrait 2.0.0.0
- Landscape 4.0.0.0
- Neutral 0.0.0.0
- Faithful 7.0.0.0
- Monochrome 3.0.N.N
RP>>I generally avoid Standard for coins, as it over-emphasizes contrast and saturation. If you like the "look" that Standard gives, and indeed the overall look of your images is good, you can give yourself more flexibility by adjusting sharpness to 0, contrast to -4, and saturation to -2. This will give a "flatter" looking image out of camera, but more latitude in post-processing
- Image format: RAW
- Post processing: Very very limited, I just check in photoshop the CR2 file "auto" suggestion" and after it's converted I have a look at the auto tone, contrast and color but I usually don't go for those
RP>>I'm surprised that you're happy with doing auto settings. Photoshop has no idea what your coins look like, so allowing it to do auto tone and color guarantees that both are incorrect. But again that's not the issue you're dealing with here, so maybe we should leave this for another time.
- I usually go for an aperture of between f5.6 to f11 (is there a formula where some numbers are better for certain sized coins vs others for larger coins?)
RP>>For single shots, I try to shoot at effective f9-f11. This is about as small as you can go without degrading sharpness at 100%. So for Dime/Cent/Nickel/Quarter size coins (m=0.8/0.7/0.6/0.55), I shoot at f5.6, and for Half/Dollar size (m=0.42/0.35) I shoot at f8. The formula is Feff = Fnom*(m+1). We can go into detail as to why ~f10 is best if you want to know.
- Shutter speed: Could be anything from 1/60 to 1/500
- ISO: I try to stick to 100 or so
RP>>sounds fine. If you use Av mode, the shutter speed will be set automatically for you, also factoring-in an EV compensation you choose.
From the menus in the camera:
- AF mode: One shot
- Exposure comp./AEB setting is just at 0
- Auto lighting optimizer: off
- Metering mode: Evaluative metering
- Custom white balance (I usually measure this before each photo session)
- WB Shift/BKT: 0.0/+-0
- Color space: sRGB
RP>>It is ironic that you do custom white balance, but then let photoshop destroy your work with auto tone and color. Perhaps you didn't realize this would happen. You might consider allowing the auto lighting optimizer to work for you, but experiment to see if you like the results.
Custom functions menu:
- Exposure: 1/3-stop
- ISO expansion: off
- Long exposure noise reduction: off
- High ISO noise reduction: disabled
- Highlight tone priority: disabled
- Mirror lockup: disabled
RP>>all are fine.
RP>>From your settings, the only thing I see that could be an issue is if you aren't using Live View, and possibly trusting the camera to do so much sharpening. I also always tell folks that post-processing is a good thing, as long as you do it very carefully. I've never used Photoshop, instead preferring Canon's DPP3. It's easy to use, very basic, and does a good job.
RP>>Would be good to have you shoot a coin with your normal settings and methods, and then shoot same coin with the setting changes suggested above, and post for comparison. Most likely the new settings will take some post processing for best results, and we can go over those adjustments in DPP. I'm not sure about sharing photos on the forum, since I use Photobucket for hosting, and I think CCF has blocked PB (at least they did last time I tried). If so, then I could only share by email.
Contact me for photographic equipment or visit my home page at: http://macrocoins.com |
|
Pillar of the Community
United States
4041 Posts |
Regarding your setup, my only concern is if the vertical column is stiff enough to eliminate vibrations. Long working distances like you're using magnify the effect of vibrations, so it's important to make sure the setup is stable. One way to tell is to view the coin in Live View at 200% and watch for vibration. If the 200% view is completely stable just before you take the shot, then all's good. If there is always a little movement that never stops, this could be a part of the sharpness problem.
Live View is also a good way to see if the shooting process has impact on sharpness. Shoot a coin with your normal method, and then open up the image and view an area at 100%. Then turn on Live View, and view the same area at 100%. If the Live View image (ignoring any movement) is sharper than your image, then there is something going on to cause the image to blur. Could be shutter shake, stand vibrations, etc.
|
|
New Member
Australia
42 Posts |
Thank you so so much rmpsrpms!
I have a few questions and comments regarding your very helpful advice below:
1)Sharpness in live view: You're ABSOLUTELY right, I did notice that almost always on movement, I thought it's from the heat of the light bulbs expanding the air (kinda like how the horizon looks on hot days), the good news is I just purchased a Smith Victor (can't justify a Kaiser) copy stand and I hope it'll help with this issue.
2) How can I program the camera to slightly under-expose the shots to avoid blown highlights? Can you guide me through the steps please?
3) If you avoid "Standard" for coins, then what DO you use?
4) I didn't know that Photoshop was destroying my whites but it does make sense now! Thanks for explaining this - in all cases like I said I rarely go with it anyway.
5) OK tell me more about aperture, what do you mean by effective f9-f11? What does m stand for in the measurements? is that width in millimeter? and yes I'd love to understand that formula Feff = Fnom*(m+1)!
6) What's EFSC?
Definitely a great idea to compare before and after photos, will do so soon!
|
|
Pillar of the Community
United States
4041 Posts |
1)Sharpness in live view: You're ABSOLUTELY right, I did notice that almost always on movement, I thought it's from the heat of the light bulbs expanding the air (kinda like how the horizon looks on hot days), the good news is I just purchased a Smith Victor (can't justify a Kaiser) copy stand and I hope it'll help with this issue.
RP>>Excellent. That may be a big factor for sharpness.
2) How can I program the camera to slightly under-expose the shots to avoid blown highlights? Can you guide me through the steps please?
RP>>First, put the camera into Av mode. Then in EOS Utility, look just above the middle of the window and you'll see a scale from -2 to +2. That is the exposure compensation adjustment. I recommend -2/3 EV to start with. In conjunction with this, when in Live View there is a white box in the middle of the screen which defines the zoom area AS WELL AS the area for setting exposure (but only in Live View, a Canon quirk). Move that box over the brightest area of the coin, and the shutter speed will drop to compensate for any over-exposure. Together the -2/3EV adjustment and the metering box over the brightest area will pretty much eliminate over-exposure.
3) If you avoid "Standard" for coins, then what DO you use?
RP>>Neutral 0,-4,0,0
4) I didn't know that Photoshop was destroying my whites but it does make sense now! Thanks for explaining this - in all cases like I said I rarely go with it anyway.
5) OK tell me more about aperture, what do you mean by effective f9-f11? What does m stand for in the measurements? is that width in millimeter? and yes I'd love to understand that formula Feff = Fnom*(m+1)!
RP>>m is magnification. The nominal aperture Fnom is only valid at infinity focus. For closer focus, the effective aperture gets smaller (larger number) because the same light paths through the lens are now being spread over a larger area on the sensor. The higher the magnification, the more spread out the light becomes. The formula quantifies this effect.
6) What's EFSC?
RP>> Electronic First Shutter Curtain. When you snap the shot in normal mode, the sequence is: Mirror Up-->Shutter Open-->Timed Exposure-->Shutter Close-->Mirror Down. This has two sources of vibration...raising the mirror, and opening the shutter. When in Live View, the sequence is different. For Live View to work, the mirror must be up, and the shutter open. This is the starting point for a shot in Live View mode, and the sequence is: Electronic reset-->Timed Exposure-->Shutter Close-->Mirror Down-->Mirror Up-->Shutter Open. This sequence ends in Live View again. It's the Electronic reset of the photosites that is important, because there is no mechanical motion at the start of exposure, and therefore no vibration.
Edited by rmpsrpms
09/11/2019 11:25 pm
|
| |
Replies: 55 / Views: 7,338 |
To participate in the forum you must log in or register.
Disclaimer: While a tremendous amount of effort goes into ensuring the accuracy of the information contained in this site, Coin Community assumes no liability for errors. Copyright 2005 - 2026 Coin Community Family- all rights reserved worldwide. Use of any images or content on this website without prior written permission of Coin Community or the original lender is strictly prohibited.
Contact Us | Advertise Here | Privacy Policy / Terms of Use
|
| Coin Community Forum |
© 2005 - 2026 Coin Community Forums |
| It took 0.66 seconds to rattle this change. |
 |
|
| |
| |


