| Author |
 Replies: 13 / Views: 2,239 Replies: 13 / Views: 2,239 |
|
|
Pillar of the Community
United States
7225 Posts |
I have gotten better at my photography and have developed some good images but I'm struggling with proper color of my coins. This coin has vibrant pink hews with a spattering of blue.  This one is brilliant white with the dark peripheral toning yet the coins have a yellow hew.  Through the lens finder the image shows perfectly but the end results are not there. Am I exposing too long? Is it the lighting? Any thoughts would be appreciated. |
|
|
|
Moderator
 United States
15664 Posts |
Interesting ... I commented on the coins color in your recent post on the lovely Albany half. I know 3% of what the experts in this forum know about coin photography ... a beginner myself ... but I'll share what I do and help us tread water until the experts show up.  Color compatibility is what you are seeking ... that is the lighting you are using must be matched to the camera you are using. I make it easy by using daylight balanced 45W, 5500K compact fluorescent bulbs in my setup. These emulate day-lighting (sun) and I set my cheap Canon digital camera to daylight when I shoot. IMHO your 'yellow' is a result of the light your camera is seeing is not coordinated with the settings in your camera. Not to pile on here ... but you also need to consider focus and photo shot stability. You image above (and of that 1936 Albany) lack detail for lack of focus. Need to get the camera out of your hands and into some sort of stable mount where the shutter can be time-delay released. As I said above ... I am a neophyte at this ... but the two simple changes mentioned above ... day-light balanced CF and a tripod ... allow me to take photos good enough for the typical click and grin stuff needed for posting on this forum.  Love all photos ... keep working at it! David |
|
Bedrock of the Community
United States
14454 Posts |
if your camera has a manual WB setting you can use any type of lighting you already have and put a white piece of printer paper in front of the lens and manually set the WB for the lighting and it should help with the yellow color you are getting. I have to do this with my JVC 3.3 MP camera and it works perfectly to get accurate color. Most cameras that do have a manual WB setting has to be put into manual mode to be able to adjust the wb manually instead of a pre-determined amount of WB by the manufacturer. I had a sony P&S camera that didn't have a manual WB setting and I could never get the WB right with that camera and that is why I always went back to the JVC when shooting pictures of coins (not to mention the macro mode on this camera was just plain awesome)
|
|
Pillar of the Community
United States
2424 Posts |
one thing I need to know nickelsearcher, is your diffusion. do you use diffusion? or not? my problem is glare. I use an ott light. I know the angles I need. but the best pictures I have tend to be with diffused lighting. your pictures are great and show a strong luster all around. let me know
|
|
Moderator
United States
15664 Posts |
Quote:
do you use diffusion? or not? I've tried it both ways ... but could not capture any luster while shooting through a light tent. My current set-up is straight light without diffusion. David Take a look at my other hobby ... http://www.jk-dk.art |
|
Pillar of the Community
 United States
7225 Posts |
I am using an old Olympus OM10 film camera. With this I have a dial setting labeled FC, with settings from 1 to 1000. What does this function do? Secondly at the end of my lens I have settings ranging from 1.8 to 16, if I remember correctly this is for exposure time; is this correct, and what is suggested exposure times for close up coin photography?
|
|
Pillar of the Community
United States
509 Posts |
|
|
Moderator
United States
23522 Posts |
Quote:
I am using an old Olympus OM10 film camera. With this I have a dial setting labeled FC, with settings from 1 to 1000. What does this function do? Secondly at the end of my lens I have settings ranging from 1.8 to 16, if I remember correctly this is for exposure time; is this correct, and what is suggested exposure times for close up coin photography?
Phew. This is truly the "hard road" for coin imaging.  The "FC" dial is exposure time, going from 1 second up to 1/1000sec. Only the "1" is a whole number; all the rest are fractions - assume a "1" above each number from "2" through "1000." Manual shutter control was an option on the OM-10, although a US-only OM-10FC model was sold which included that option. The dial on your lens is aperture, from f/1.8 through f/16. There is no possibility of adjusting White Balance in your camera. You're either going to have to do it with lighting itself - your best bet is to seek out and use 6500k "Daylight" bulbs - or in postprocessing through software. The second image is just out of focus; it's not a function of any particular camera setting. Either the viewfinder is too small to accurately determine whether the focus is proper (Heaven knows my eyes wouldn't be up to it), or there's a bit of camera shake when the shutter is triggered. If you are currently triggering the shutter by hand, use the self-timer function so nothing is touching the camera when the shutter goes off. Your goal is to get images which satisfy you with an exposure of around 1/60-1/120 at f/5.6 or f/8. These are the settings at which I'd expect camera shake and depth-of-field to be optimal, although your specific lens might differ. You'll need to vary the amount of light used in order to make these settings work. I'm afraid you'll also need to become proficient with postprocessing software such as the Gimp, Photoshop or the like; chances are it's going to cost you the price of a decent digital camera in film alone, to refine your technique enough to get truly satisfying results. And the settings will be different between copper and silver. |
|
Pillar of the Community
United States
4041 Posts |
It is hard to get both luster and color in a single shot. I've tried many different lighting setups and have never taken a photo that I was completely satisfied with. I thought I was satisfied many times, but then I looked at a previous photo, or one taken by someone else, and found something lacking.
One aspect of lighting I have not seen a good discussion of is what I think of as "Apparent Size". A light source can be "large" or "small", regardless of its actual size, depending on distance to the coin. For instance, an OTT Light is pretty big, much larger than a coin, so if it is close to the coin it will shine down on it from a wide range of angles. This illuminates the coin fairly evenly, and only a small percentage of the light getting to the coin will specularly reflect straight to the sensor and cause hot spots ("glare"). But even an OTT Light, placed far away from the coin, will look "small" and can cause hot spots due to specular reflections from the coin surface. If most of the light is coming from that one "small" source, the hot spots dominate the overall exposure and are emphasized. The overall exposure is set by the overall amount of light getting to the coin, so more light that does not cause hot spots will keep any unavoidable hot spots from being emphasized.
Diffusers and reflectors make a light source look "bigger" by spreading the light over a wider area and reducing reflections. The problem is that luster needs that specular reflection to be visible. Luster is created by millions of little mirrors that reflect the light from a "small" source. This is why coins at a coin show look so lustrous, they are being lit by all those pinpoint halogen sources around the bourse floor or at the dealer's table.
I've found an acceptable compromise to get both good overall lighting, color and some luster is to use a total of 3 lights: Two diffused sources at around 10:00 and 2:00, as high an angle as I can get them to emphasize the color presentation and close enough to look "large"; and one "small" source high and far away around 6:00 to emphasize luster. If I have time I'll take some comparative pics...Ray
Contact me for photographic equipment or visit my home page at: http://macrocoins.com |
|
Pillar of the Community
United States
7225 Posts |
SuperDave: Excellent feedback on my camera. you have given me a broader knowledge of basic settings for this old camera. I will run the next roll at or near the settings you have mentioned, ensure stability on the tripod and use my extender shutter release to avoid possible wobble in that.
Rmpsrpms: It looks like lighting will be the key to my color issue. I have tried a variety of "household" lighting I have and have found that fluorescent seem to give me better color but at the cost of luster as you had mentioned. Thank you for your direction.
|
|
Pillar of the Community
United States
4618 Posts |
Your "White Balance" is off. I use a Nikon D200 to shoot. I can set the white balance there. I also use Photo Shop CS4 it has an "AUTO" adjust to correct the off color shots, or you can set up a all of the adjustments in Photo Shop and save them. Then each time you shoot a photo with the same camera settings, you can load the set of adjustments to get every shot the proper color, exposure, sharpness and any other setting you can think of.
Is it okay if I copy the photos you have above, copy them and correct the color with PS4? I'll post the results in this thread.
Just let me know if you want me to try.
Thanks!
Ben
ANA ID: 3203813 - CONECA ID: N-5637 Clean a coin that may be worth collecting? Please DON'T! When in doubt, leave it dirty!! 
|
|
Moderator
United States
23522 Posts |
Many lenses have a fairly small range of aperture where they are at their sharpest; I'm guessing that f/5.6-f/8 is a good spot for yours. Wider apertures (lower numerically) tend to reduce depth of field, and although they help greatly with getting light onto the coin (wide apertures physically allow more light to reach the film), it's a tradeoff.
My guess is that you'll need a bare minimum of two available 60w bulbs to achieve results at these settings. If I read correctly, your camera will warn you if the shot is underexposed, which will help.
If you haven't already, make specific records of exact settings for each shot. Vary things. Play a little with aperture to see if your lens has such a "sweet spot." Once you believe you're getting enough light onto the coin, for every step wider in aperture, speed up the exposure by one equivalent step. I'm guessing 2-60w lights will allow you 1/125@f/5.6 or 1/60@f/8.
|
|
Pillar of the Community
United States
7225 Posts |
Yokozuna, feel free to work with the photos.
|
|
Pillar of the Community
United States
4618 Posts |
Photo Shop is great, but can cost quite a bit. The version I use is an older version. It's CS4. When new, the program was $699.00. Once you see what the program can do, you'll understand why it cost so much. There are LOTS of programs to use to correct digital photos. I just like Photo Shop. Adobe will let you download and use the latest version (5.5, I think) for a free trial, but It takes a PC with lots of processing power to run correctly. Check the recommendations on the download page. I'm using a Toshiba Qosmio X505 laptop. It's a Quad-Intel® Core™ i7-2630QM processor (64-bit). I did work as a motor sports photographer before I became disabled so I had lots of money tied up in Cameras, PC equipment and programs. You can do great photography and digital processing with almost any PC-Camera combo now, so don't let price worry you. Here's what I did with your 2 shots. It's the best I can do with the .jpg format I copied and without having the coin in hand to make adjustments to match colors. It took about 3 minutes each. You can spend an hour getting a shot right and then save the settings you used. Then the next shot is just loading the settings and it's done. 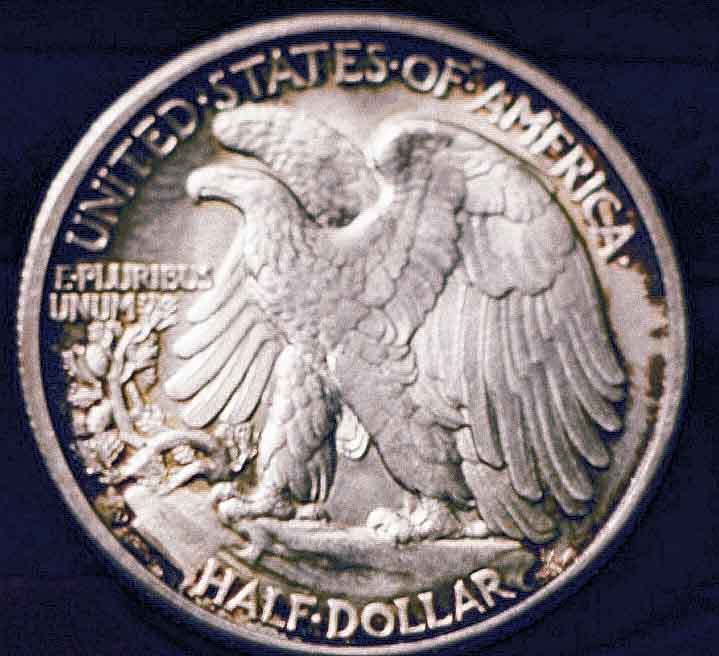 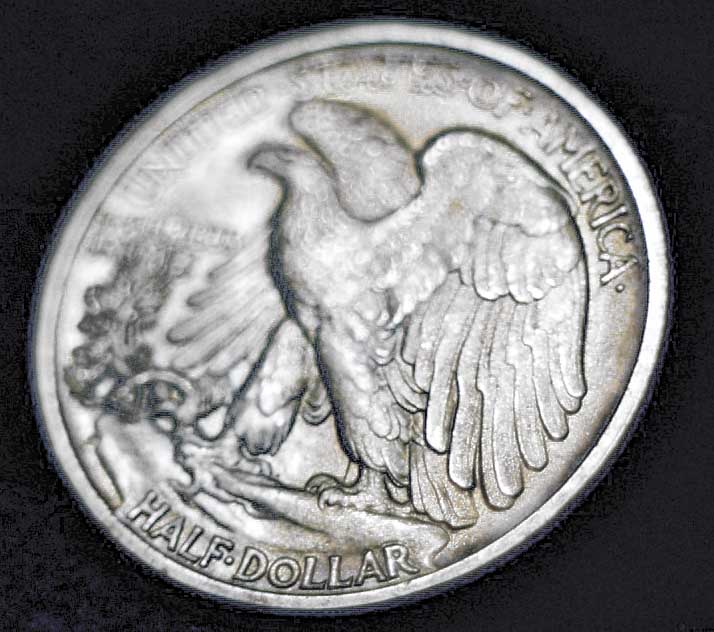 Here are the steps I used: Crop, adjust colors in highlight/mid-tone/shadows changed the Vibrance and Saturation and did an overall Sharpen of each shot, then did "Sharpen Edges" 2 or 3 times to bring out all the detail of the coin possible. This will also bring out scratches, so you have to find a point that reflects the true look of the coin. As you can see, it can also cause a grainy look in the dark areas of the shot, but depending on the time you want to spend on the shot, you can fix all of that too. Processing a digital shot with any "Photo Shop" type program lets you fix everything you need as far as color, white balance and sharpness with ease. It also allows you to bring out details that are hard to see in the original shot. Just remember, DON'T use it to hide flaws, add things that don't exist. If you have any question, send me an email at Yokozuna@ErrorCoins.CO I'll be glad to help if I can. Ben ANA ID: 3203813 - CONECA ID: N-5637 Clean a coin that may be worth collecting? Please DON'T! When in doubt, leave it dirty!!
|
| |
Replies: 13 / Views: 2,239 |
|


