| Author |
 Replies: 199 / Views: 23,275 Replies: 199 / Views: 23,275 |
|
|
|
Pillar of the Community
 United States
1298 Posts |
Thanks, Ray. It is an improvement. My eyes are not what they used to be, but I can see the increase in contrast and darkening you made. It sure helps when a professional points out areas for improvement. Thanks so much.
|
|
Pillar of the Community
Canada
2784 Posts |
hello ham. could you do me a favor. I see where you are not able to get pics of full slab. would you mind taking a couple pics of your setup. post them here and I may have a suggestion that might help you get the full slab. but first need pics of your set up and show why you can not get the full slab in. its up to you. I will be back later this evening. I may have a fix for you
|
|
Pillar of the Community
United States
1298 Posts |
Hi rocky, I ran across a copy stand that I couldn't pass up. Bought a Kaiser 5510 RS1 RA1 Arm. It might be overkill as the arm is 40". It is extremely well built. But it will solve my problem of being able to shoot a full PCGS slab with my Vivitar and 75mm lens. At some point when I have everything up and functioning, I'll provide some pics. Below is a link to the copy stand. Click on the 5510 model. Hamm. http://www.kaiser-fototechnik.com/e....asp?nr=5511Edited by Ham1947
10/31/2015 7:30 pm
|
|
Pillar of the Community
Canada
2784 Posts |
wow ham I really like that one. I don't think that's overkill. I am wondering was it expenses I like that ham that crank wheel is going to help a lot with focus. I see it anti vibration you got a good one. good move ham like it
|
|
Valued Member
United States
397 Posts |
Very helpful thread Ham1947! I recently purchased equipment from Ray, by the way excellent equipment and Ray was very helpful. I am just about as new as you can get when it comes to taking pictures period. I am capable of powering a camera up, setting it to auto and snap. I don't post very often due to limited time. I jump on here and read when I get the opportunity. I came across this post and I can't say thanks enough Ham for putting yourself out there. I want to thank Ray, Rocky, and Dave for all the help. Hopefully I didn't forget anyone. I put the camera equipment together followed this tread and I'm taking pictures of coins. I have much to learn, such as posting some pics for you all to critique. I don't make a lot of noise, but I'm watching and learning.
Appreciate all the help...Jim
|
|
Pillar of the Community
United States
1298 Posts |
Thanks, smoke1439. Just keep following the posts and don't be afraid to ask questions. Good Luck!!
|
|
Valued Member
United States
397 Posts |
Ok folks time for me to join in. I'm shooting with a Rebel T1i same as Ham. I'm using 75mm Nikon lens (Purchased from Ray) and I have it set on 4. I was shooting in Program mode, after reading the list of settings rocky posted pg.1, should I be shooting in Tv mode? I guess where I should start is getting all my general or standard settings correct first? I have shot a dozen or so pictures. First thing that I cannot correct is, when in DPP the coin is profiled correctly on screen, but when I take the pic it pops up rotated 90 degrees in the quick view box. It saves them in DPP rotated. I will rotate back properly. But when I attach them to an email or save them in a folder they are rotated 90 degrees again.  Your help would be much appreciated...Jim |
|
Valued Member
United States
397 Posts |
after reading the list of settings rocky posted pg.1, should I be shooting in Tv mode? Quote:
Correction to my previous post. Ham actually posted the setting he was using. Sorry for any confusion. |
|
Pillar of the Community
Canada
9167 Posts |
smoke1439 , I would suggest that you start a new thread just for your info and pics, it will be a lot easier to follow.
|
|
Rest in Peace
United States
10625 Posts |
This is something I came across a while back and saved. I'm not even sure who posted it originally.
think both of those can be set with Zoom Browser! Here is a step by step I wrote for someone who bought a camera from me, and I think this covers everything I personally do before plugging in the USB first time.(some of these might be settable in ZB...)
- Install the software that came with the camera onto your PC:
... EOS Utility
... Digital Photo Professional
- Turn on Camera and set the following settings:
... Turn top knob to Av
... Press Menu button (top left corner on back of camera)
... Tab over til you are on the 3rd setup menu (wrench with 3 dots)
... Tab down to Clear Settings and press Set, then Clear all Camera Settings and confirm
... Tab to the first camera settings menu (camera with 1 dot)
... Verify the Quality is set to high quality L (has a smooth quarter circle to the left of the L)
... Turn Image Review to Off
... Tab to second camera menu
... Set Metering Mode to Partial
... Tab to the first setup menu (wrench with 1 dot)
... Decide if you want auto power off. I have mine set for 15 min
... Turn Auto Rotate Off
... Tab to second setup menu
... Go to Live View settings menu
... Turn Grid Display to "tic tac toe" setting
... Turn Metering Timer to 30min
... Press Menu button twice to get out of all menus
- Press ISO button near the top knob and press the right tab key on back of camera to set ISO to 100
- Press the WB button (it's the tab up key)
- Set WB to Tungsten Light and then press the Set button (it won't change if you don't press set)
- Install the USB cable from your PC to the Camera. EOS utility should start automatically.
Quote:
EU/ZB default settings for a new camera (I'd use my T2i)
Necessary? I know I'll want to address changing the destination directory for shots.
I think so...this is where you can show a pictorial view and explanation of each of the parameters that can be set, with the camera defaults.
Quote:
Set MWB
Yup. Have to go back into camera-based settings for WB, though - I set WB before I attach the camera at all.
I couldn't get by setting them in-camera. I want immediate feedback as to whether the MWB setting looks correct. I only get about 33% hit rate, ie I need to re-do on average twice before I am satisfied with the MWB result. This is where it might be nice to go through the eyedropper MWB function in ZB, and the preferred defocusing method of setting MWB, etc.
Quote:
Focus (what OOF high and low look like vs critical focus)
Another shudder moment. Should you be taking pictures if you don't know what a focused shot looks like? I suppose we should, though.
I think so, since so many folks rely on AF, they need to know why AF is often inadequate when shooting at high resolution.
Quote:
Ought to mention the image Zoom Browser pops up of the shot, as the place for the taker to review his work and decide on any necessary changes.
I didn't know it did this, or maybe I'm disabling that function and didn't know it? I just look at the shot in DPP for RAW or other viewer like ViewNX2 for jpg.
One piece of trivia I would add - the image preview has the wrong exposure if you're using a manual lens in manual exposure mode (M on the dial). The preview actually looks a couple stops darker than what the actual exposure will turn out to be. It's a known bug in the Canon software. It works fine in Av or Tv mode. However, if you are using lens with a manual aperture ring, you can just use Tv mode if you want a fully manual exposure (since the camera can't set the aperture) and the preview is correct.
Most people probably stick with Av mode, but I like to lock in the exposure manually so I can get the same exposure for both sides of a coin or a series of coins and edit them all in exactly the same way and get really consistent results.
1) Open lens aperture to maximum
2) Adjust bellows length to approx magnification desired
3) Adjust lens height for best focus
4) Iterate 2 and 3 above while framing coin in viewfinder or on PC screen
5) Set aperture for desired resolution and depth of field (usually 5.6 or 8 for coins...)
6) Adjust Lighting for desired composition and effect
7) Adjust ISO and shutter speed
8) Shoot picture and check result
9) Iterate 7 and 8 above until correct exposure is achieved
|
|
Valued Member
United States
397 Posts |
Quote:
smoke1439 , I would suggest that you start a new thread just for your info and pics, it will be a lot easier to follow. Sorry about that Ham, I sometimes get caught up in the moment. I am relatively new on forums in general. I'm trying familiarize myself with the proper forum etiquette. I will start a new thread. Thanks Dave I did follow all those steps. |
|
Pillar of the Community
United States
1298 Posts |
Anyone. I have a Rodenstock APO 75mm lens, but without the lens cap. I have the plastic container.. What is the size of the cap, and where can I purchase one? Thanks.
|
|
Pillar of the Community
United States
9395 Posts |
Quote:
... What is the size of the cap, and where can I purchase one? Mine doesn't have a real Rodenstock cap either. I'm just using a generic (unbranded) 40mm cap that I got on ebay. |
|
Pillar of the Community
United States
1298 Posts |
Here are 2 photos of my new setup. Kaiser 5510 RS1 copy stand. Canon t1i, Vivitar bellows, and Rodenstock APO 75mm lens. Pics coming soon. 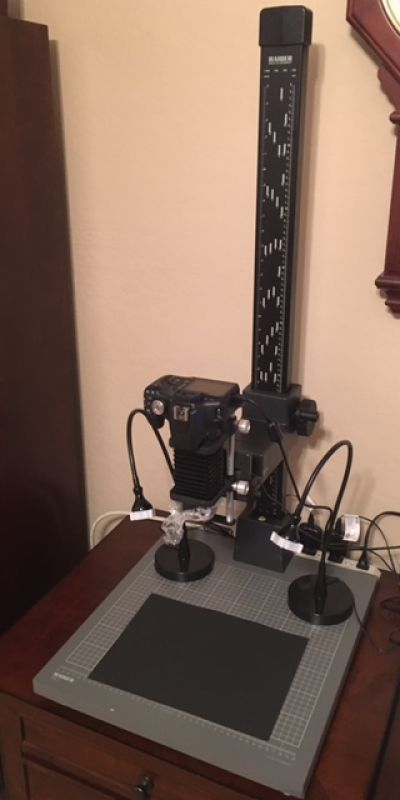 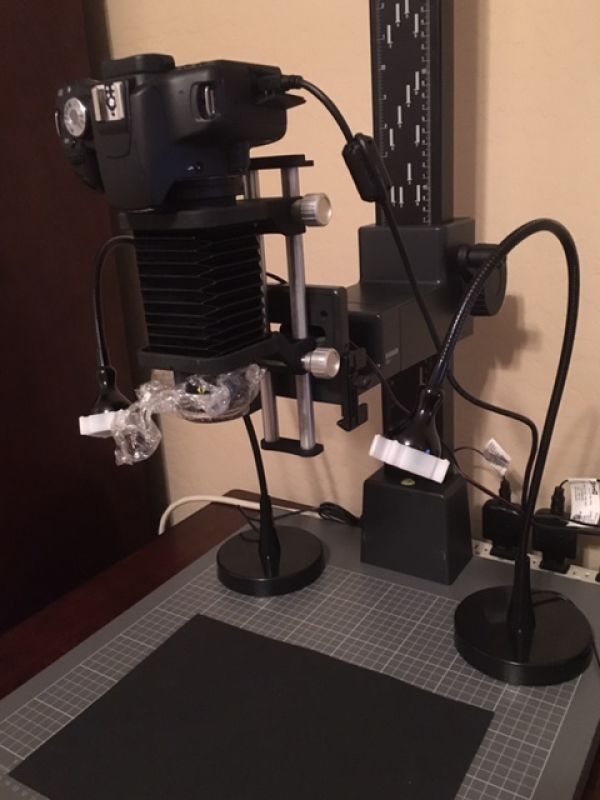 |
|
Pillar of the Community
United States
1298 Posts |
Thanks, pepactonius. I am going to order one right away.
|
| |
Replies: 199 / Views: 23,275 |


