| Author |
 Replies: 98 / Views: 32,915 Replies: 98 / Views: 32,915 |
|
|
|
Pillar of the Community
United States
1095 Posts |
Quote:
Do you just move the camera away from the coin, to reduce the resolution, so it isn't so zoomed in on it? Yes elevate the scope to what ever distance from the object is required to achieve the results you need. Ideally it's nice to have the scope on some type of stand or arm that allows you to adjust height. But I use what ever is handy, small box, books, stacked CD cases, etc. just prop it up on that. |
|
Pillar of the Community
United States
3546 Posts |
Quote:
would love to see a pic of that set up if you can get one Per a previous request the following CCF URL displays about 70% of what I have now completed regarding my USB (incorporating model iT7) tripod stand that currently still lacks a 'permanently attached', previously-referred-to concave white reflective plastic surface(for proof shots) and the adjustable CFL lights that are still a work in progress. If one does not mind following my somewhat detailed process for the nine part step-by-step construction of this device, I guarantee the successful creation of some pretty decent photos including discernible DDOs ... etc. I realize it seems like a lot of work to construct the tripod stand and related accessories but once it has been completed it is just like clockwork photographing coins; pretty much just 'set it and forget it' when taking shots of the same type of coin. https://goccf.com/t/109328fyi, mdpmedia PS: Remember a 'stupid' question does not exist in my book so ask me anything if I may be of further assistance to help one create their own adjustable tripod stand. |
|
Pillar of the Community
United States
3546 Posts |
Hello, Going back to June of this year to within this thread I will initially attempt to answer Samual Tan's inquiry entitled, Quote:
can you detect or see the etched (rough) surface with microscope My comments below will serve as a dual response since they will also attempt to keep the CCF family members informed of how to avoid one of my most recent investigative mishaps. Take a look at the following pictures showing 14k test acid on the surface of a piece of early 1900s Polish silverware: specifically a fork. Firstly, remember that when placing one's photographic lens (in this case my Mambate it7 USB camera) near the surface of an item being assessed with ‘any' strength of testing acid always have a small fan slightly blowing the potentially caustic fumes away from your respiratory orifices as well as away from the camera lens(including a possibly plastic ‘porous' camera housing). The last situation one would want to end up with is to be the proud owner an effective piece of photographic equipment containing entrapped corrosive acidic fumes gradually destroying the internal components leading to a catastrophic failure sometime in the future... Acidic fumes behave somewhat similar to static electricity in terms of the realized delayed effects on electronic parts; the malfunctioning equipment may not be noticed or experienced for months or even years after the initial exposure. |
|
Pillar of the Community
United States
3546 Posts |
Hi, The test procedure expletive is as follows: The following comments are my conclusions derived from these photographic shots taken with the Mambate it7 USB camera: The first photo below displays a Polish-made fork's surface ‘before‘ any application of 14k test acid: 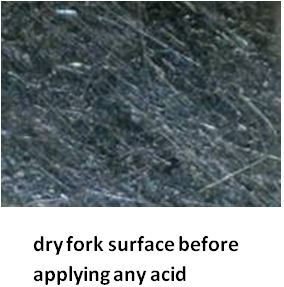 |
|
Pillar of the Community
United States
3546 Posts |
Hello, The photo below on the right is indicative of a silver fork that contains less precious metal in the approximate range of only 80% Ag(silver). This photo below on the right shows ‘liquid' or ‘wet' 14k acid having a very light tint of green hue within the acid itself while being exposed to the metal surface of this silver fork. Very dark green or especially bubbling green acid, however, would respectively indicate negligible or no silver content. In addition to the wet photo on the right I am also including the photo on the left which illustrates a dry (without liquid 14k acid on top) .800 Ag surface. The black arrows show the positions of a couple of very light scratches whose scratch depth intensity appears to remain the same both during the exposure to acid and afterwards when the surface has had the acid removed and neutralized. This comparative demonstration also serves to support the fact that unlike Buffalo nickels using acid to reveal a hidden date on a 90% silver coin such as a Standing Liberty quarter is simply an exercise in futility.  |
|
Pillar of the Community
United States
3546 Posts |
Hi, The next set of comparison photos now introduce a completely different surface on the left photo below: a candle holder, which is actually marked with the words, ‘Newport Sterling' I placed the same previously-used ‘liquid' 14 k acid on the left substrate which produced a creamy-colored result void of any green tint whatsoever. This left photo below is an example of what should normally be expected when testing for true ‘sterling' silverware or pre '65 US coins both containing silver (Ag) in the range of 92.5% and 90% respectively:  I hate to admit this but my mistake, unfortunately, was paying someone too much $ based upon the incorrect assumption that their silverware was composed of .925 sterling silver when it was later correctly determined by the it7 USB camera to be only .800 grade silver: ouch For what it's worth I hope my divulged mistake helps all interested parties avoid this error in the future. fyi, mdpmedia |
|
Pillar of the Community
United States
3546 Posts |
Hello, I initially was not sure if a coin being discussed in a previous thread had its photo taken while enclosed in a slab or not. The issue at hand in another thread was that the owner was for some unknown reason unable to obtain a clearly-focused shot of his coin which later turned out to be without a slab. Anyhow, I had already started composing my own small narrative using one of my PCGS-slabbed 1921 Mercury dimes as an example of what steps I personally perform to ensure a very clear and focused photo for easier grading. My USB camera applied in this technique remains the same model and brand already previously featured in detail earlier in this CCF thread; it has been the same instrument used on all of my previous photographic examples within this thread. The customized tripod used today is also the same one seen earlier in this thread. The explanation of how to construct this home-made tripod stand is already well documented and illustrated earlier in this same thread. mdpmedia continued... |
|
Pillar of the Community
United States
3546 Posts |
Firstly, the purpose of this comparative photographic example using this slabbed 1921 Mercury dime is to emphasize the simplicity and repeatability when using my custom-made tripod stand for consistently producing in-focus pictures. Next, one notices the two reverse side-by-side photos of this PCGS-slabbed dime as follows:   A. the left photo, A., is purposely photographed just a bit out of focus while B. the right shot, B., has noticeably crisper details From a procedural point of view once the proper lighting is set and the surface area of the dime completely fills the USB camera's field of view, one is able to effect incremental focal adjustments by easily and accurately turning only the crank of the tripod. This really makes life easy when the setup is all ready to go like this. mdpmedia continued... |
|
Pillar of the Community
United States
3546 Posts |
The following photos display a superimposed angle measuring scale device that possesses an ‘x' axis which is horizontal to the top part of the tripod in both photos A. and B.:  The USB camera used for this demonstration is mounted on the top part of these sectional tripod shots but is currently not shown here since its photos have been already laid out and described in depth in multiple features throughout this thread. These two photos of the differently-positioned/rotated tripod crank handle below used for up/down (z axis movement adjustments) demonstrate: A. a left photo with its hand crank positioned approximately 40 degrees off of an assumed vertical line: * this crank handle, A., correlates with the previously-shown, slightly-out-of-focus reverse coin side, A. B. a right shot having its hand crank located only about 5 degrees off of an assumed vertical line: * this crank handle, B., correlates with the previously-shown in-focus/crisper-appearing reverse coin side, B. mdpmedia continued... |
|
Pillar of the Community
United States
3546 Posts |
The details and recommendations for efficiently implementing this procedure are explained as follows: 1) To transition from an unfocused view of any coin(such as the featured reverse-sided Mercury dime) to a better focused and more detailed view of the same coin, one must only rotate the vertical up/down (‘z' direction) crank of the tripod about 35 degrees(about 1/10 of a turn) in this specific instance, 2) When one is photographing the same diameter coin it is commonly necessary to establish the other parameters like (x and y axis) field of view accommodations and the associated lighting only once or twice at most in the beginning of the process, 3) When changing from significantly larger diameter coins over to smaller diameter coins (and visa-versa) one must: a. initially adjust the focusing dial on the USB camera itself in conjunction with the hand crank of the tripod stand, b. then perform, as the final step, the all-important fine focusing adjustments by only using the up/down hand crank of the tripod. 4) When accumulating large quantities of coin photographs while utilizing USB/tripod-equipped devices such as this featured combination, one should consider grouping together all coins having similar diameters to minimize the numerous amounts necessary focal adjustments: a. For example all coins 20 mm and smaller diameters (i.e. LHC and dimes) could be a type of group to photograph together, In summary I hope that individuals seeking inexpensive but effective methods for photographing their coins will consider the above methodology. fyi, mdpmedia |
|
Pillar of the Community
United States
1511 Posts |
Wow, thanks so much for this thread, it's been very very informative! I actually just ordered this same USB scope of of ebay.. It's still $26.89 free shipping. I've been debating it for a while now and was worried it wouldn't take pics of large dollars and such (Morgan's, ASE's etc) but you've shown me it can and does a nice job to boot!! For $26 it seems like a darn good deal! I can't wait for it to come in now! So thanks again, and I may be back with a few questions.. Lol. |
|
Pillar of the Community
United States
1511 Posts |
Wow, I just got mine in today.. It's great!! For the price unbelievable! I can zoom in on a date, for instance a 2000 penny and zoom all the way so only the 20 shows... And clear as day! Such a nice scope for the price!! I'm blown away!! Blown away...
|
|
Pillar of the Community
United States
3546 Posts |
Hi, On page three of the following URL one can view an example of four photos taken by my USB camera on a nice 1936 Gettysburg commemorative coin(matte proof?) having a net distribution of only 26,928 coins since several of the original 53,000 minted coins were melted down by the US mint: https://goccf.com/t/126805&whichpage=3Incidentally, over '40,000' soldiers were either killed or severely injured in the Battle of Gettysburg which occurred during the extremely short time-frame of July 1 - 3, 1863. Enjoy. mdpmedia |
|
Pillar of the Community
United States
3546 Posts |
Hello, My recent thread using my USB camera to shoot a Gettysburg Commemorative is no longer at the above aforementioned thread ending in ...TOPIC_ID=126805&whichpage=3 but is now located at: https://goccf.com/t/144889Since it now appears from the USB-derived photos I provided that this coin is not a counterfeit, the moderators created a new thread per my request in an attempt to expose this coin to more CCF folks en route to having more opinions on record insofar as the appropriate grade designation. Please weigh in if you'd like to. Everyone is welcome to comment no matter how many posts one has. fyi, mdpmedia |
|
Pillar of the Community
United States
3546 Posts |
Hello,
To anyone using a USB camera that has an adjustable ball joint from which the USB camera swivels on, this tip is at least worth a shot to try out.
Over time and depending upon the exact design of one's USB ball joint the weight of the USB camera may contribute to a slight downward movement of the USB camera causing an object to move outside of the desired focal area.
As a solution to this sometimes annoying issue try to fit some coarse grit sandpaper(size of 10 mm x 10 mm) in between both sides of the ball joint and the two pieces of metal pressing onto the ball joint.
This small addition of coarse sandpaper placed on both sides of the ball joint should actually cease the undesirable downward motion of the USB camera.
Finally, keep in mind that this quick fix is just thin paper with sand glued on it which will eventually wear out and/or tear with excessive movement and friction etc.
Therefore, if one is using the adjustable tripod stand featured earlier in this thread, attempt to primarily use the crank handle of the tripod and the elongated adjustable spiral-wound snake arm to create the majority of x-y-z modifications when focusing in on an object.
Most likely gluing another flexible type of thin substrate to the back of this coarse sandpaper would probably prolong the life of the sandpaper but that is a project way down on the priority list at present.
In summary, at this point, however, the sandpaper alone functions fine since the majority of USB positional changes occur as a result of pushing and pulling the extended spiral snake apparatus to which the USB connects to.
Hopefully, this tip makes life easier and more consistent when photographing with the USB camera.
fyi,
mdpmedia
|
| |
Replies: 98 / Views: 32,915 |


