| Author |
 Replies: 32 / Views: 6,390 Replies: 32 / Views: 6,390 |
Page 3 of 3
|
|
|
|
Valued Member
 United States
71 Posts |
Two more pictures for critique. They are the obverse and reverse of a recently released circulating commemorative coin for spaceflight. The original pictures with greater details can be viewed at: *** Edited by Staff - Please review the rules that you agreed to when you registered. *** 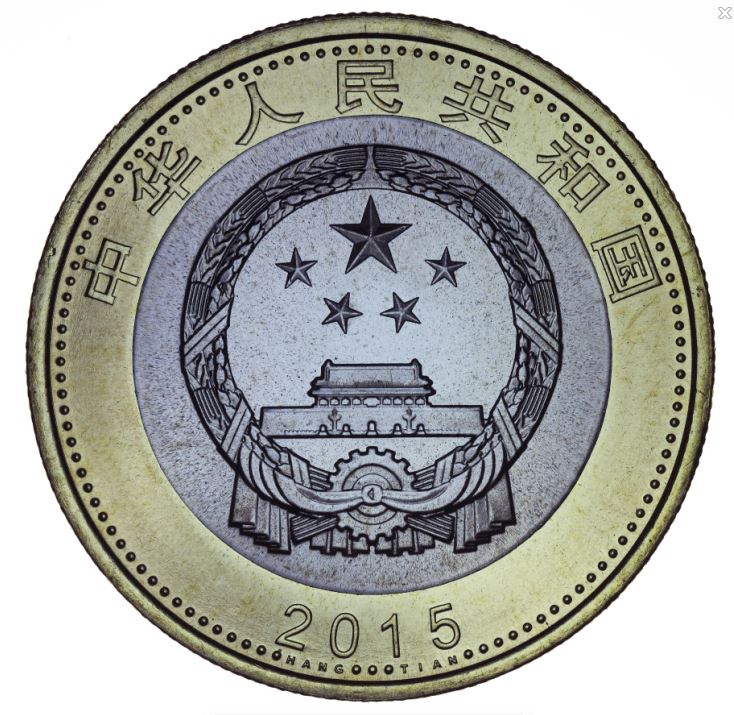 |
|
Pillar of the Community
 United States
4038 Posts |
Quote:
Thanks for your critique, Ray. It is much appreciated. I have a question, though. How do you remove the reflection mentioned in 4? It seems that the light on the rim is part of the lighting. I often determine the source of the light by looking at the light on the rim. Is it possible to remove it by adjusting the height of the light? Just saw this response today for some reason... There are two reflections in the lower left: 1) Off the denticles. This is the normal illumination from your light source 2) Off the raised portion of the field. This appears to be coming from a secondary light source. It is almost as bright as the reflection off the denticles so I don't think it is a re-reflection from the coin. If you are 100% sure there is no other light source in the room that might be causing the problem, then it must be a re-reflection. I also assume the coin is raw, so reflections off the slab can't explain it. One thing you might try is a black tube around the coin to eliminate possibility of extraneous illumination. Hamm and rocky have done that to good effect and Hamm published results in another thread. Other than that, a higher angle to the light would keep the reflections down but would also change the look of image quite a bit. Quote:
Lastly, I wonder what the lines are in the corners in the pictures below? Flowlines in wrong directions? Looks to me like those are die polishing/sanding marks. The areas you're showing are on the edges of raised die elements. Quote:Two more pictures for critique. They are the obverse and reverse of a recently released circulating commemorative coin for spaceflight. The original pictures with greater details can be viewed at: http://www.ahsyw.net/viewthread.php?tid=22319 Nice pics. They appear to be mostly axial. I'd like to see them a bit brighter and with more contrast, but as always it's up to the photographer to match the image to the coin. My "contrast" comments are of course imaging-related, and are independent of the look of the coin, just geared to presenting the best image of the coin. This is a subtle distinction. It's important in an image to ensure proper overall exposure (re: the recent thread https://goccf.com/t/246014&whichpage=4) but also to use the full dynamic range of the jpg medium. To illustrate, I adjusted the dynamic range of the first of your latest images in two ways. First, bringing the black level up until I see just the first glimpses of saturation:  The black level here is 192, so this means you can drop your white level as low as 192 and not see significant over-exposed highlights. I also lowered the white level to see where the first shadows are lost:  In this image I lowered the white level to 16. So this means your image dynamic range can be improved quite a bit without crushing blacks or blowing out whites. Contact me for photographic equipment or visit my home page at: http://macrocoins.comEdited by rmpsrpms
01/15/2016 11:21 am
|
|
Pillar of the Community
Canada
4227 Posts |
Quote:
Lastly, I wonder what the lines are in the corners in the pictures below? Flowlines in wrong directions? Possibly die polishing lines. These are great photos and I'm really enjoying this thread. |
|
Valued Member
United States
71 Posts |
Thanks again, Ray. I passed your comments on to the photographer of the Great Wall and the Spaceflights coins. He does not remember whether there was an extra lighting source on the lower left side of the Great Wall coin. Still he was very impressed by your attention to such details. Any comment on the high mag pictures I posted earlier taken with Nikon objectives? I was kind of shocked when I read about the depth of field in Lefkowitz's book. I started on 10x without realizing what I was facing. Here are two pictures I took with the 10x objective, after a lot of sharping. 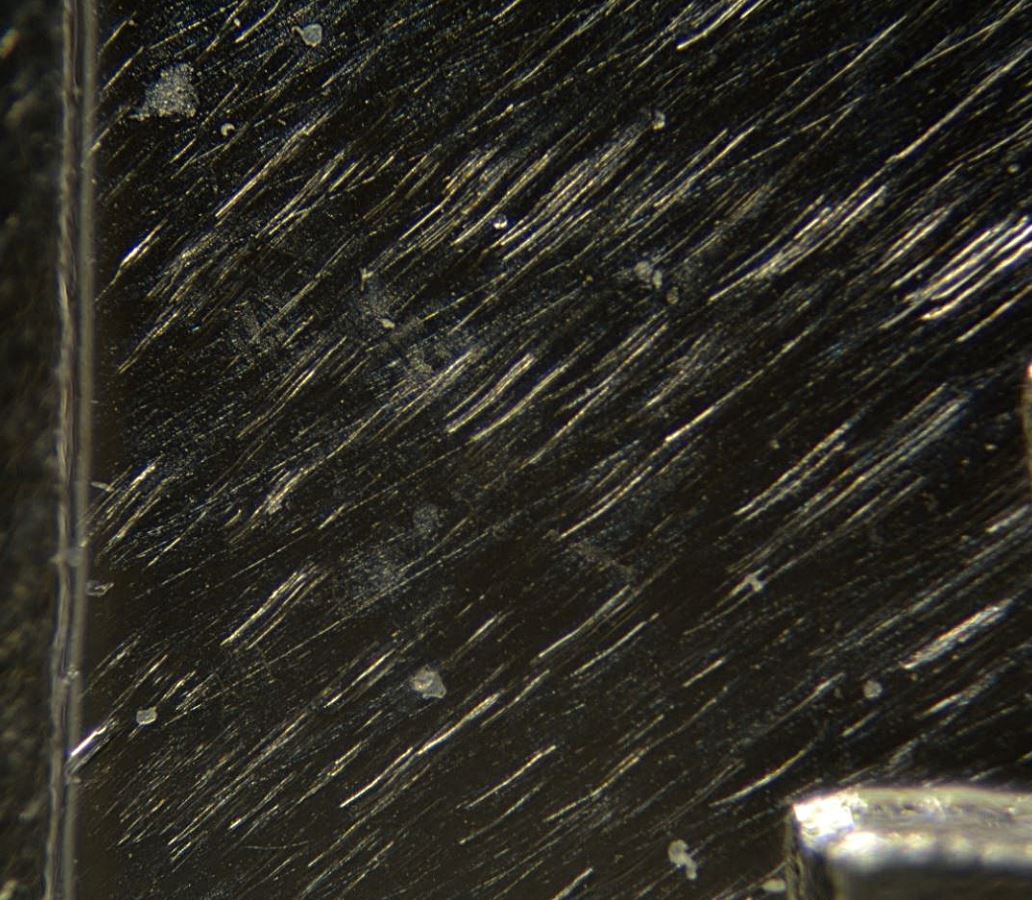 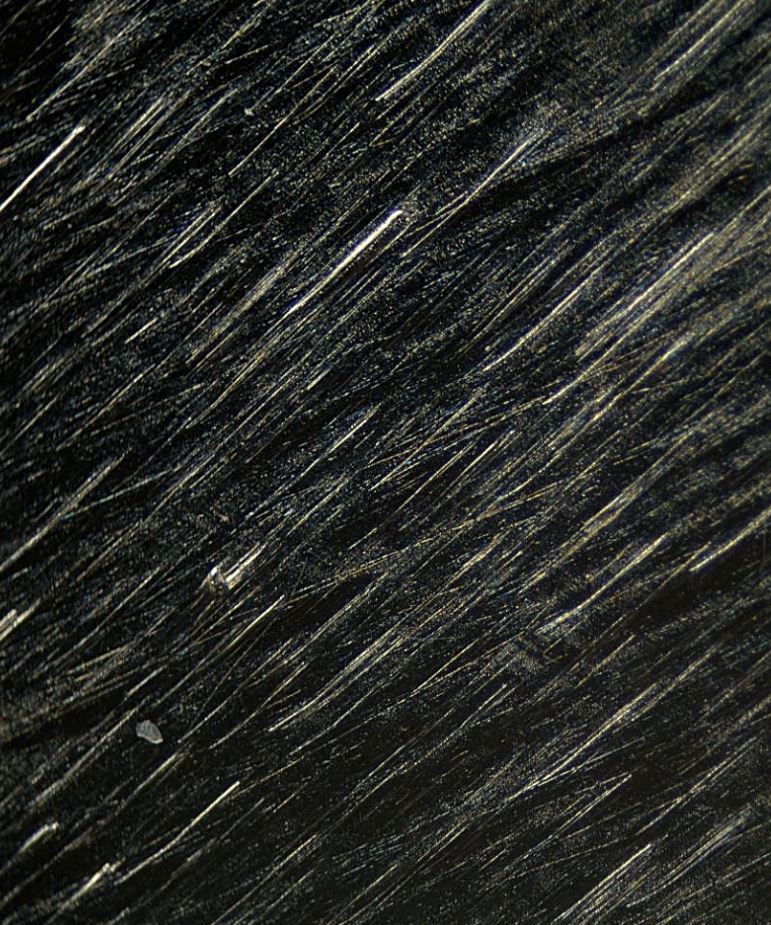 |
|
Pillar of the Community
United States
4038 Posts |
Quote:
Any comment on the high mag pictures I posted earlier taken with Nikon objectives? I was kind of shocked when I read about the depth of field in Lefkowitz's book. I started on 10x without realizing what I was facing. Here are two pictures I took with the 10x objective, after a lot of sharping. cpf...which 10x objective are you using? It's tough to judge sharpness based on the field unless extreme side-lighting is used. There are few definable "features" that can be scrutinized. The raised feature shown in your second image looks pretty sharp, but a similar feature in the lower right of 2nd to last image is not so sharp. I generally find 10x objectives with NA 0.25 to be extremely sharp, and don't require much sharpening to present well. The DOF is of course very small. For 10x 0.25 objectives I usually must use 15-20 shots in the stack to cover the topography of a Cent. I expect your coins to have similar topography. How many shots are included in your stacks? |
|
Pillar of the Community
Canada
2784 Posts |
coinphotofan hello I worked in the electrical field. we did a lot of pressing 50 ton. with many dies over the years. what looks smooth to the naked eye. you will find is not smooth at all. we worked with various metals it does not matter is never perfectly smooth. it can be close but there will always be lines. from where the dies are made. when the machine them. there are lines. thou they be micro they are there. using the magnification your using. you are only seeing what is on every piece of metal. if you don't see it increase the mag and it will be there.
|
|
Valued Member
United States
71 Posts |
Quote:
which 10x objective are you using? Nikon 10x 0.25. I did not do any stacking on these images (have yet to learn it), just sharpening. Also, I cropped only part of the image. The unsharpened full image looks like this: 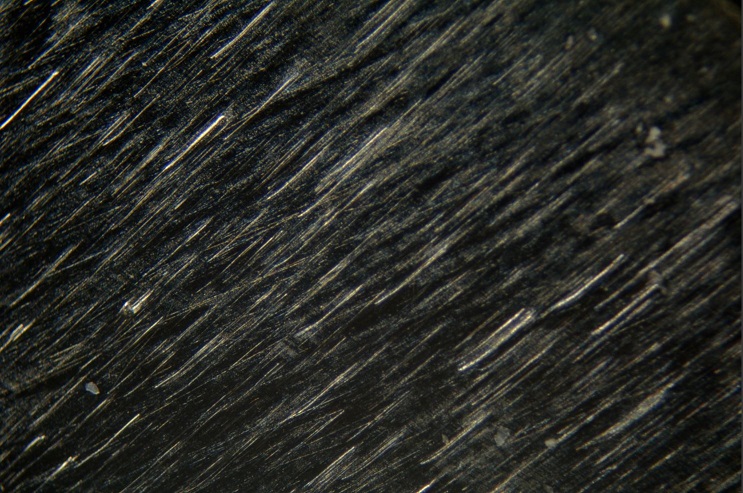 My question is: can the 10x objective take a sharper picture than this? (I took the photo to show the flow lines on a proof coin.) |
|
Valued Member
United States
71 Posts |
Quote:
hello I worked in the electrical field. we did a lot of pressing 50 ton. with many dies over the years. what looks smooth to the naked eye. you will find is not smooth at all. we worked with various metals it does not matter is never perfectly smooth. it can be close but there will always be lines. from where the dies are made. when the machine them. there are lines. thou they be micro they are there. using the magnification your using. you are only seeing what is on every piece of metal. if you don't see it increase the mag and it will be there. Thanks for the info! |
|
Pillar of the Community
United States
4038 Posts |
Quote:
My question is: can the 10x objective take a sharper picture than this?
(I took the photo to show the flow lines on a proof coin.) It's hard to tell how sharp this actually is. It looks like there is a "stripe" of best focus on the left side of the image. Can you post a 100% crop, unsharpened, taken from that part of the image. How much in-camera sharpening are you doing? |
|
Pillar of the Community
United States
1314 Posts |
Quote:
I wonder what the lines are in the corners in the pictures below? I believe they are polish lines. Periodically a die will be "cleaned up" with a file, and followed by a finer polish. If you've ever done any metal working, you know that file marks do not polish out easily. While appearing in the protected part of the coin, they are actually on the exposed corner of the die. A closer look at other coins will show that they are fairly common. They can be used as a clue to identify the specific die used to make the coin. 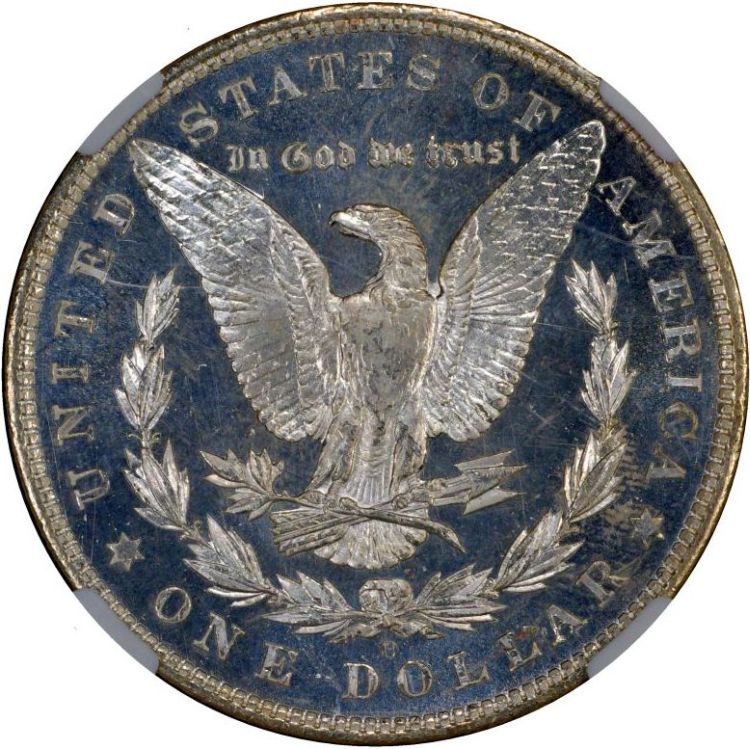 These examples come from a Morgan dollar made at New Orleans. The close ups are of the wreath bow, below the eagle's tail. (Note: the "O" mint mark was hand punched into the die after the rest of the die was prepared, so its position isn't always the same.)    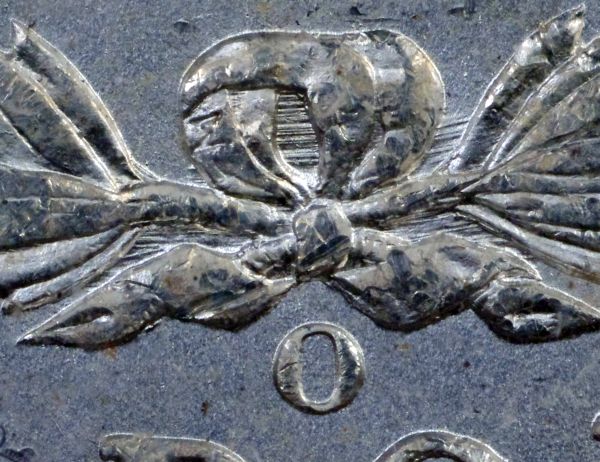 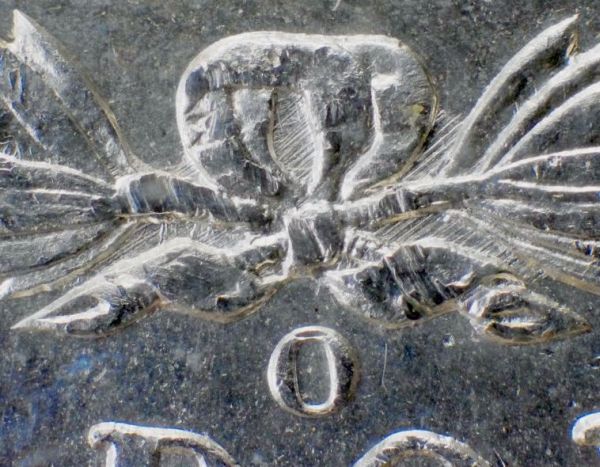 |
|
Valued Member
United States
71 Posts |
Quote:
It looks like there is a "stripe" of best focus on the left side of the image. Can you post a 100% crop, unsharpened, taken from that part of the image. How much in-camera sharpening are you doing? I am attaching an unsharpened image of that stripe. Also, I do not use in-camera sharpening. I thought it would not make a difference if I used the RAW format?  |
|
Valued Member
United States
71 Posts |
@Chute72: Thanks for the comment and for all the great images.
|
|
Pillar of the Community
United States
4038 Posts |
Quote:
I am attaching an unsharpened image of that stripe. Also, I do not use in-camera sharpening. I thought it would not make a difference if I used the RAW format? The image is showing very good sharpness for 10x at pixel-level. Not so sharp at the left edge but middle and right side is good. It seems the problem you're having is more to do with depth of field rather than the objective itself. Likely you need to stack a few images even to get the relatively flat field fully in focus. What I do see is perhaps a contrast problem with the objective. This could be due to flare, or it could be due to internal reflections inside your extensions. I would suggest looking down into the extension system without camera while shining a flashlight into the objective to see how much light is reflecting off the inner surfaces. You may need to add some light absorbing material. I don't remember discussing what camera you're using, but I assume it is a Canon or perhaps a Nikon with EFCS? The image at 10x is sharp enough that it seems EFSC/EFCS is being used. If not, then this might be an area for further improvement. As to workflow, the starting point for the RAW processor is the in-camera Picture Style. When you load the RAW image it will look pretty much like the .jpg unless you make changes to it. The Style info is stored with the RAW image and applied by the editor. How that info is interpreted by the editor varies between editors, so they'll each look a little different. What are your in-camera Picture Style settings and sub-settings? How much post-processing are you doing to the RAW image? |
|
Valued Member
United States
71 Posts |
Quote:
The image is showing very good sharpness for 10x at pixel-level. Not so sharp at the left edge but middle and right side is good. It seems the problem you're having is more to do with depth of field rather than the objective itself. Likely you need to stack a few images even to get the relatively flat field fully in focus. It is good to know that this image is doing justice to the 10x lens. I realize that for the full image to be sharp, I have to stack. The lens may not even be parallel to the coin. I will take care of these. At the moment, I still have problems with sharpness. Not all my 10x photos show this sharpness. In fact most do not. I am trying to figure out how I can consistently produce this sharpness. I am using a Nikon 5200, with remote shutter release and mirror lock-up. The shutter speed can be as low as 1/6 second as lighting is diffused. I can observe shaking of the camera body when the mirror is raised (and lowered). I am wondering whether increase shutter speed would help. As I have no control of the aperture, a friend suggested increasing ISO. Another way to eliminate vibration caused by mirror action is to use LiveView. But in LiveView, the shutter speed is limited to 1/30 or faster. I found this afternoon that turning off Manual Movie Settings can override this limit. I still have to try it out. Quote:
What I do see is perhaps a contrast problem with the objective. This could be due to flare, or it could be due to internal reflections inside your extensions. I would suggest looking down into the extension system without camera while shining a flashlight into the objective to see how much light is reflecting off the inner surfaces. You may need to add some light absorbing material. I discovered that some light is reflected off the inside of the cone-shaped adapter. How can I add light absorbing material? Quote:
As to workflow, the starting point for the RAW processor is the in-camera Picture Style. When you load the RAW image it will look pretty much like the .jpg unless you make changes to it. The Style info is stored with the RAW image and applied by the editor. How that info is interpreted by the editor varies between editors, so they'll each look a little different. What are your in-camera Picture Style settings and sub-settings? How much post-processing are you doing to the RAW image? I have not changed the picture control setting in the camera. It is "Standard." I normally do some sharpening, exposure and contrast adjustment during post-processing. |
|
Pillar of the Community
United States
4038 Posts |
Quote:
Another way to eliminate vibration caused by mirror action is to use LiveView. But in LiveView, the shutter speed is limited to 1/30 or faster. I found this afternoon that turning off Manual Movie Settings can override this limit. I still have to try it out. Your D5200 does not have EFCS, so the problem you're having with sharpness is probably due to shutter shake. With non-EFCS cameras, only effective way to eliminate shutter shake is to use external flash with 2nd curtain sync. You can prove if the problem exists by using delayed lighting, but it's not very practical. To do this, adjust lighting so that you need a 1-sec exposure. Use a single light for convenience and add more diffusion, etc. Set ISO to 100 or lower if available. Once you have 1-sec exposure settings, change to manual mode and 2-sec exposure. Turn off the lights. Press the shutter release. Wait 1 sec. During that 1 sec the vibrations from the camera will dissipate. Turn on the light in such a way as to not induce any vibrations. This will give the proper 1 sec exposure with no vibration and will tell you if the shutter shake is the issue you're seeing. If so, you'll either need to start using flash, or get a Canon camera. Even the venerable Canon XS has EFSC, and does not need flash to eliminate shutter shake. Quote:
I discovered that some light is reflected off the inside of the cone-shaped adapter. How can I add light absorbing material? You can buy sticky-back black velvet flocking material, or other type of velvety material. Just make sure it looks very black. Cut a small piece and form into a cone shape and place inside the cone adapter. Cone adapters are notorious for reflections. Quote:
I have not changed the picture control setting in the camera. It is "Standard." I normally do some sharpening, exposure and contrast adjustment during post-processing. If you're just using Standard style, you're doing a lot of internal sharpening, and your contrast settings are higher than you want them to be. Go into the Standard Style settings menu, turn off sharpening, and reduce contrast, and you will have a better starting point for your post processing. You can do the same thing in the RAW processor as well. It should show what Picture Style is being used and allow you to change it. |
|
Page 3 of 3
|
Replies: 32 / Views: 6,390 |
Page 3 of 3
|


