| Author |
 Replies: 18 / Views: 4,751 Replies: 18 / Views: 4,751 |
|
New Member
United States
47 Posts |
Hi everybody! Hello Swamperbob, Just want to share pictures of 1782 8R Mo FF. The weight is right 26.73 gr SG is 9.65 ! Edge doesn't look right (not done by the right edgers, looks weak and "mushy", circles are too "tight" and right side looks "flat" also I couldn't find the second edge overlap). Some copper color spots like one on the nose (silver plating)... Wear of the coin ... center comparing to the letters of the coin. "8R" - 8 has weird shape ... Got it from ebay and sending it back: http://www.ebay.com/itm/260894190039?ru=http://www.ebay.com:80/sch/i.html%3F_from=R40&_trksid=p4712.m570.l1313&_nkw=260894190039&_sacat=See-All-Categories&_fvi=1&_rdc=1 Any comments are very welcome. 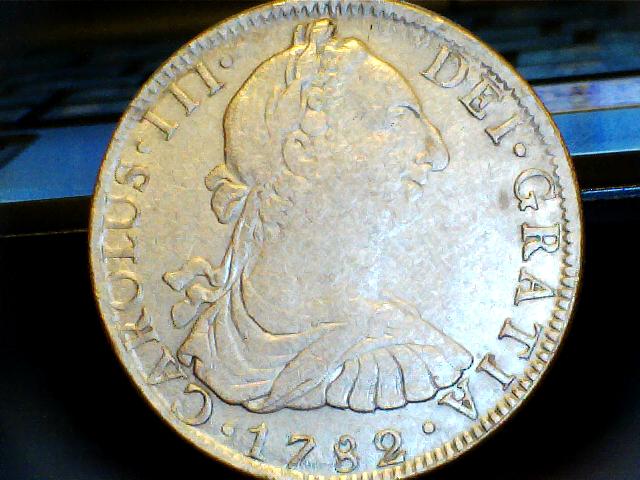 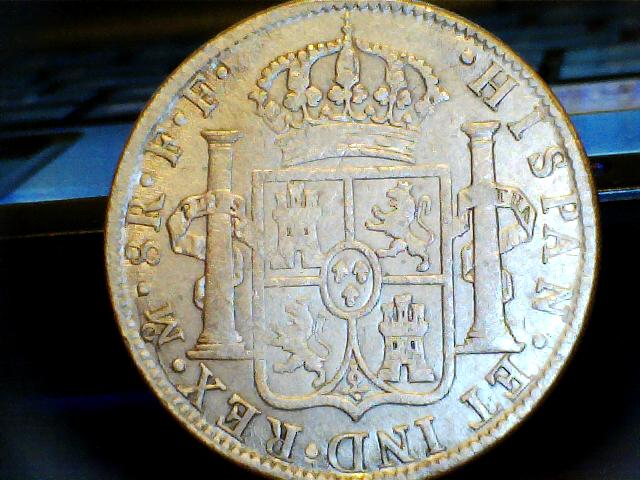 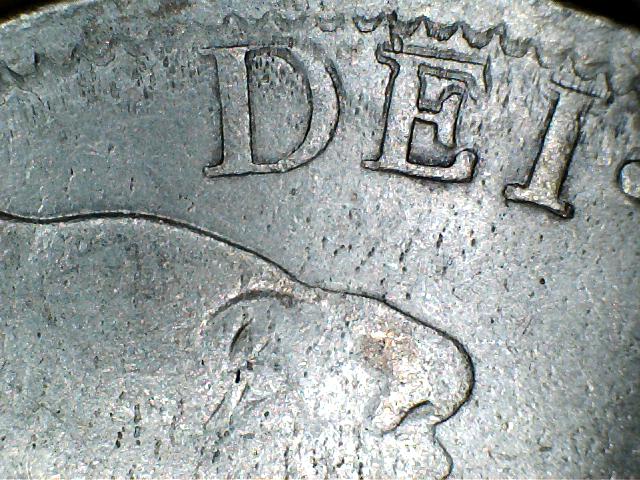 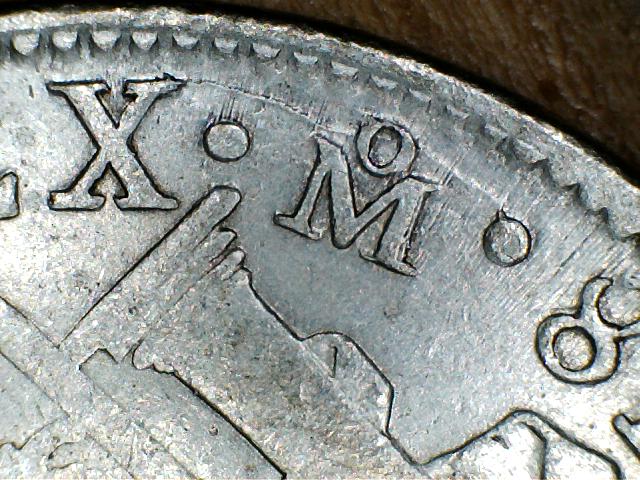  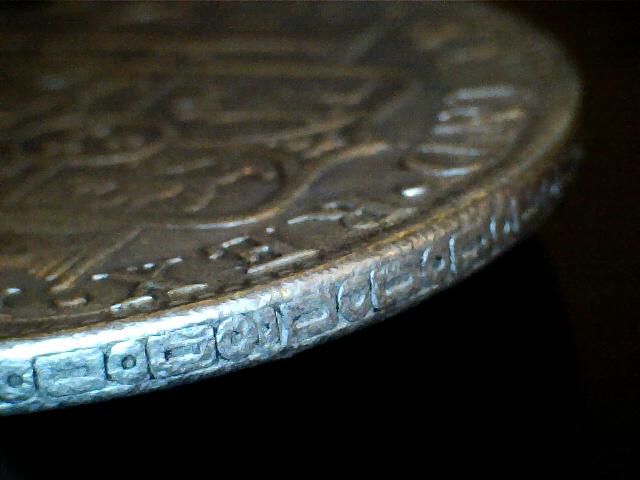 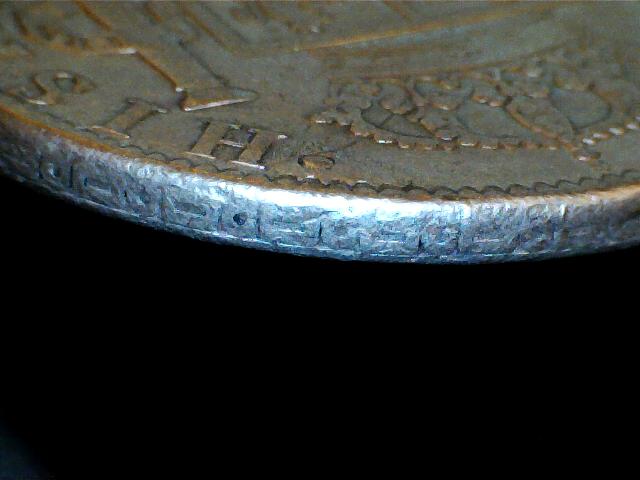 Edited by bobstam
11/27/2011 01:46 am
|
|
|
|
Valued Member
United States
326 Posts |
I too await the reales experts opinion (to further my education) on this coin.
|
|
Pillar of the Community
France
1591 Posts |
Looks like a cast copy to me, with bubbles and retracted metal . Great pictures BTW !
|
|
Pillar of the Community
United States
5362 Posts |
Nice counterfeit - date is hard to determine. Looks like a Boston type but the SG means it is debased to about 50% silver. That would make the SG come out 9.65.
What did it set you back and who is the seller - I might contact him about selling it.
The tell-tale signs here include the filed edge visible in the top photo (it cuts off the dentils before the rim is reached). It is also visible on the 6th shot - this time associated with the shield die.
The third picture is VERY interesting. What some people are interpreting as casting bubbles looks like traces of a split surface caused by low temperature rolling. This is the most likely cause for the marks on the face and on the field of the coin. The dimples in and around the DEI are caused by an entirely different mechanism. This is die erosion seen on very old dies and to some degree on older worn molds. It occurs because the die face is unevenly tempered (hardened). The metal directly around the PUNCHED elements is hardened by the strike of the punch. The die steel in this case did not harden well and so the DIE erodes in the weaker areas resulting in die metal wearing away. This in turn causes an upwelling of the coin's surface to fill the eroded area of the die.
The 4th picture is also great but as a counterfeit diagnostic. Look at how the dentils stop short of the edge. The die was a copy made from a coin that lacked full dentils at that point and the forger did not add them on the die.
The 4th picture for me is a conclusive demonstration that the coin is a strike not a casting. That 4th picture shows radial flow lines caused by metal flow during repeated strikes. I also see a clear die crack that has eroded. The crack may have been copied from the host coin.
The last two pictures clearly show a BAD overlap and several squared off circles.
This coin has all 5 points of comparison I use to diagnose a Boston fake BUT the SG is the killer. If that is accurate not only is it a fake but it falls into a Boston sub-category that is scarcer than the full weigh silver versions.
Edited by swamperbob
11/27/2011 7:25 pm
|
|
Pillar of the Community
United States
1962 Posts |
This piece has a twin - see the pic. Note the same surface markers, but the long scratch on the 2nd piece definitely marks them as (2) separate pieces. These two have very similar surfaces to many pieces I've seen certain promotional packaging, particularly those of the Postal Commem. Society. I'm very much inclined to believe these pieces and the others like them are numismatic fakes fabricated by these outfits.  |
|
Pillar of the Community
United States
1962 Posts |
Note that the seller of the piece the original poster bought (the first piece in the comparison pic - those were the seller's photos) also offered the 1783 shown below... Perhaps they originated from the same retail source? The coin appears to have been copied somehow from an El Cazador 8R. However, those surfaces are porous in a way that usual El Cazador pieces aren't...  |
|
New Member
 United States
47 Posts |
Thank you to everybody for the feedback.
Swamperbob, I tried to send a message to you in private, however the site did not allow me. It would be my honor to send this coin to you as a small appreciation for sharing and educating people like me. Please, let me know where I should mail it.
Boris
|
|
Pillar of the Community
France
1591 Posts |
Wow, thanks for this awesome explanation Bob !
I was way off for a cast - moreover the surface was pretty fine for it (doesn't seem mushy / round in the closeups)
|
|
Valued Member
United States
326 Posts |
Quote:
The coin appears to have been copied somehow from an El Cazador 8R. However, those surfaces are porous in a way that usual El Cazador pieces aren't...
The 1783 sure looks real. I would probably have bought it because it appears sea salvaged. |
|
Pillar of the Community
United States
5362 Posts |
Bobstam Myv address is:
Robert Gurney
PO Box 337
Angier, NC 27501
|
|
Valued Member
United States
326 Posts |
Quote:
The 4th picture is also great but as a counterfeit diagnostic. Look at how the dentils stop short of the edge. The die was a copy made from a coin that lacked full dentils at that point and the forger did not add them on the die.
I will admit to not really grasping what the dentils should look like on a genuine coin vs what the dentils look like on a counterfeit coin thus this question : Will dentils that may be off center line up in the same off center pattern on the obverse and reverse sides of a genuine coin? The same for a counterfeit coin? |
|
Pillar of the Community
France
1591 Posts |
The dentils should go to the edge of the coin (or be complete, as displayed in another topic)
Here you clearly see that they stop before the edge of the coin - and even under the surface of the edge (it clearly can't be because of wear of the edge)
|
|
Pillar of the Community
United States
5362 Posts |
Larryh86GT The first thing to consider is the mechanism (screw press) used to make the coins. The anvil die is the stationary die that faces upward. This die is in a chuck in the base of the press. The precise position of this die is controlled by the screws on the chuck and therefore they CAN VARY. The traveling die (hammer die) is mounted in a chuck on the end of the screw. It also can vary in position slightly. The press operators attempted to "adjust the positions of the die to produce a SQUARE and ALIGNED strike. Theoretically the dentils on the two dies should be concentric, but in practice a small variation can be seen on many coins. Counterfeiters are less likely to properly align their dies. Some did some did not. BUT whenever I see an alignment that is terribly wrong I get suspicious and check the coin more closely. The next thing to consider is the size of the die versus the size of the coin. Original dies were made LARGER than the coins by several mm's. 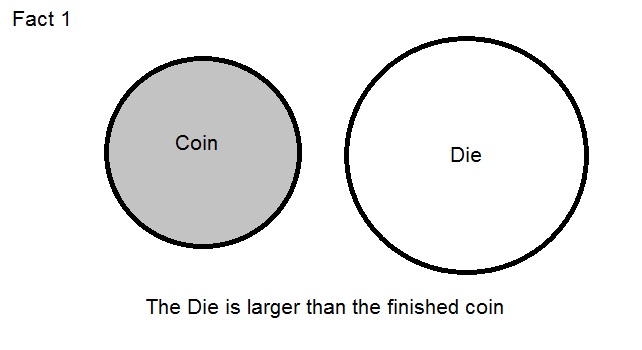 There was a very good reason for the die being oversized. The purpose of the dentils was not just to be a decoration. The dentils like the edge design was to prevent clipping of the coin. When silver was actually money (the days of hard currency) silver was shaved off coin edges for a profit. To reduce this practice the dies were made with WIDE bands of dentils so that at least some of the dentils appeared all the way around the perimeter of the struck coin. When a coin was struck so that the entire band of dentils appear - the area outside the band can be filed off. So coins made that eccentric may have been rejected during NORMAL coining intervals. The vast majority of widely eccentric strikes with full dentils were made in the WAR era when pressure to produce caused more crude strikes. 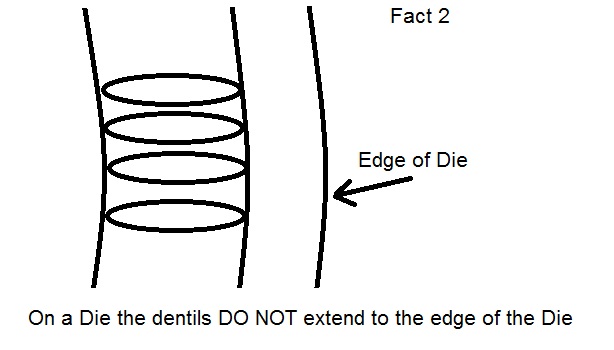 The need for wider than necessary bands of dentils was because the planchet was placed between the MOVING dies manually. There was NO COLLAR on a screw press to position the planchet for the strike. Therefore the planchet was rarely centered on the dies precisely. Close to center was normal but not with the precision seen on MODERN coin presses. On the following sketch the red line is the edge of the planchet.  So placement of the planchet determines how much of the dentils you see in any particular place on the edge of the coin. 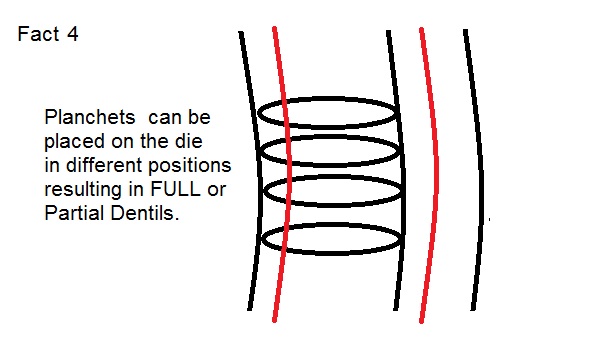 So a typical 8 Reale may have longer dentils on one part of the perimeter than on the opposite side. This is what counterfeiters miss when they make their fake dies. The forgers copy the coin they have in hand and make dies. The dies they make from a coin with partial dentils has PARTIAL dentils. 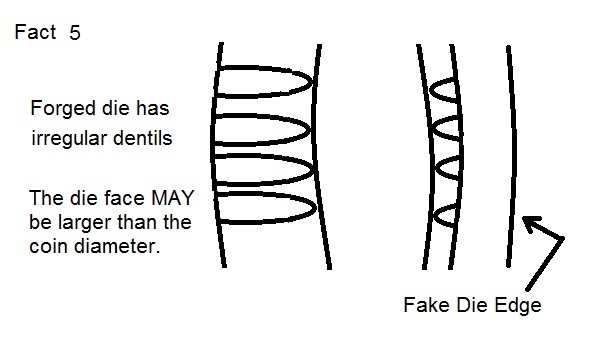 So if the forger does not align the planchet precisely they often show the EDGE of the original coin inside the perimeter of the counterfeit.
|
|
Valued Member
United States
326 Posts |
Thanks Bob for the great illustrations. I promise I will study.  It's like anything else in life - it's easy if you know how to do it. |
|
Pillar of the Community
United States
5362 Posts |
Hi Boris - the coin arrived safely and it is a MODERN copy newer than I thought from the photos. The dies were transferred from an original coin which lacked a complete rim detail. The missing places have a ODD looking attempt at making dentils. There are also many areas in the fields that are raised to near the tops of some letters.
It is NOT Chinese in my opinion. The edge is done in a distinctive manner. The dies used to apply the edge were created from the repetition of a punch that had one rectangle and one circle. In the process of making the die - nearly all of the O figures were flattened on one side by the edge of the punch.
Thanks again for sending it along.
|
|
Pillar of the Community
United States
3195 Posts |
Very interesting and great pics and illustrations!  |
| |
Replies: 18 / Views: 4,751 |


