| Author |
 Replies: 15 / Views: 1,149 Replies: 15 / Views: 1,149 |
|
|
Valued Member
United States
360 Posts |
I was wondering if any of you have seen something like this before? This was just a trial and it will look much better when I actually do a real one. I am sorry about the picture quality, I was trying some new techniques out. Anyway, tell me what you think. 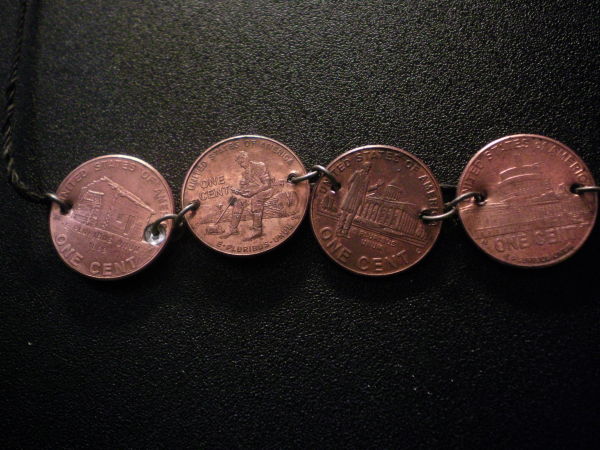 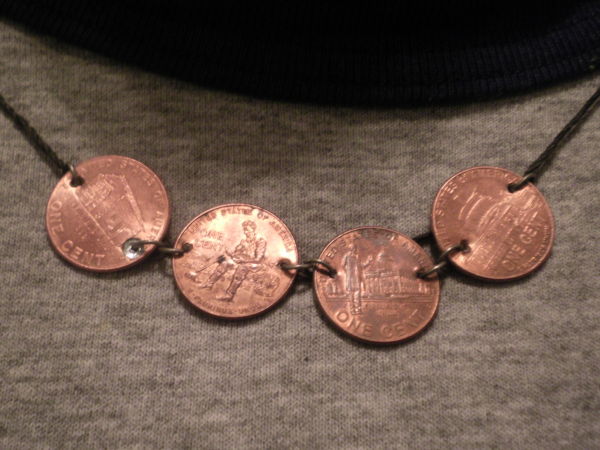 |
|
|
|
Moderator
 United States
188770 Posts |
I am always a little squeamish when I see a holed coin, so I am not sure.
|
|
Valued Member
 United States
360 Posts |
Well even if you weren't, don't pay attention to the second hole from the left. That was a mistake.
|
|
Moderator
United States
188770 Posts |
Ouch. Yes, I see that now.  How are you making the holes? With a punch or a dill? |
|
Valued Member
United States
360 Posts |
At first with the one I was using a drill bit and my hand. The rest I used a screw and a hammer. The rest of the holes are smaller and less noticeable. As I said though, this was just a trial one.
Edited by YoungNumismatist
10/11/2012 4:01 pm
|
|
Moderator
United States
188770 Posts |
As I said before, I am always a little squeamish when I see a holed coin, but a decent first try.  Now, if you have access to a power drill...  |
|
Valued Member
United States
360 Posts |
I have drilled coins before for Buffalo Necklaces, but I don't like the look of a large hole on the coins. Especially a small coin.
|
|
Pillar of the Community
United States
3843 Posts |
Quote:
I am always a little squeamish when I see a holed coin, so I am not sure.  |
|
Rest in Peace
United States
4078 Posts |
Where would be the market? If you intend to make a profit, go for it.
|
|
Valued Member
United States
360 Posts |
I was just thinking of offering them as a little pusher when I trade or buy coins. The same goes for the Buffalo necklaces I make.
|
|
Moderator
United States
188770 Posts |
Quote:
but I don't like the look of a large hole on the coins. This may be easier said than done, but get a smaller bit.  The trick would be to keep from breaking it. I know from experience that is definitely easier said than done.  |
|
Valued Member
United States
360 Posts |
Yes it is. I have already broken the smallest bit I could find and one a little bigger.
|
|
Bedrock of the Community
United States
14454 Posts |
I can agree that small bits break very easily. I bet I went through $20.00 worth of bits while making two computer cases. I always seem to want to apply to much pressure and the frill and all ends up slamming against what I am working on
|
|
Valued Member
United States
360 Posts |
I know the feeling, trust me. Since it's a huge hassle to go and get new bits that will just break to make a bigger hole, I just decided that it is just as easy to use a screw and a hammer. It also makes a smaller hole. But I don't think that will work in your case.
|
|
Pillar of the Community
United States
1227 Posts |
Here is my input:
I actually want to do something like this with 2-euro (cent) coins to make a bracelet, and see no issue with using common or cleaned coins for a project like this. However, I took a jewelry class in high school and a very kind teacher allowed me to kibitz on one I couldn't afford in college, and from a design standpoint, you have a couple of problems:
--A necklace in which each coin almost touches the other is going to look juvenile to most people; modern jewelry is either very heavy (google "chandelier necklace") or features "accent pieces," like a single pendant or three hanging pieces. Add links in between the coins, or make a linked chain with the coins hanging from it.
--Your holes are too big. The first thing I notice is the tarnish, the second thing is the holes. I see that you're having trouble with drill bits and are using a screw; I would suggest going to a hardware shop and picking up a dozen "moulding/crowning nails." These are very long and thin and may work better.
--Pennies are made of unsealed copper, and zinc. The zinc will rot out because of the holes, and the copper will rapidly turn skin green--and tarnish. There's a folk remedy for fire ant bites in which you put a copper penny against the bite and cover it with a cotton ball soaked in vinegar, then tape it over and leave it. I've used it several times and can tell you that in only twelve hours, the penny is a nasty, slimy-looking black and green; the vinegar accelerates the process, but that is what sweat will do over the long-term. You'll need a good sealant to protect both the copper and the zinc.
|
|
Bedrock of the Community
United States
10038 Posts |
I suggest you find a local hometown sort of hardware store, tell them what you want the drill bit for, and invest in a better quality drill bit. It should not cost too much. Then DO take your time with the drill press. Remember to let the machine do the work - don't force it to go faster. Honestly, with the right drill bit, and these being soft zinc material, if done right it should take very little to drill through them. Of course you want to clamp them properly so they cannot move when drilling.
|
| |
Replies: 15 / Views: 1,149 |
|


