You won't be using the regular "Upload image to post", you'll be over in the gallery uploading your pictures there.
You might want to read through this a couple of times before you get started. You'll need to wait for your gallery to be created to go on to step 2, but you can start downloading your Photobucket albums to prepare. And feel free to ask any questions. Hopefully this is all clear
 Step 1: Downloading your images from Photobucket
If you want to download the pictures individually, you need to click on each one. Then over on the right side will be a "Download" link under "Options".
 To download an entire album:
In Photobucket, click on the album name in the left menu (or leave it on "Your Bucket" if that's where all your pictures are).
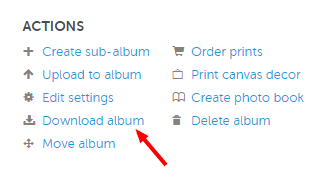
After it shows your album's images on the next page, there will be an "Actions" area on the right.
Click "Download Album".
Prove you're a human via their little interaction window

Depending on the size of your album, it may take a while..
When it is finished compressing your images into one downloadable file, it will send you an email that it is finished, with a big blue "Download" button that links to the file. The page you were on will also automatically go to a page with the "Download" button if you didn't navigate away while it was compressing.
You will need a decompression program. If you don't have one already, I recommend 7-zip - it's free and easy to use.
http://www.7-zip.org/download.html Make sure to download the right one depending on whether you have 32 bit or 64 bit Windows.
During install, if it asks if you want it to add an explorer/context menu extension, tell it yes. That way you can right click on any .z
ip file and you will have a 7-zip option in the menu that pops up to unzip the file.
After you've downloaded the album, open the folder you downloaded it to and unzip the file to a folder of your choosing (if you're using 7-zip, just right click on the zip file and look for the 7-zip option. It will have unzip options to unzip to a folder named the same as your zip file, or other options).
Right click options:

Repeat the above for all the albums you want to retrieve.
Now you are ready to upload them to the CCF Member Gallery.
Step 2: Uploading your images to your CCF Member GalleryAfter Bobby lets you know your CCF Photo Gallery is created, read over the instructions here:
http://www.coincommunity.org/galler...ms/cms&id=21 on how to first create your album(s) then upload your images.
Step 3: Getting your picture from your member gallery into your postAfter you have your pictures uploaded, you can add an image to any post by doing the following:
Log into the gallery section
Click "My gallery" in the left menu
Navigate to and click on the image you want to insert into a post
On the page with the image, copy the entire line of text under the image that starts with [
IMG] and paste it into your post.

If you have any questions about any of this, let me know!