


chafemasterj Fair question - that is my intent.
The first thing I always check on an 8 Reales is the edge.
That for me is a shortcut because the average forger spends very little time getting the edge design correct. I know this because I have spent so many thousands of hours focused on this one coin. It is like reading the last chapter of a book first because I often know the answer before I even look at the faces. Remember that even if the two faces are absolutely perfect an incorrect edge is absolute proof.
The first thing you need to know is that the edge design was applied to the blank BEFORE it is struck in the screw press. That is a critical fact. The application of the edge creates the upset edge needed for the dentils at the edge to show. The perimeter of the coin is thickened so that details will show even at the edge of the die face where the pressure of the strike is lower.
The next issue is how the edge was applied. The Spanish referred to their machine as a mill (hence milled dollars) but in Europe and the US it is called a Castang machine after the inventor who was French. The apparatus consisted of two straight flat bar dies that were moved by hand cranks. One die was fixed to a table. The second die was mounted so that it could move parallel to the first. The distance between the dies was set first to match the diameter of the blanks. Controlling the diameter precisely was necessary for the speed of the production operation. Too much variation would slow production and lower the salaries of the workers. The planchet was started at one end by placing it into a pair of slots in the edge dies. These slots were slightly tapered at both ends to allow the blank to be gripped quickly by the dies at one end and easily released at the other. The dies were impressed with the edge design. As the dies gripped the coin, the movable bar was moved parallel to the fixed bar so the planchet began to roll between the two dies. This motion cuts the impression of the dies into both sides of the blank simultaneously and exactly 180 degrees apart. The depth of the impression is based on the amount of pressure exerted by the dies which in turn is a function of the diameter of the blanks. Slight variance in diameter (caused by an out of round punch) means differences in the impression depth at opposite points - ALWAYS at opposite points. The completed blank now called a planchet emerges at the other end after a distance equal to slightly more than ONE HALF OF THE CIRCUMFERENCE of the planchet.
The clues from application are:
1. The dies leave TWO overlaps in the design that are exactly opposite one another.
2. The overlaps in the design are rather short on the order of one to three segments. These overlaps are of identical lengths.
3. The depth of the impression on opposite sides of the coin are complimentary - depths of impression match.
4. The fact that the dies had grooves with the design at the base means that rapid side to side wobble of the impression is limited.
The next thing you need to know is how the edge dies were made. Surviving Matrix blocks (master die blocks) indicate that the punch had three elements - a rectangle - a circle - a rectangle. This is critical because it means that the punch itself kept the design on the die alligned in a straight line. The die sinker sets the first impression R-C-R then he places the punch with the first R over the last R. So after two presses he has R-C-R-C-R. The central rectangle is double pressed but this rarely shows. The process continues until the length reaches just longer than 1/2 the circumference of the blank.
This method also leaves clues;
1. The Circles are never overcut but all rectangles can be.
2. If you draw a line from center to center of each element you produce a straight line. An edge using two segments was a very common error and results in one side of the circle being cut off flat. Two segment punch applications also tend to be miss-aligned.
3. Individual circle and rectangle punches were never used.
4. The wall thickness of the circle, the diameter and spacing does not vary.
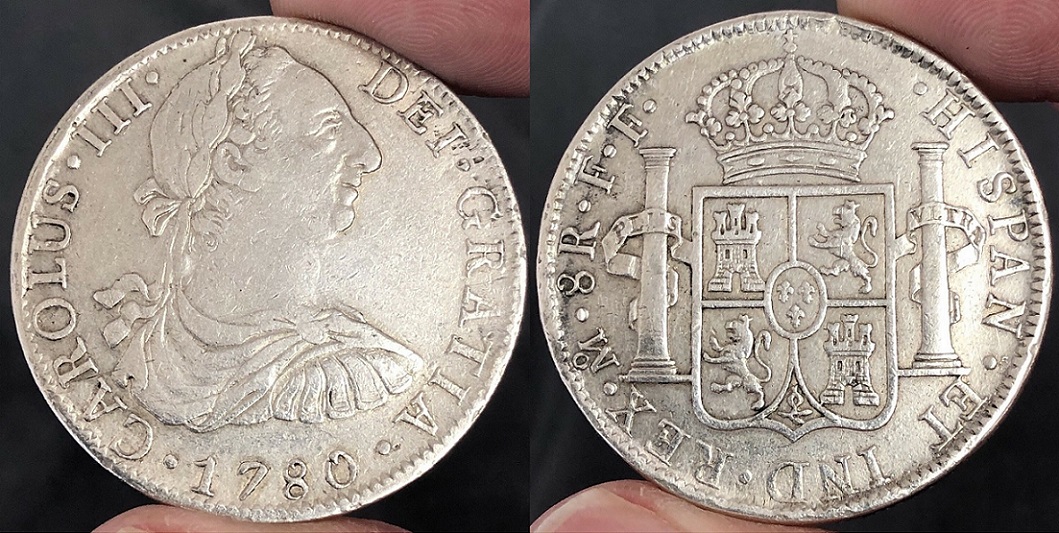
Now compare the description of the edge process with the edge shown for the coin.
Could that edge have been formed using the correct edging process?
The first thing I always check on an 8 Reales is the edge.
That for me is a shortcut because the average forger spends very little time getting the edge design correct. I know this because I have spent so many thousands of hours focused on this one coin. It is like reading the last chapter of a book first because I often know the answer before I even look at the faces. Remember that even if the two faces are absolutely perfect an incorrect edge is absolute proof.
The first thing you need to know is that the edge design was applied to the blank BEFORE it is struck in the screw press. That is a critical fact. The application of the edge creates the upset edge needed for the dentils at the edge to show. The perimeter of the coin is thickened so that details will show even at the edge of the die face where the pressure of the strike is lower.
The next issue is how the edge was applied. The Spanish referred to their machine as a mill (hence milled dollars) but in Europe and the US it is called a Castang machine after the inventor who was French. The apparatus consisted of two straight flat bar dies that were moved by hand cranks. One die was fixed to a table. The second die was mounted so that it could move parallel to the first. The distance between the dies was set first to match the diameter of the blanks. Controlling the diameter precisely was necessary for the speed of the production operation. Too much variation would slow production and lower the salaries of the workers. The planchet was started at one end by placing it into a pair of slots in the edge dies. These slots were slightly tapered at both ends to allow the blank to be gripped quickly by the dies at one end and easily released at the other. The dies were impressed with the edge design. As the dies gripped the coin, the movable bar was moved parallel to the fixed bar so the planchet began to roll between the two dies. This motion cuts the impression of the dies into both sides of the blank simultaneously and exactly 180 degrees apart. The depth of the impression is based on the amount of pressure exerted by the dies which in turn is a function of the diameter of the blanks. Slight variance in diameter (caused by an out of round punch) means differences in the impression depth at opposite points - ALWAYS at opposite points. The completed blank now called a planchet emerges at the other end after a distance equal to slightly more than ONE HALF OF THE CIRCUMFERENCE of the planchet.
The clues from application are:
1. The dies leave TWO overlaps in the design that are exactly opposite one another.
2. The overlaps in the design are rather short on the order of one to three segments. These overlaps are of identical lengths.
3. The depth of the impression on opposite sides of the coin are complimentary - depths of impression match.
4. The fact that the dies had grooves with the design at the base means that rapid side to side wobble of the impression is limited.
The next thing you need to know is how the edge dies were made. Surviving Matrix blocks (master die blocks) indicate that the punch had three elements - a rectangle - a circle - a rectangle. This is critical because it means that the punch itself kept the design on the die alligned in a straight line. The die sinker sets the first impression R-C-R then he places the punch with the first R over the last R. So after two presses he has R-C-R-C-R. The central rectangle is double pressed but this rarely shows. The process continues until the length reaches just longer than 1/2 the circumference of the blank.
This method also leaves clues;
1. The Circles are never overcut but all rectangles can be.
2. If you draw a line from center to center of each element you produce a straight line. An edge using two segments was a very common error and results in one side of the circle being cut off flat. Two segment punch applications also tend to be miss-aligned.
3. Individual circle and rectangle punches were never used.
4. The wall thickness of the circle, the diameter and spacing does not vary.
Now compare the description of the edge process with the edge shown for the coin.
Could that edge have been formed using the correct edging process?


