| Author |
 Replies: 17 / Views: 4,347 Replies: 17 / Views: 4,347 |
|
Pillar of the Community
United States
5362 Posts |
Today a ne Beijing seller appeared selling some very nice looking Pillar dollars. These coins show essentially correct designs and I will bet they are silver. They will sell to US novice buyers and they soon will appear on the SECONDARY market. So get to know what they look like. In the latter years of issuing the Pillar Dollar - the Spanish Colonial mints ALL adopted the same edging method. The lotus flowers were applied to the edge BEFORE the strike. In the earlier years of issue, this subject is not as uniform but by 1756 at the very latest they were edged before the strike. The following fake was edged AFTER it was created (either by casting or striking). Look at the dentils around the edge. http://cgi.ebay.com/Mexico-1764-8-R...XF_W0QQitemZ120083978403If you notice there are regular bumps along the edge. That is caused by the pressure of applying the edge. The edging process distorts the dentils. If the edge design was applied first (the correct way) the dentilds would crush the irregularities out and produce a smooth looking edge border. |
|
|
|
Pillar of the Community
United States
4589 Posts |
ARe you talking about the waffling appearance around the rim , when you blow it up appears to have a crinkle cut or ridges and valleys around the rim
|
|
Pillar of the Community
Australia
1295 Posts |
I think so. If the edge was applied first the dentils would be flat as the waffling as you call it would be flattened by the strike.
|
|
Pillar of the Community
Czech Republic
803 Posts |
I have heard different opinions about the production process of pillar coinage. It is my understanding, and please correct me if I am wrong since I do not yet own this reference, that "Columnarios" talks about edge being added after the strike. If that is the case, at which point did mints convert to edging the blanks prior? The answer is probably along the lines of "each mint was different", but just curious if there is a good reference for this.
Thanks!
|
|
Pillar of the Community
 United States
5362 Posts |
The up and down undulation is precisely the problem. It is caused by post strike edging. Pre-strike edging produces a flat coin. This in turn is essential to stacking the finished product.
The ability to be able to stack a pile of 8Rs to a certain height (I forget how high) was a critical element demanded by banks by the early 1800s for sure. Some dishing of the dies for the portrait 8Rs was actually introduced to facilitate stacking and the original profile eagle design was modified because of banker complaints. But that is a different subject.
I have read Columnarios and discussed the topic with a couple experts who have actually had physical access to the original mint equipment used at Mexico City. I have discussed the hows and whys of the operation at lenght. The switch over is not documented anywhere I know of but was as you say a mint by mint thing. This can be determined by looking at numerous examples of real coins. But at some point it is obvious that the mint masters realized that production was made easier by edging the blanks before the strike. The physics seems obvious from this point in time (Monday Morning Quarterbacking) - But that is because upsetting a planchet is a "normal" practice for just about every struck coin made for a long time. If you cut a perfect circle of metal and strike it in an open sided press it often ends up slightly OUT OF ROUND. Edging the finished coin uniformly then can become a real problem since the diameter of the planchet varies. The operation of the edging mill demands that the two flat bar dies remain in contact with the planchet/blank and this can only happen if the coin rolls along evenly. Think of rolling an egg versus an orange. This variation in diameter would require a method of somehow exerting exactly the same force on the planchet while varying diameter to get a uniform edge design. The apparatus as described to me and as it appears in photographs simply does not allow for that adjustable pressure and diameter. The apparatus was rather crude. A distorted planchet either failed to edge completely and slipped or it jammed the mechanism.
The point of conversion to edging BEFORE the strike is certainly no later than 1756 as I noted above. The conversion to the circle square colonial edge (a shallower design) was at least in part attributable to or driven by the conversion.
So on a coin dated 1733 - the edge design was in all probability applied last at every mint. On a 1756 it was before - in between, you need to be aware that it could be done either way.
The physics of the pressure side to side (producing strong or weak images on exact opposite sides) and certainly the length of overlaps is more critical in establishing a fake during this period of uncertainty. But priority of edging is an absolutely certain detection method AFTER 1756.
The coin in question is dated 1764.
Edited by swamperbob
02/06/2007 5:01 pm
|
|
Pillar of the Community
United States
4589 Posts |
Thanks again BOB for that insiteful , and Educational piece of knowledge. I wait to learn more
|
|
Pillar of the Community
Czech Republic
803 Posts |
Thank you, Bob. I guess the best way is to "listen" to what every individual coin tells you :) I love this series - the idea behind it, the process, the end result...
|
|
Pillar of the Community
United States
954 Posts |
Thank you!!  |
|
Valued Member
United States
57 Posts |
Bob, Thanks so much for sharing your Knowledge, of this most spectacular series of Coins!! Frank |
|
Pillar of the Community
Australia
1295 Posts |
Bob,
What sort of tool was used to edge the coins? Are there any pictures I can see so I can understand physically how they operated it and how it restrained the planchet while applying the edge?
Mark
|
|
Pillar of the Community
Czech Republic
803 Posts |
|
|
Pillar of the Community
Australia
1295 Posts |
Thanks Roman. Is therte anything Bob doesn't know?
|
|
Pillar of the Community
United States
6406 Posts |
Thank you Swamperbob for sharing your expertise. Very interesting stuff!
This coin is a very attractive counterfeit and I can imagine how easily it could decieve a buyer. I do see one other design feature that could be diagnostic. The O's in the MO mintmarks appear to have flat lower edges and they are touching the M's. On my 1770 MO Pillar Dollar (which I hope is genuine!) the O's are fully rounded and are clearly separate from the M's. If this mintmark configuration is consistent for all MO issues, this difference might help spot the fakes.
|
|
Pillar of the Community
United States
5362 Posts |
Jaobler You said: quote:
I do see one other design feature that could be diagnostic. The O's in the MO mintmarks appear to have flat lower edges and they are touching the M's. On my 1770 MO Pillar Dollar (which I hope is genuine!) the O's are fully rounded and are clearly separate from the M's. If this mintmark configuration is consistent for all MO issues, this difference might help spot the fakes.
Good thinking and it could work if you could be certain of two facts. 1. The Mo mintmark would have to be made with ONE punch. 2. If you could be certain when the punch was changed and how often that was done. Unfortunately neither of those facts can be established with any certainty. In fact, it is far more likely that at times two punches were used for the Mo mint mark. It is also almost certain that multiple letter punches were available over period of several years. Even if 1 and 2 could be established you would also have to be cautious about repaired dies (a superscript could be re-punched). Finally, die wear will definitely cause an alteration of lettering near the perimeter as the die ages. Many coin types are noted for having perimeter elements - draw or elongate toward the rims. This is a simple function of the pressure of the strike causing an outward RADIAL flow of metal. This flow imparts a radial force that acts to erode the die. A letter 0 creates a perfect example of how this occurs. Even if it starts perfectly round with a perfectly uniform thickness - this will change over time. The top and bottom of the O will thicken and draw in the direction of the rim. Jaobler - keep you eyes open and always ask probing questions like this one. If you want you can post pictures of your 8R or send me scans and I will let you know what I think. 1771 is an often forged date, but counterfeits of the 1770 are a bit scarcer - so your chances are fairly good that the coin is real.
Edited by swamperbob
02/10/2007 9:59 pm
|
|
Pillar of the Community
United States
6406 Posts |
Hi Swamperbob, Thanks again for all the info. I finally got around to making photos of my pillar dollar, so here they are. I bought this coin from what I believe is a reputable dealer and it looks "real" to me. I would certainly appreciate hearing your opinion. 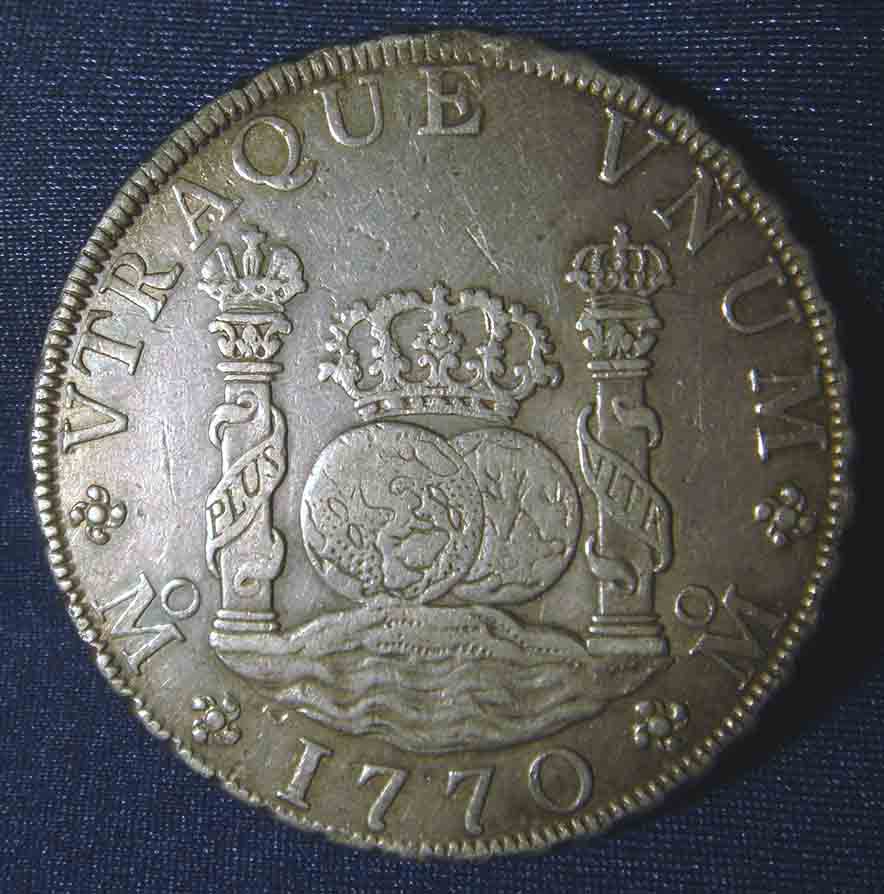 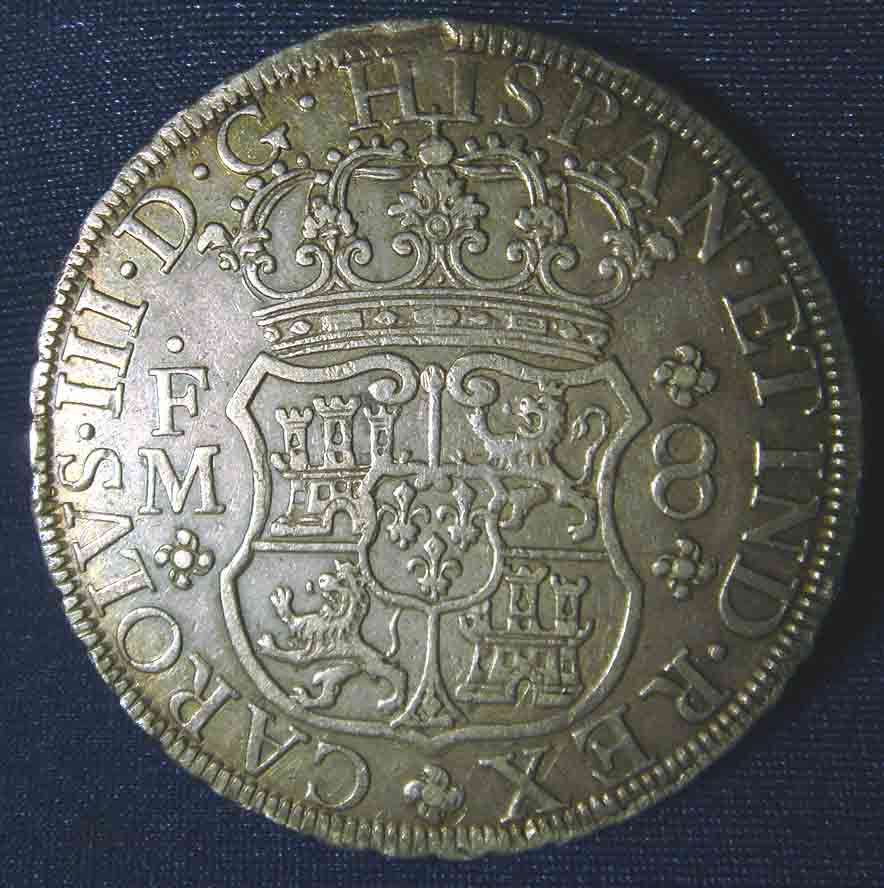 |
|
Pillar of the Community
United States
5362 Posts |
Hi Jaobler - Looks like you have a good one there. There are a few interesting (or possibly interesting) features. If you notice, in the places were the strike was "full" - the denticles definitely crush flat the planchet ripple effect caused by the blank being edged first. Look at the area above "QUE" in Vtraque on the Globe side which corresponds with the area above "PAN" in Hispan on the shield side. This is a fully struck area on a thick portion of the planchet and the distortion is NOT visible in the dentils. There are two very strong stike areas on the rim. The weak areas may still show some slight distortion because when the planchet is tapered (thinner) it doesn't allow the full strike. Here most of the "weak" areas like the one above "HI" in Hispan may be simple post strike damage. There are some rim bumps like the one just right (clockwise) from the R in Carolus. These should not be confused with the regularly spaced undulations due to the edge being applied after the strike. I notice that there appears to be some mint luster in the protected areas near the edge of the coin. There is also a folded fin (or rim Burr) struck into the dentils above the word REX. This happens when the blank is punched out of the silver strip. A worn punch can leave an excess of metal called a "fin" or "Burr" depending on who is classifying the coin. That excess metal often remains connected to the coin. In this case the fin remained connected along its entire length (which is why I like Fin for this type and burr for the partially disconnected type). When the blank is edged (making it a planchet), the fin is pressed inward toward the center of the planchet and then when struck it is pressed into the surface of the finished coin as you see here. You may be asking - "Why didn't they simply file off the fin?" Before the blank is edged - it is weighed and filed to remove any excess weight. If the blank was overweight - that is the point at which the fin would be taken off. My guess here is that the removal of the fin might have made the blank UNDERWEIGHT - so they left it - hoping that it would roll in as it did. This is a relatively common feature on coins of this period and must not be confused with a casting "fold" often seen on Modern Chinese silver cast copies. Here is a typical rim Burr on a US Large Cent. In this case, the burr was partially detached and folded over the surface of the planchet and it was then struck in and retained. The burr was created when the blank was damaged during the process that created the planchet. Image Insert: |
| |
Replies: 17 / Views: 4,347 |


