| Author |
 Replies: 41 / Views: 8,802 Replies: 41 / Views: 8,802 |
|
Pillar of the Community
United States
1599 Posts |
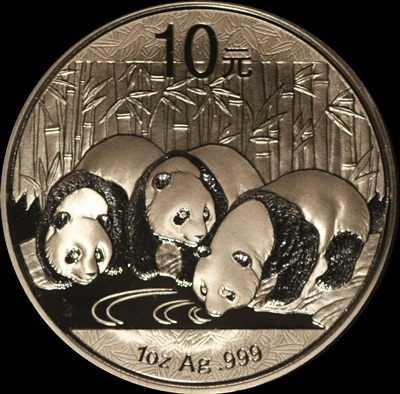
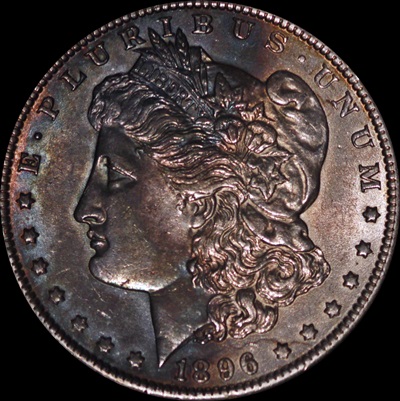
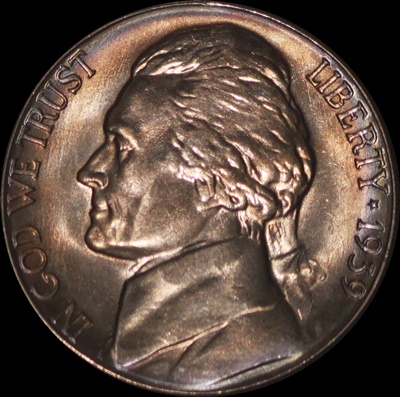
Thought I would try something new, like I need something else to make me crazy; so I built an axial box and here are my first attempts. I am using a standard piece of picture frame glass. The pics have NO processing other than resizing. Shot them at ISO 800, 2.8 and a jansco light. I initially had difficulty getting the light in what appeared to be the appropriate spot. Then I was not having adequate light getting to the coin so I moved it closer to the glass (the coins are less than 2 inches from the lower/back edge of the glass). This seemed to help although I am still not sure if I am getting enough light on the coin. First thing I notice is the glare on the left of the coins. I am shooting during the day and there is a window to my right, so I am guessing that is where the glare is coming from. I will reshoot the same coins tonight where I have no light except the jansco. 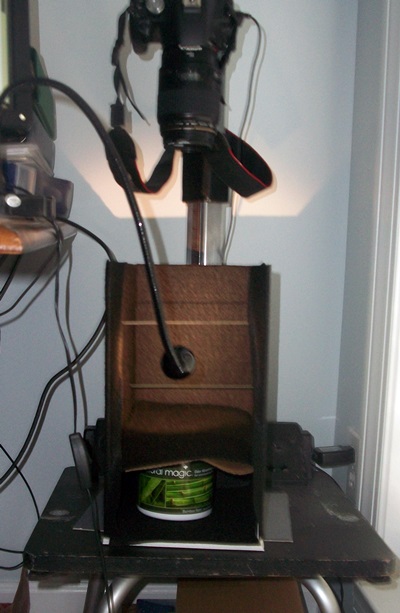 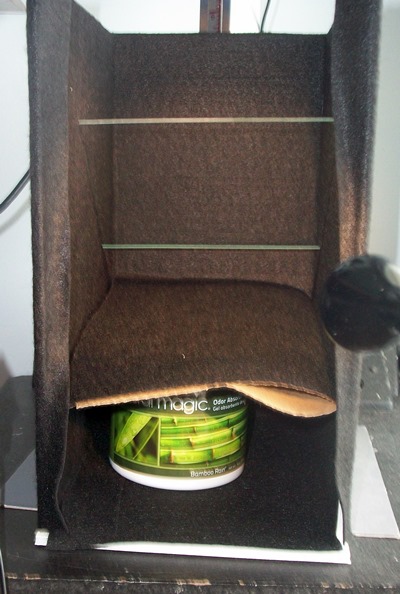 I picked this coin because of the luster. Not sure what is causing the 2013 showing above the date on the coin. ? 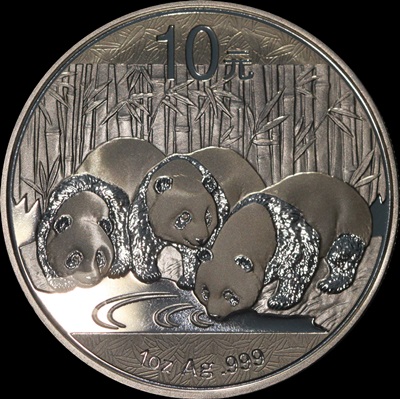 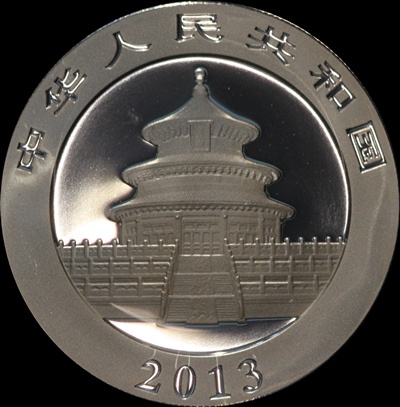 I chose the next two because of the toning. I am reasonably pleased with the outcome as it is pretty close to the coin in hand, I have tried to shoot the Jefferson several times in the past and had no luck at all getting the toning. 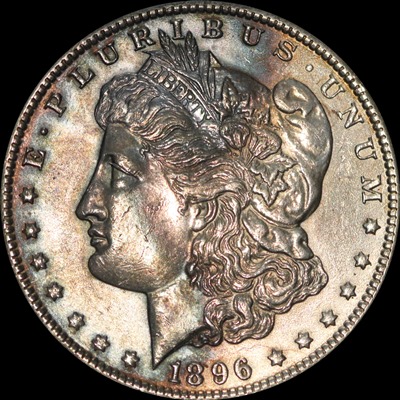 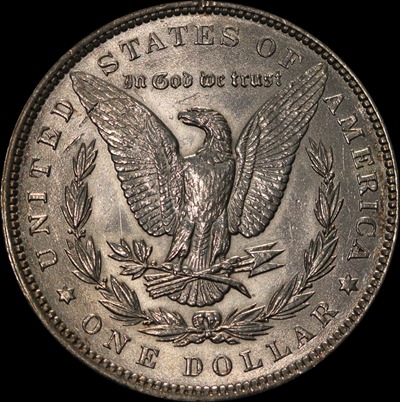 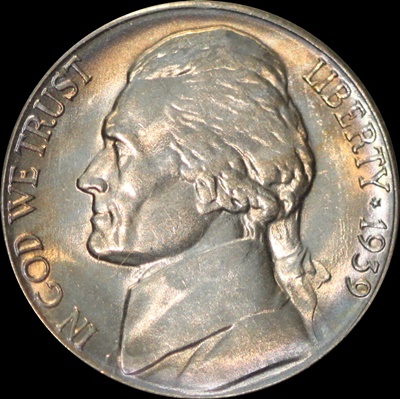 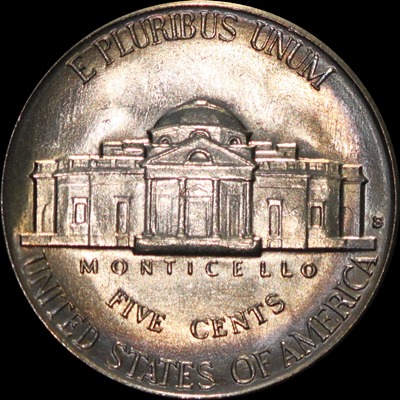 Any opinions/help/suggestions would be greatly appreciated! Thanks |
|
|
|
Pillar of the Community
 United States
4038 Posts |
Looks like you have the classic problem of more direct light than axial. Try blocking the light coming directly from the jansjo from hitting the coin and see what you get. I think that is what your reflection is above 2013.
|
|
Valued Member
440 Posts |
"Not sure what is causing the 2013 showing above the date on the coin. ?" Date was most likely being reflected off of your glass onto the coin due to the angle of your lighting. I like the look of the nickel; lighting may be a tad harsh. The Morgan lighting is too harsh & looks unnatural. The Panda coin also does not have a natural look to it & as Ray pointed out shows direct light hitting it. You can also see @ 7 oclock too much light reflection/glare from the glass. I have found that to achieve true axial lighting is difficult & did not provide me with a natural look to the coin. This may be due to the quality of the glass I am utilizing, lighting or a combination of the 2. What I have discovered is that a combination of axial & direct lighting (my form of  ized axial lighting) gave me the look I was trying to achieve with toned & PL/DMPL Morgans. In order to achieve this I had to shoot in entire darkness & shroud certain items in the room that reflected light with black cloth & really play with the lighting angles & glass angle which changed with the unique differences in each coin. You may also find that diffusing the lighting works better on some coins and on some not so much. There is a lot of trial and error involved here but eventually you get the pic that really represents the coin & makes it pop. The other issue that helped in this process for me is stacking photos using this method. Took me a while to figure out how to get the stacking program to work but it was worth the aggravation. One other suggestion. For me the jansjo's just won't cut it for lighting using this technique. I found using these provided much better lighting for me: https://goccf.com/t/176225 |
|
Pillar of the Community
United States
5825 Posts |
Is that arm coming down with the disk on the end your light source?
If so, from what I can tell from your pics you are NOT doing axial lighting.
In a correct axial lighting setup NO light can come DIRECTLY from the source, i.e., the coin has to be "hidden" from the light source.
You should end up with NO glare if setup is correct.
The lighting should be even across the whole coin.
As for strange reflections on the coin that has to do with the lighting being reflected from surrounding objects.
EVERYTHING even remotely shiny has to be masked.
I had a lighter fuzzy bar on my coins when I first tried.
I found that it was caused by a reflection from the chromed vertical bar of my camera stand.
If you don't already have Mark Goodman's book Numismatic Photography, 2nd Edition I highly recommend getting a copy.
|
|
Pillar of the Community
 United States
1599 Posts |
|
|
Valued Member
440 Posts |
Looks better but the lighting is still too harsh with hot spots. Need to fix lighting so it is even across the subject coin. There is still evidence of direct lighting which is IMO not necessarily a bads thing if the look of the coin is correct/to your liking. I would dump the jansjo's and try the light setup I suggested in the above post. You will notice a huge difference. Even diffused the jansjo's (for this type of application) throw to narrow of a light beam which creates glare/hot spots irregardless of the angling you use with the light. Have you also played with the angle of your glass in relation to your coins?
|
|
Pillar of the Community
United States
5825 Posts |
This is NOT my axial lighting setup BUT I wanted to show you what my light sources are like. Note that they are tubes (5" long) rather than point source type lights.  Here's one image of my setup (without much of the blackout curtains). Notice EVERYTHING paintable is a flat black; the draping is black corduroy.  |
|
Pillar of the Community
United States
5825 Posts |
|
|
Pillar of the Community
United States
1599 Posts |
Thanks for the replies. I have adjusted the lighting and cannot see any light hitting the coin except reflected light. I have also tried every different light source I have with no luck. Chereepicker-I have also adjusted the angle of my glass to no avail; in fact, it seems like the more I do, the worse my shots get.
kanga, thanks for the. references. I have read them and will re read. I like how you have a black cloth draping ( about tore my box up changing the angle of the glass). Are you using any special glass? That may be an area that I need to adjust. Did you build your glass frame? Looks like it is easily adjustable.
Thanks again, I am going to keep reading and listening to the experts till I get better at this.
|
|
Valued Member
440 Posts |
Those Home Depot lights are inexpensive. The Jansjos did not work well for me when trying to bounce that tiny beam of light off the glass.
kanga is I believe making the same statement "I wanted to show you what my light sources are like.
Note that they are tubes (5" long) rather than point source type lights."
With a larger light source & diffusion you will get a much more even lighting situation.
|
|
Pillar of the Community
United States
5825 Posts |
Quote:
kanga, thanks for the. references. I have read them and will re read. I like how you have a black cloth draping ( about tore my box up changing the angle of the glass). Are you using any special glass? That may be an area that I need to adjust. Did you build your glass frame? Looks like it is easily adjustable. I bought a 1 foot square of ¼" safety glass (not plate glass). I built my own frame and did the best I could with the tools at hand to fix the glass firmly at 45°. It's NOT adjustable so any changes would be significant. IF your setup is with the glass at 45° to the table top then your light source HAS to be set so the light rays are parallel to the desktop. Note that I have a 2x4 blocking the light from shining directly on the coin. The geometry of the whole setup has to be reasonably close to correct. Do tests with the positioning of your light source. In a dark room you should be able to see where the light is hitting the table after it's reflected by the glass. Move your light source around until the reflected light illuminates the spot where your coin will be placed. LOTS of trial and error involved in finding the correct setup. |
|
Pillar of the Community
United States
1599 Posts |
Well, here I go again. Built a new box and painted it flat black, bought new glass. Seems like a little improvement, but still not a winner. I shot in a dark room with no additional light except my computer monitor (turned away from the coin). I am shooting with live view. ISO 400, F8. The Morgan still has some hot spots that I worked hard to get rid of with no luck (the left side of the coin is pretty heavily toned and much darker than the right side and much darker that the picture reflects). The ASE looks better and alot like the coin in hand but still has some hot spots on the non toned portion. Shot both with a diffused 60 watt incandesent bulb. Tried with the diffused jansco and a 13 watt CFL but no luck at all. Opinions/help.  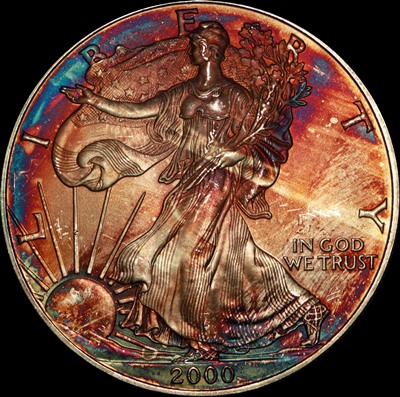 |
|
Pillar of the Community
United States
3076 Posts |
I guess I am ignorant of this subject, but your idea of axail lighting is to put a box around something just doesn't jive with me...looks like you have 2 lights on 180 degree's apart
pointing into a box?I always thought Axial lighting was a lighting source that is projected from all angles, such as a "ring" lighting system.....360 degree's of light source...
2 lights will never do this.....one can use glass at a 45 degree angle between the lens and the subject as others have done,,, but this is not axial...By the way.. I think your pictures are good, but they are not axial......
|
|
Pillar of the Community
United States
1599 Posts |
aladinslamp-my setup includes a light source perpendicular to the camera lens reflecting off glass at a 45 degree angle. The coins are shielded from the (single) light source. Maybe I shouldn't have used the term box-my setup looks similar to the second pic in kanga's post above and other reference materials. If I am not mistaken that is a pretty standard axial setup.
|
|
Pillar of the Community
United States
4038 Posts |
Yep, that's the axial "look". Now it's all about size of light source and post-processing.
Contact me for photographic equipment or visit my home page at: http://macrocoins.com |
|
Valued Member
440 Posts |
jprine getting there. "Now it's all about size of light source and post-processing." Both the Morgan & ASE to me show an uneven light distribution across the coin. Again for me the utility lights I referenced which have shields over 10 inches in diameter help me dipserse the light source more evenly across the coin. When I use them to bounce light off glass I don't always use tissue paper to diffuse the light; depends on the coin. You can hand hold these lights and adjust the angle to an almost infinite degree which really helps with this process. The other thing I like is using the 5600k daylight bulbs which help to bring out the coins natural look. They are only about $12 bucks plus bulbs. BTW nice looking ASE; love the toning. |
| |
Replies: 41 / Views: 8,802 |