Coin Community Family of Web Sites Join Thousands of Coin, Bullion, & Money Collectors
Royal Estate Auctions - $1 Coin AuctionsRoyal Canadian Mint products, Canadian, Polish, American, and world coins and banknotes. Vancouvers #1 Coin and Paper Money Dealer 300,000 items to help build your collection! Join Thousands of Coin, Bullion, & Money Collectors Specializing in Modern Numismatics Coin, Banknote and Medal Collectors's Online Mall


Username:
Password:
Save Password
Forgot your Password?


This page may contain links that result in small commissions to keep this free site up and running.

Welcome Guest! Registering and/or logging in will remove the anchor (bottom) ads. It's Free!

Progress Report And Thanks For Your Generous Sharing

To participate in the forum you must log in or register.
Author Previous TopicReplies: 65 / Views: 8,190Next Topic
Page: of 5
Pillar of the Community
lrbguy's Avatar
United States
949 Posts
 Posted 07/11/2016  3:39 pm Show Profile   Bookmark this topic Add lrbguy to your friends list Get a Link to this Message Number of Subscribers
After "taking" for the past three months, I thought it was time to give back a little - hoping to justify taking up your time on this list.

Over the past three months several members of this list have assisted me in fashioning a cost effective photography system for shooting ancient coins, and I wish to express to you my appreciation and delight. Special thanks go to Ray for his patience and generous assistance with advice on equipment choices. He knows the techniques and what it takes to do them. I am just a follower. Up to now I have not shown you what kinds of results I am getting from trying this out, but now that the gear is gathered together it is time to shift my attention to technique. Here is what has been coming together.

This review only covers things I have been doing to configure systems based on bellows lens extensions alone. Although I have extension tubes to correspond to the Olympus and Nikon mounts, I find them cumbersome and prefer to use them as bellows supplements.

- - - - - - - - - - - - - - - - - - - - -

GENERAL SETUP

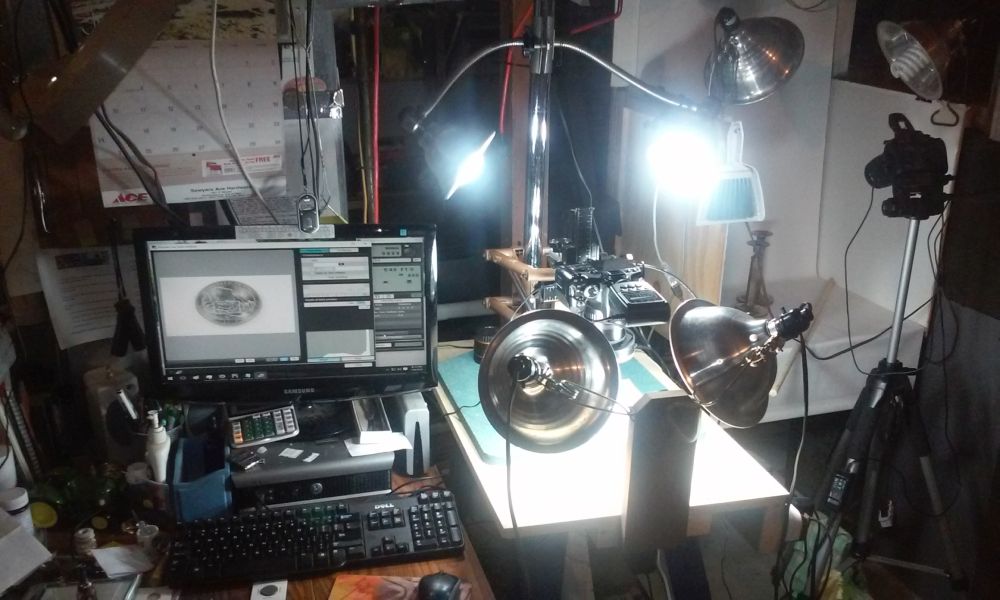
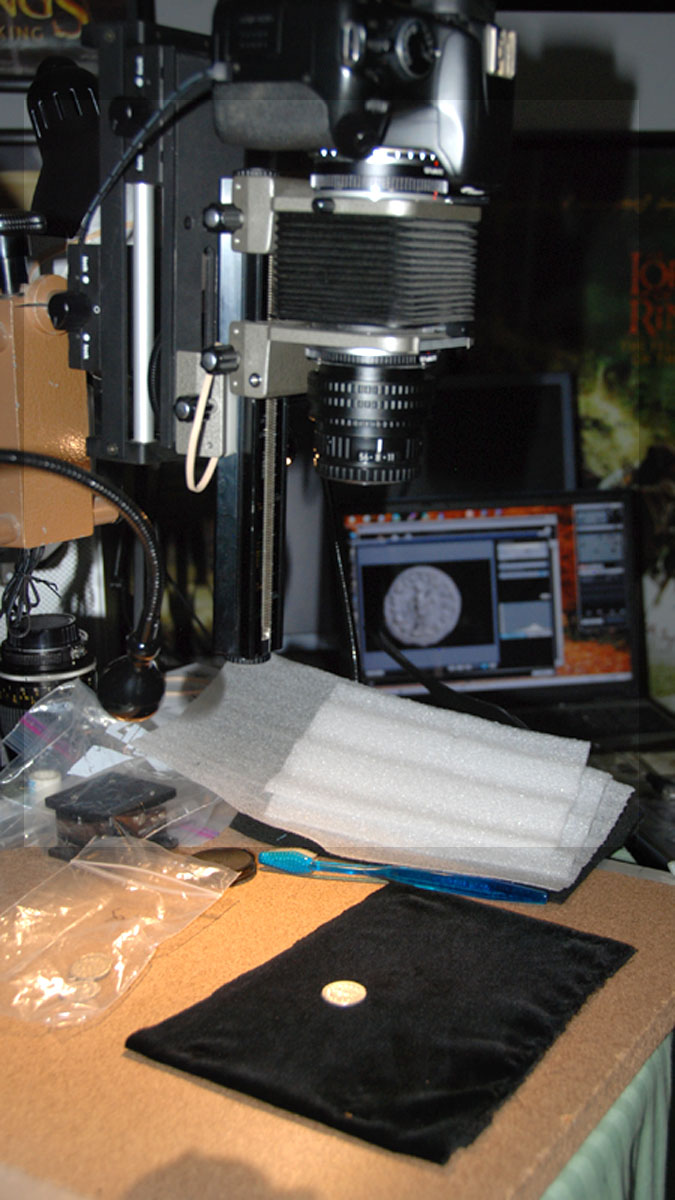
I.- All my numismatic photo setups are built on a TestRite copy stand I purchased in the 1970s. For illumination I turn off the room lights and use one of two sets of lights near the copystand:

A. Two desk lights equipped with 5000K LED bulbs and diffusers are used for daylight illumination. The diffusers are made from sheets of paper backed fabric used by dressmakers for pattern tracing (from a fabric store). A pair of these are banded onto the desk lamps. (Despite "daylight" white balancing, some color adjustment is still required in post.)

B. A pair of 3200K Jansjo LED lights are used without diffusion. Different grades of packing plastic sheets (lower right) are used manually to dodge the light beams when preparing a shot. (Setting the white balance for "incandescent" requires no further color adjustment in post.)

Progress-Report-And-Thanks-For-Your-Generous-Sharing


II - The subject coins are placed on a mat of black velvet (fabric mounted to a card backing). A toothbrush is kept nearby to brush the velvet lightly and remove particles that interfere with a pure black background.

The camera is tethered to a dedicated laptop (center rear) and all image adjustment is based on the screen image. Using the camera in this mode is very power intensive, so I use an AC adapter (cable upper left) as a standard part of the setup.

Progress-Report-And-Thanks-For-Your-Generous-Sharing


MACRO-VIEW WITH BELLOWS

III - Most of my coin photography is going to take place in the macro range, so here is an example in heavily patinated bronze. (It is a 28mm pente-assarion of the early 3rd century emperor Geta issued in Upper Moesia.) The high relief of these coins coupled with variations in the suface colors of the patina and other adhesions highlight the very special challenges of photographing ancient bronze.

Progress-Report-And-Thanks-For-Your-Generous-Sharing


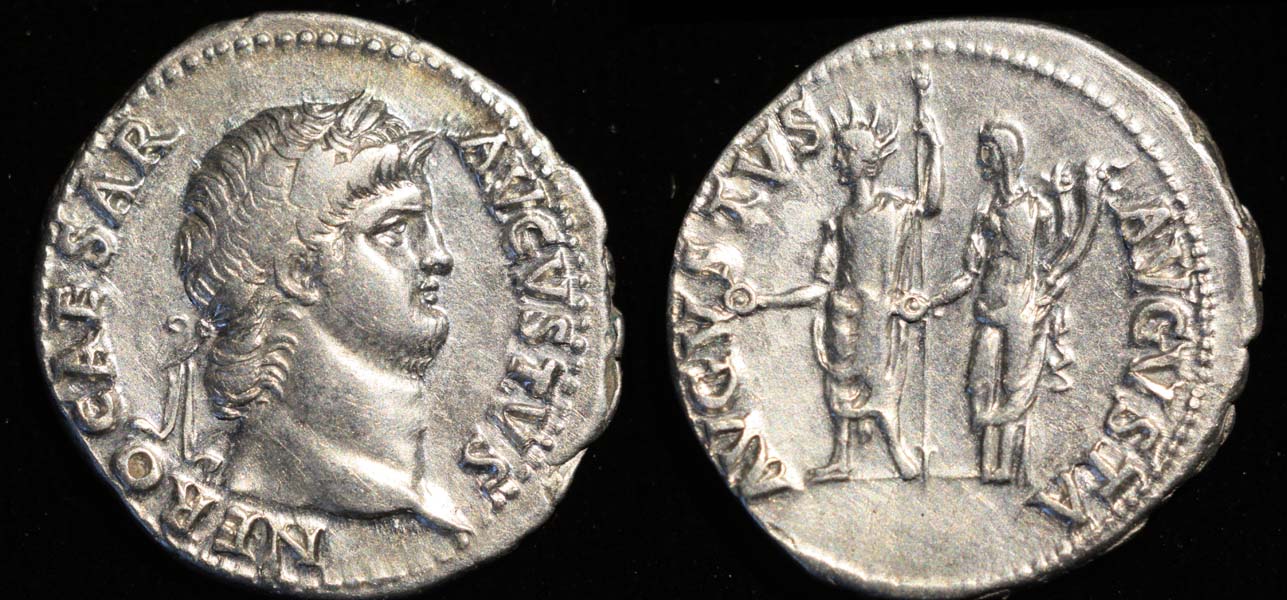
IV - the same lighting preserves the detail but not the lustre of the good silver in this denarius of the emperor Nero.

Progress-Report-And-Thanks-For-Your-Generous-Sharing


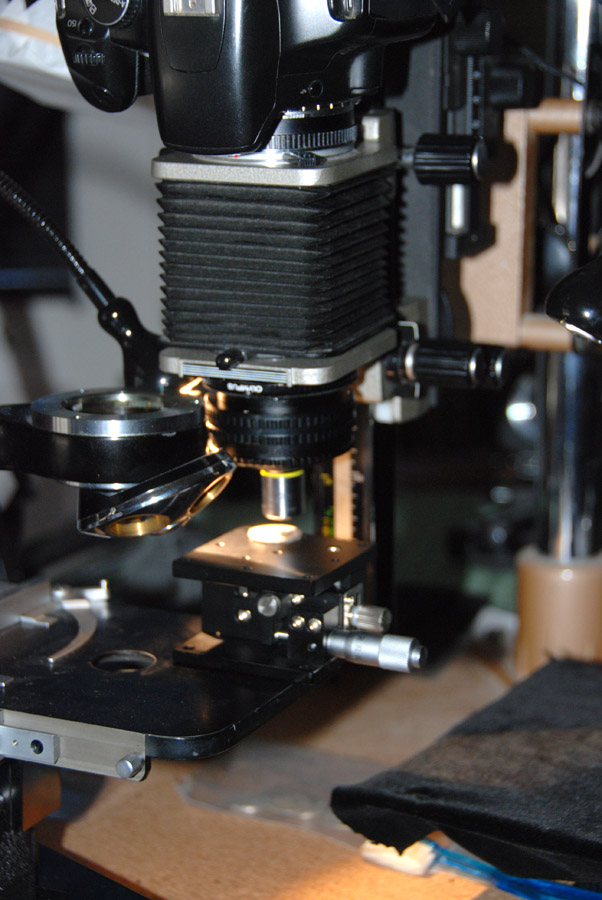
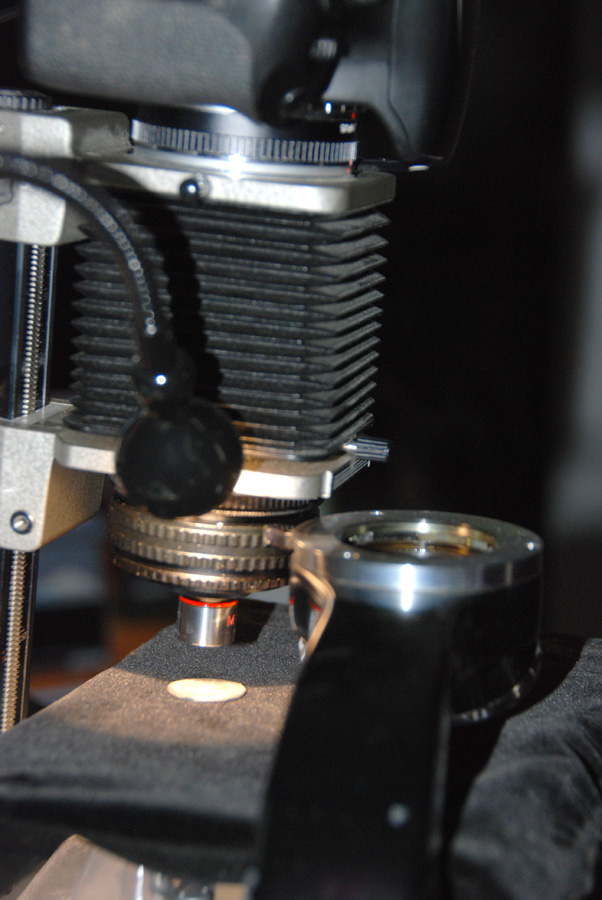
V The camera setup for shooting in this mode looks complicated but is really very simple. Its elements are as follows, by the numbers:
1. As some on the list have recommended, the camera body is a Canon Rebel XSi, 12 megapixel. Although most of my equipment is Nikon, the Canon tethering software seems superior to me and I purchased this body without lens exclusively for numismatic setups.

Progress-Report-And-Thanks-For-Your-Generous-Sharing

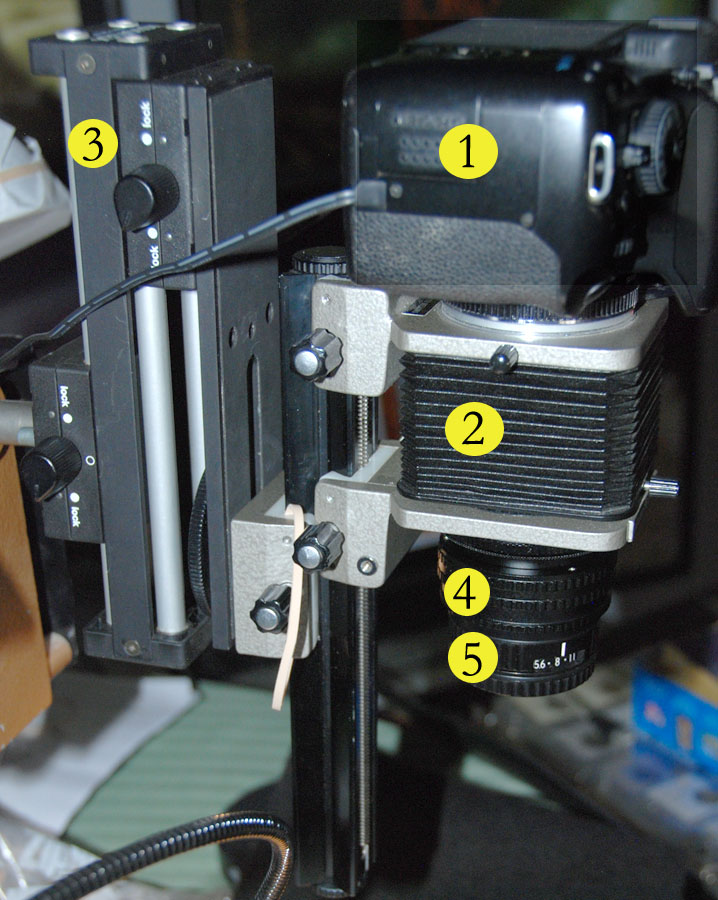
2. The bellows unit in this picture is an old Olympus OM bellows I have from years ago. It is now dedicated for this work. The camera body attaches to it via an OM-EOS Confirm adapter that allows use of the Av and Manual camera functions. Unfortunately this particular bellows unit has a slight inset rear mount that will not allow the camera body to attach without the use of a few millimeters of extension tube (14mm). This adds to the minimum extension thereby reducing the range of object sizes that this setup can handle for any given focal length lens. (More on this later.)
The bellows have a dual track rail that allows extension fore and aft (variable magnification) and position relative to the subject for close focus and composition.
-----Alternative: With compatible adapters I have allso rigged out the use of a Nikon PB-6 bellows in place of the Olympus. This is able to accomodate the Canon body for tethering, and a Nikon D80 for non-tethered shooting. Both sets of bellows have the same length at maximum extension, and both have dual track rails.

3. For greater range in gross camera movement, I have mounted the bellows unit to an auxiliary focusing rail. This is a ruled dual track arrangement that allows me to vary the distance to the subject by as much as a foot, but in very small increments. It is faster and more precise than adjusting the load on the copy stand to which it is mounted.

4. To attach the lens elements I had to modify a 7mm Olympus extension tube by replacing its front element with an aluminum M42 adapter. This allowed me to keep an M42 front standard for both bellows systems. Since the lenses I use in this setup do not have variable focus, I prefer to use an M42 focusing helicoid. This permits a very fine adjustment of the extension and so a fine tuning of the focus over the gross movements of the rails.

5. For macro-view I use fixed focus enlarger or duplicating lenses, all of M39 standard (with an M42-39 step up ring adapter on the threads). Some of my finest lenses are 75mm Apochromatics, however due to the longer minimum extension of this setup, these lenses are limited to coins of less than 1 cm diameter. For most coins I use a 105mm El-Nikkor when I want to use the bellows setup for macro-view.


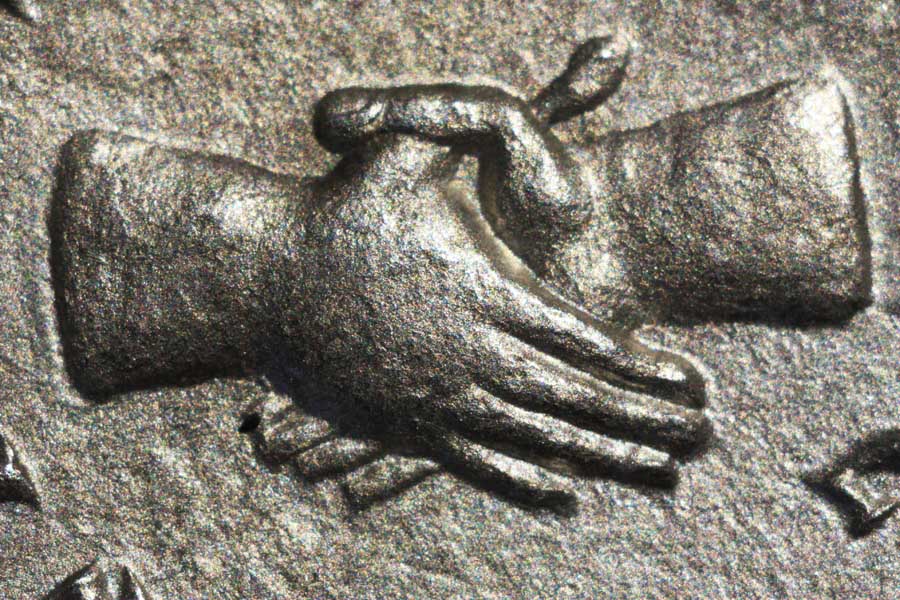
VI - These are the two sides of an antoninianus of Balbinus (a 99 day appointee of the Roman Senate as emperor) using the 105 El-Nikkor in the setup with only slight extension.

Progress-Report-And-Thanks-For-Your-Generous-Sharing


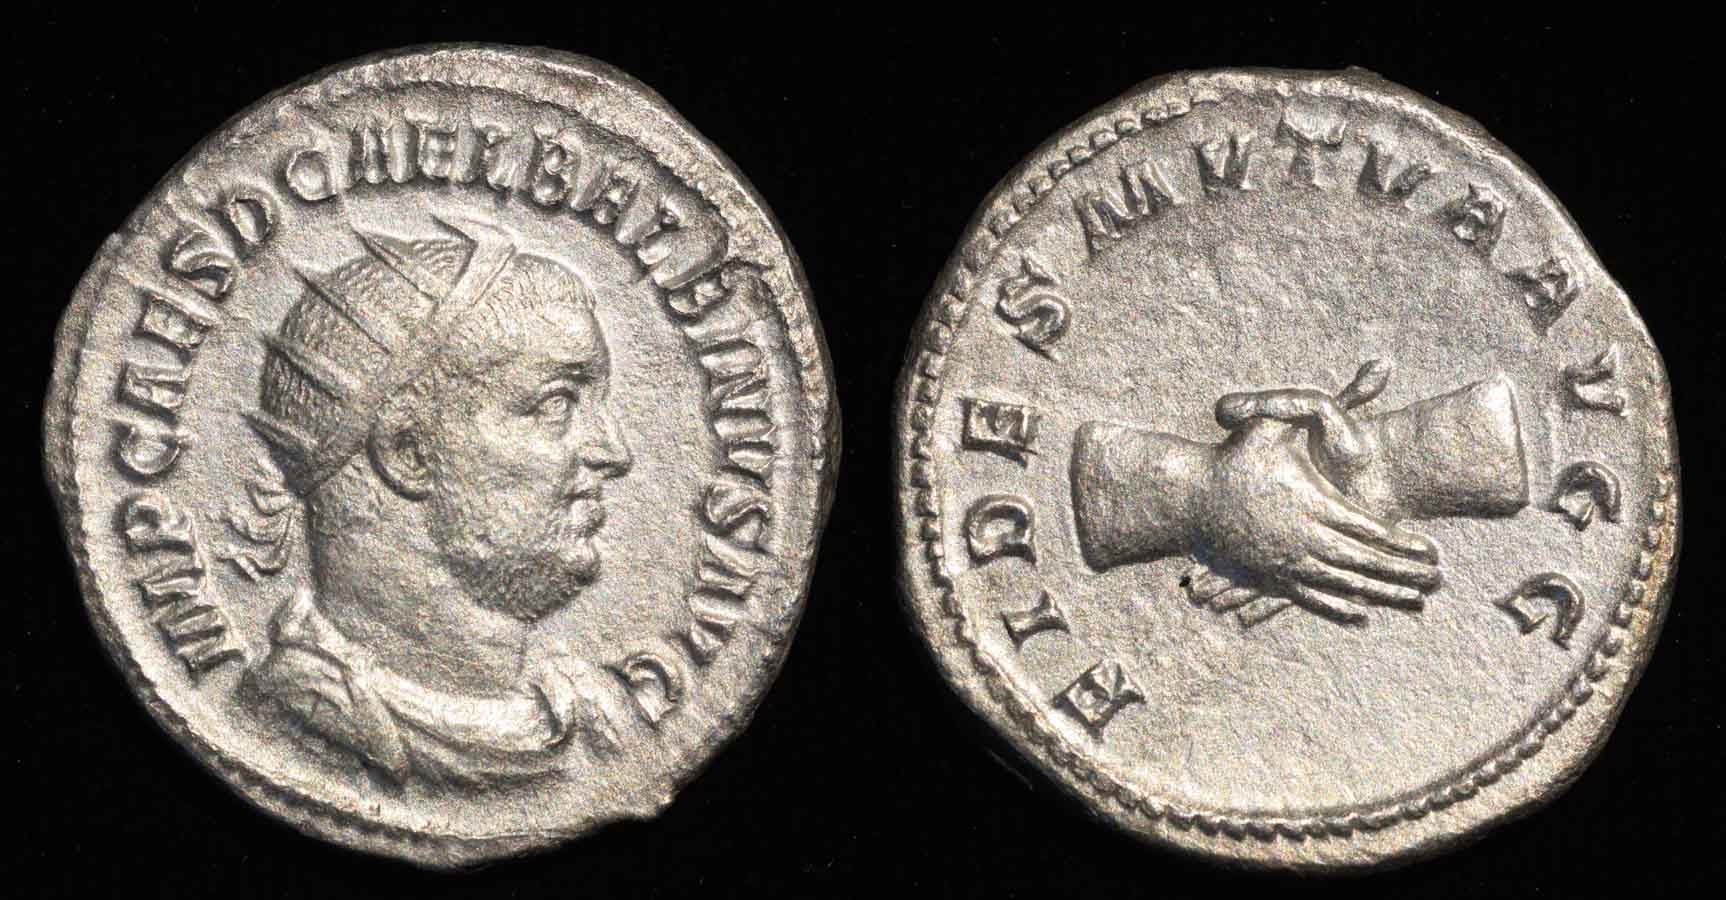
VII - At full extension the granularity of the degraded alloy used for the fabric of the coin is plainly visible. This allows for viewing surface texture and gives a sense of the glyptic relief with enough depth of field for clear focus.

Progress-Report-And-Thanks-For-Your-Generous-Sharing


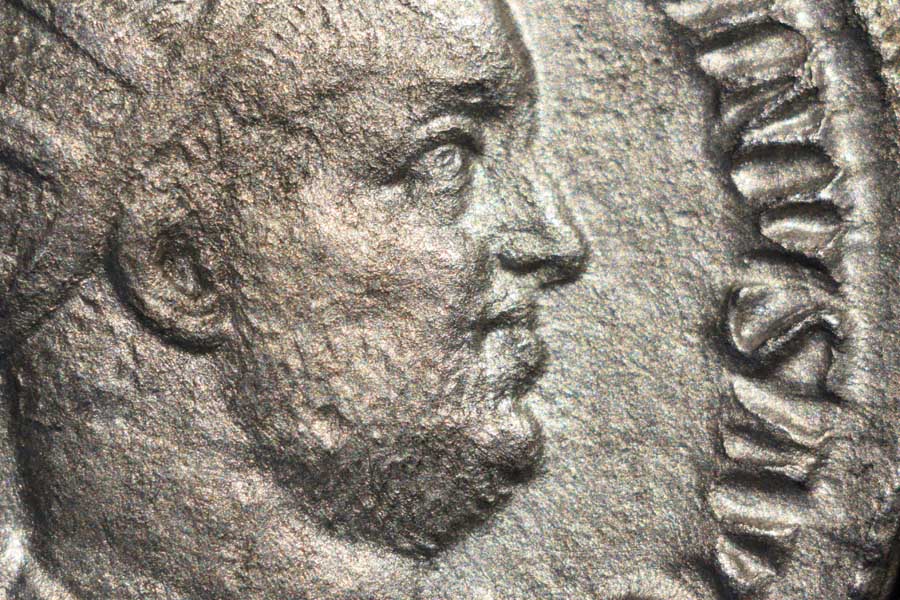
VIII - this obverse image shows the limit of magnification for the macro-view setup with this lens. This same composition will now be used as the point of comparison with the micro-view setup.

Progress-Report-And-Thanks-For-Your-Generous-Sharing


MICRO-VIEW WITH BELLOWS

IX - A simple replacement of the enlarger lens with an M42-RMS adapter allows the use of microscope objectives for imaging. Here the lens is a Nikon five millimeter objective (M5).

One critical addition to this micro-vs-macro setup is the use of a microscope stage to support the coin and background. This allows for extremely fine movement of the coin in the field of view, essential for focus stacking.

Progress-Report-And-Thanks-For-Your-Generous-Sharing


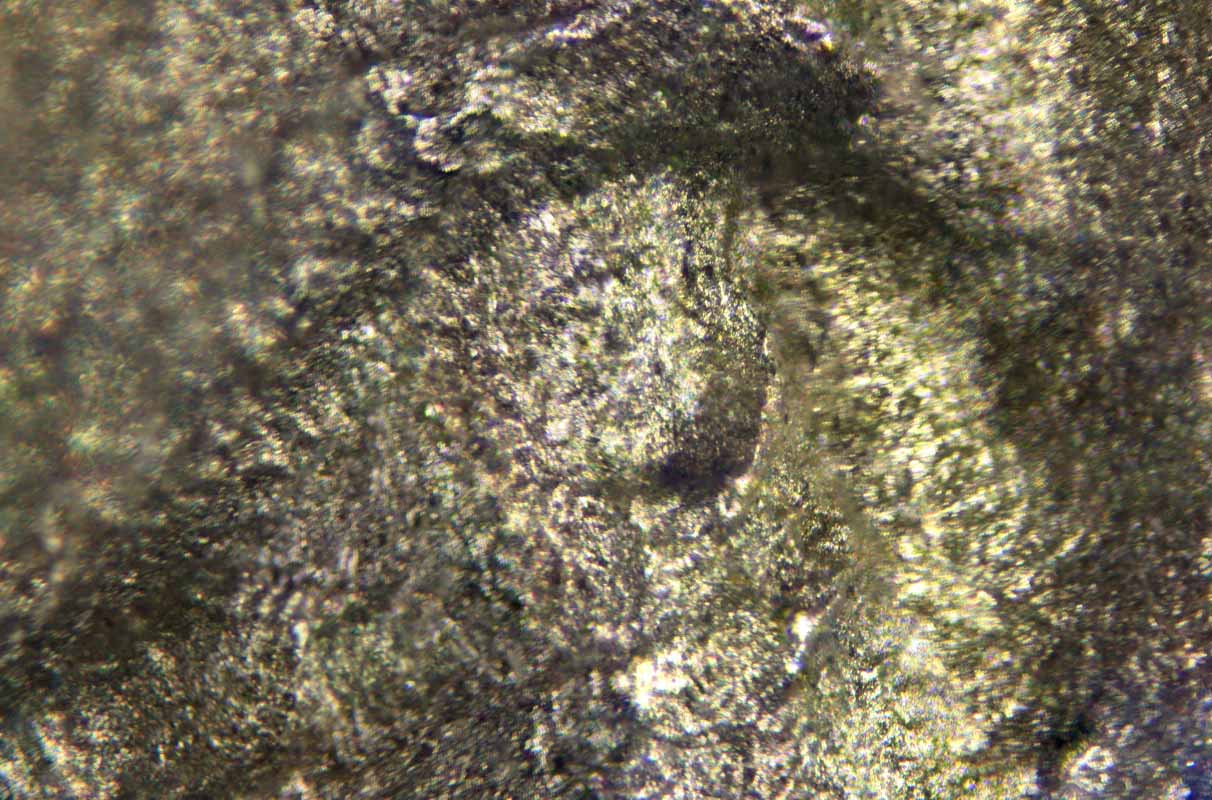
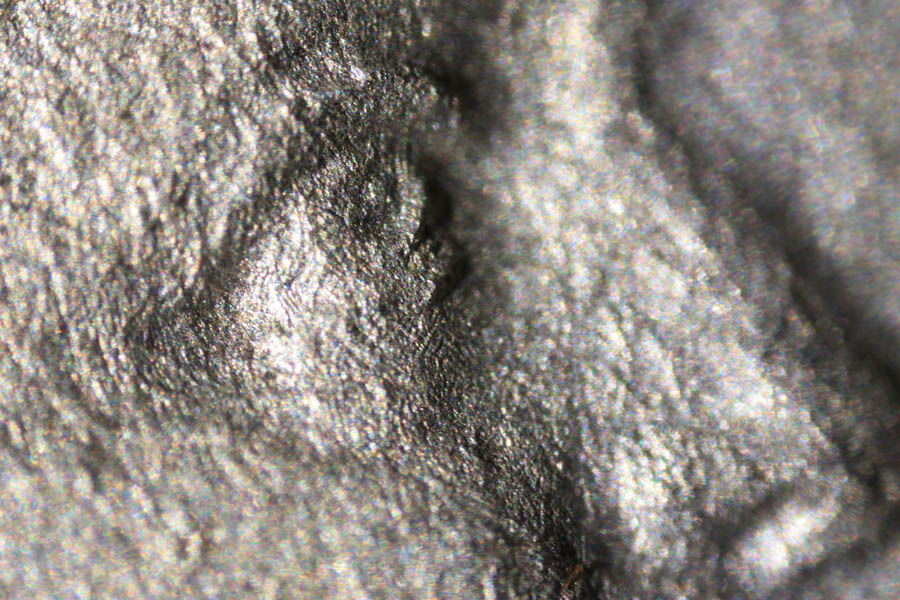
X - this is the field of view for the M5 in this setup when the bellows is at minimum extension. Note that there is very little depth of field in this image. This is my first candidate for some trials at focus stacking which I have not yet attempted.

Progress-Report-And-Thanks-For-Your-Generous-Sharing


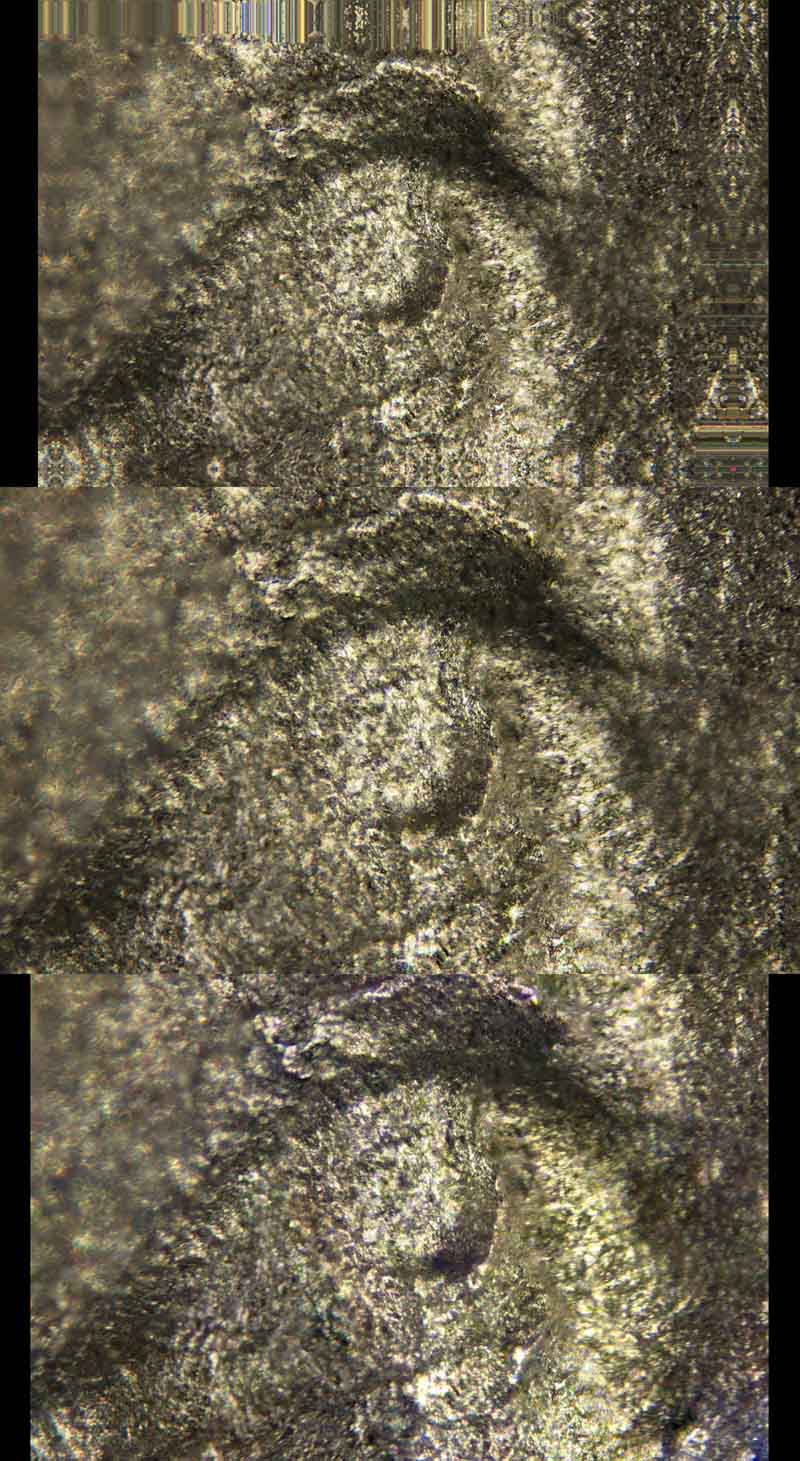
XI - The tethered image on screen showed me what I could expect from a moderate extension of the bellows, and allowed for extremely fine focus

Progress-Report-And-Thanks-For-Your-Generous-Sharing


XII - and this was the final trial image without focus stacking.


Progress-Report-And-Thanks-For-Your-Generous-Sharing

-------------------------------------------

For old hands this is probably a tiresome review, but perhaps other newbies like me will find it useful. If it is useful for some, then that is enough.

Now I need to start work on focus stacking. I will report on that when I have something to show. In the meantime, I would appreciate any pointers you can give on aspects of the lighting which could be tweaked.
Valued Member
SolomonValley's Avatar
United States
92 Posts
 Posted 07/11/2016  5:09 pm  Show Profile   Bookmark this reply Add SolomonValley to your friends list Get a Link to this Reply
Looks great...I may have to get a bellows myself...setup sure looks vaguely familiar...I also use a dedicated canon xsi on a testrite stand with an adjustable rail...works great... I also have gotten a lot of help and advice here and have nothing but praise for the members of the group here...thanks everyone...!

Progress-Report-And-Thanks-For-Your-Generous-Sharing

Progress-Report-And-Thanks-For-Your-Generous-Sharing
Pillar of the Community
pepactonius's Avatar
United States
9395 Posts
 Posted 07/11/2016  10:36 pm  Show Profile   Bookmark this reply Add pepactonius to your friends list Get a Link to this Reply
Thorough and detailed description of your setup. It looks like it works well.

For focus stacking with the 5x objective, what stepping method will you be using? -- Stackshot (or something similar), z-focusing stage, moving the bellows, etc.

Note: My setup has a microscope focusing block and rotating stage for fine focus and higher magnification (4x-10x) stacking. On rare occasions, I've resorted to moving the rear standard of a bellows (indirectly, with micrometer-positioned translation stage).

Pillar of the Community
Learn More...
United States
4038 Posts
 Posted 07/11/2016  11:41 pm  Show Profile   Bookmark this reply Add rmpsrpms to your friends list Get a Link to this Reply
Irbguy...great writeup, and excellent results. The Balbinus is exquisite, and the closeups on it are super nice. I'll be interested in seeing your focus stacking results...Ray
Contact me for photographic equipment or visit my home page at:
http://macrocoins.com
Pillar of the Community
Ham1947's Avatar
United States
1298 Posts
 Posted 07/12/2016  08:20 am  Show Profile   Bookmark this reply Add Ham1947 to your friends list Get a Link to this Reply
I concur Irbguy. Thanks for sharing. Ham
Pillar of the Community
Learn More...
United States
4038 Posts
 Posted 07/12/2016  10:51 am  Show Profile   Bookmark this reply Add rmpsrpms to your friends list Get a Link to this Reply
Looking closely at the Balbinus face closeup, taken with the 105mm, you can clearly see the effects of longitudinal chromatic aberration (LoCA). Balbinus' cheek has a slight reddish hue, while his nose has a slight greenish hue. It appears the focus was set perfectly centered (good job!) vertically between highest and lowest relief.

To mitigate this effect, you have a few choices:

1) Reversing the lens may help. At the magnification you're using, you are well outside the design window for the lens. Anything above 1:1 should be reversed.

2) Stop-down the lens. The image is very sharp, so I would assume it is wide-open. Stopping-down by one stop should help LoCA.

3) Focus stack. I generally stack at 1:1 or higher. By stacking, you will ignore the slightly OOF high/low regions and replace them with sharply-focused pixels which should be true-color.

None of the above is guaranteed to fix the problem, but each should help. BTW, #3 above should be combined with #1 to get best results. But don't combine #2 and #3. So the recommendations would be:
#1 alone
#2 alone
#1 + #2
#3 alone
#1 + #3
Contact me for photographic equipment or visit my home page at:
http://macrocoins.com
Edited by rmpsrpms
07/12/2016 10:52 am
Pillar of the Community
lrbguy's Avatar
United States
949 Posts
 Posted 07/12/2016  2:19 pm  Show Profile   Bookmark this reply Add lrbguy to your friends list Get a Link to this Reply
Thank you for the comments, they are giving me the kind of guidance I was hoping to get.


Quote:
1) Reversing the lens may help.


Thanks, Ray. I had noticed the "red stain" but did not identify it as LoCA, and frankly would not have known what to do about it if I had. I have seen your note about reversing the lens in other posts, and wanted to ask, how do I mount the El-Nikkor (or any other enlarger lens) in reversed position? Is there a particular adapter that will screww into an M42 and the front of the lens? What is that? (I have a lens reverser for my Nikon system, but it is too big for this.)


Quote:
For focus stacking with the 5x objective, what stepping method will you be using? -- Stackshot (or something similar), z-focusing stage, moving the bellows, etc.

z-stage (as follows)

For my first effort at stacking I moved up to a 10x objective. The coin was placed on the bed of a z-focusing stage atop the microscope base I mentioned above. (I still have not lopped off the objective mount.) I had thought I would use the microscope focus controls, but in the end the only purpose for using the microscope base unit was to elevate the z-stage to a better (for me) working height. Only moderate extension of the bellows was used.

Progress-Report-And-Thanks-For-Your-Generous-Sharing


On the assumption that the reticule of the z-stage is calibrated in microns I started with what I thought was going to be top focus, and moved down by 5 micron intervals. This is a level of control that is worth the extra money for a separate z-stage (if the scope does not have "infinite fine" control) . Predictability. This gave me 8 images for the stack.

Progress-Report-And-Thanks-For-Your-Generous-Sharing


These went into Photoshop, which did a fair to poor job of auto-aligning them. When I manually aligned them, cropped to uniformity, and did the blend, this was the final 10x image of the eye of Balbinus, our common test subject:

Progress-Report-And-Thanks-For-Your-Generous-Sharing


For a first time effort I am not too disappointed in the final image, but obviously I did not track far enough for the full stack, since there is a range of soft focus on the left. More on that in a moment. While this 10x micro image is overkill for this particular subject, in another study, after I get a few more bugs worked out, I intend to show you some numismatic examples that need this kind of treatment.


In the course of doing this stack I ran into something I did not anticipate; i.e. a problem which had not been discussed here in my awareness. It is a problem in parallelism. The focus seemed to shift from one side to the other rather than truly descending in layers. Here are the original images 1 and 8 so you can see what happened:

Progress-Report-And-Thanks-For-Your-Generous-Sharing


Assuming I am not barking up the wrong tree entirely in diagnosing this as a problem with the parallelism of the object plane and the focal plane, I had ordered a goniometer some time ago, before this came up, but it has not yet arrived. Presumably by mounting this atop the z-stage will allow me to adjust for alignment of the x-y plane and the plane of the sensor. Is this the best way to do that?

If that is not the problem, why does the focus shift from right to left instead of from top to bottom? By top to bottom I am not referring to the edges of the image, but the plane of focus descending into the image plane. (Think 3D)

BTW am I seeing the effect of chromatic aberration in the Nikon 10x objective with that bit of green tinting in the final blend as well as the individual shots? I can't reverse that lens and it has no aperture. Just live with it?
Edited by lrbguy
07/12/2016 2:40 pm
Pillar of the Community
Learn More...
United States
4038 Posts
 Posted 07/12/2016  4:28 pm  Show Profile   Bookmark this reply Add rmpsrpms to your friends list Get a Link to this Reply
Lots of interesting things going on here!

First, which Nikon objective are you using? All the ones I have show reasonable LoCA. Maybe something else is going on here?

Each small increment (1/50 of a turn on the micrometer) equals 10um for the focus block. I'm seeing a lot of focus banding, and a lot of areas that are simply unfocused. I have never used PS for FS so can't comment on how effective it is, or how to improve it. I'd suggest trying CZP, which is a free download.

A few small areas of the shot are in very good focus and are very sharp, so I have hope for the objective. Could there be some vibration in the system? You are using Live View?

The focus shift one side to the other just means that area of the coin is not flat, but slightly tilted. Very normal. Coins are generally flat, but at 10x the DOF is only around 10um, so any non-flatness is noticeable.
Contact me for photographic equipment or visit my home page at:
http://macrocoins.com
Pillar of the Community
lrbguy's Avatar
United States
949 Posts
 Posted 07/13/2016  11:42 am  Show Profile   Bookmark this reply Add lrbguy to your friends list Get a Link to this Reply

Quote:
First, which Nikon objective are you using?

Nikon 10x/0.25 achromat. Model num. 55031


Quote:
Maybe something else is going on here?

Not familiar enough with the equipment to say.


Quote:
Each small increment equals 10um for the focus block.

Okay, that's 10 times what I had thought, but very good to know.


Quote:
I'm seeing a lot of focus banding, and a lot of areas that are simply unfocused.

What is focus banding, and what causes it? It sounds like something that results from taking focus steps that are too big. Any recommendations?


Quote:
I have never used PS for FS so can't comment on how effective it is, or how to improve it. I'd suggest trying CZP, which is a free download.

Is this the only place to download it? http://www.­hadleyweb.­pwp.­blueyonder.­co.­uk
I can't get that url to post.
Hmmmmm.
I tried accessing their website yesterday at various times, and earlier today, with two different browsers but without making a connection. It spins and times out.


Quote:
A few small areas of the shot are in very good focus and are very sharp, so I have hope for the objective. Could there be some vibration in the system?

I am a flight above ground level. When my wife left the house yesterday she slammed the door (to keep the dog in) and the vibration showed up in the camera. At this mag level there is a lot of ambient vibration, including mirror slap I suppose, but I usually try to wait for things to settle down before taking the shot.

I am using Live View mode, but haven't figured out how to do an intermediate mirror lock-up (variable interval lock up prior to the final act of shooting) . The Nikon D800 has a two stage shutter release for this. Not sure about my Rebel XSi.


Quote:
The focus shift one side to the other just means that area of the coin is not flat, but slightly tilted. Very normal. Coins are generally flat, but at 10x the DOF is only around 10um, so any non-flatness is noticeable.

At this magnification that could be a local unevenness or bias on the whole coin. Either way, shouldn't that be controlled somehow? Otherwise I am dealing with changing focus on two planes.


Let me repeat my request for some instructions on how to reverse mount an enlarger lens in an M42 system. I have 2 Nikon and 4 Rodenstock lenses I will be using, so something universal would be ideal. But for starters what kind of ring do I need for the El-Nikkor 105?
Pillar of the Community
Learn More...
United States
4038 Posts
 Posted 07/13/2016  12:32 pm  Show Profile   Bookmark this reply Add rmpsrpms to your friends list Get a Link to this Reply

Quote:
Nikon 10x/0.25 achromat. Model num. 55031


Good objective. Maybe I'm less sensitive to LoCA since I generally shoot copper. Color shifts are much more annoying on silver. Looks like I need to take this into consideration when doing testing. Cents may not be the best subjects when testing CA.


Quote:
What is focus banding, and what causes it? It sounds like something that results from taking focus steps that are too big. Any recommendations?


Yes, exactly. One solution is simply to take smaller steps. Or you can get a lower-quality objective (lower NA), which will have better DOF. Or use a lens or objective that has variable aperture.


Quote:
Is this the only place to download it? http://www.­hadleyweb.­pwp.­blueyonder.­co.­uk
I can't get that url to post.
Hmmmmm.
I tried accessing their website yesterday at various times, and earlier today, with two different browsers but without making a connection. It spins and times out.


I haven't tried downloading it in a couple years. Maybe Alan is no longer supporting it. I also no longer see the Combine Z Yahoo group. Maybe it is defunct. Maybe I (or someone else on the forum) can dig up the installer and send to you.


Quote:
I am using Live View mode, but haven't figured out how to do an intermediate mirror lock-up (variable interval lock up prior to the final act of shooting) . The Nikon D800 has a two stage shutter release for this. Not sure about my Rebel XSi.


You won't need anything other than Live View with the XSi, and if you're using the D800 you'll probably never get a good shot at these mags without flash. You do need to ensure the Live View image is stable at 100% view before shooting.


Quote:
At this magnification that could be a local unevenness or bias on the whole coin. Either way, shouldn't that be controlled somehow? Otherwise I am dealing with changing focus on two planes.


I don't follow your point about two planes. There is only one focal plane, +/- the DOF. Any tilt just causes more Z-height variation, which causes you to need more shots in the stack. It also can cause you to do a smaller step size if there is a lot of slope.


Quote:
Let me repeat my request for some instructions on how to reverse mount an enlarger lens in an M42 system. I have 2 Nikon and 4 Rodenstock lenses I will be using, so something universal would be ideal. But for starters what kind of ring do I need for the El-Nikkor 105?


Something like this will work, with addition of M39-M42:

http://www.ebay.com/itm/RafCamera-R...AOSw37tWEaOW
Contact me for photographic equipment or visit my home page at:
http://macrocoins.com
Pillar of the Community
lrbguy's Avatar
United States
949 Posts
 Posted 07/13/2016  1:26 pm  Show Profile   Bookmark this reply Add lrbguy to your friends list Get a Link to this Reply
I found the CombineZP software at another site, running it this very minute.

Okay, done. I got six results, which I can show if you like. However, here is a comparison of result #4 from CZP, first in its full version, then cropped to eliminate problem areas. The third image is the stacking composite I did in Photoshop. All have been resized to 900 pixels high, composited, and the composite adjusted to fit the 200Kb limit.

Progress-Report-And-Thanks-For-Your-Generous-Sharing

I selected CZP output #4 in part because its result was closest to what Photoshop had done (with some tweaking in Ps). But more than this, it displayed the most sharpness over the greatest portion of the image. However, I am really not conversant with how to rate stacks like this for "true" representation of the image, so if you would like to see the other options from the various macro paradigms CZP used, just say the word.

Planes of focus -

(Here is how I am thinking of it)

In photomacrography when the focal plane (of lens) and the intended subject plane are not parallel, and you simply increase the depth of a photostack to accommodate the extra depth of focus, the final image will display the same kind of linear distortion one gets any time the focal plane is not parallel with the subject plane, i.e. linear convergence from near/shallow to far/deep. (Tall building problem.) Such an image will not be "true" to the actual subject. To counter this it is important that, when the variation of focus is down the z-axis, the xy plane is at all points perpendicular to the z-axis. Alternatively shifting the lens can counter the effect (compensatory distortion at the film plane) - but that is more difficult when the lens is a microscope objective.

Edited by lrbguy
07/13/2016 3:31 pm
Pillar of the Community
Learn More...
United States
4038 Posts
 Posted 07/13/2016  4:28 pm  Show Profile   Bookmark this reply Add rmpsrpms to your friends list Get a Link to this Reply

Quote:
In photomacrography when the focal plane (of lens) and the intended subject plane are not parallel, and you simply increase the depth of a photostack to accommodate the extra depth of focus, the final image will display the same kind of linear distortion one gets any time the focal plane is not parallel with the subject plane, i.e. linear convergence from near/shallow to far/deep. (Tall building problem.) Such an image will not be "true" to the actual subject. To counter this it is important that, when the variation of focus is down the z-axis, the xy plane is at all points perpendicular to the z-axis. Alternatively shifting the lens can counter the effect (compensatory distortion at the film plane) - but that is more difficult when the lens is a microscope objective.


I don't see how this can be possible. Too many local variations. I agree if there is a general slope to the entire subject, then it may be good to flatten it, so that the total number of shots is minimized. But tilting a coin creates a problem of perspective. Tilt can cause shadowing of areas that are normally visible when viewed straight-on.
Contact me for photographic equipment or visit my home page at:
http://macrocoins.com
Pillar of the Community
lrbguy's Avatar
United States
949 Posts
 Posted 07/13/2016  10:15 pm  Show Profile   Bookmark this reply Add lrbguy to your friends list Get a Link to this Reply

Quote:
Too many local variations. I agree if there is a general slope to the entire subject,


Yes, I agree with that too. The authentic image will come when the slope of the entire coin surface (subject plane) is zero. Then the local conditions represent the proper contours for the individual features; edge of a nose, the sides of letters and numbers, the path of a surface fissure. True representation requires discriminating between local features and the overall subject plane.

However, when the overall subject plane is truly parallel to the focal plane of the lens, then the areas of focus will follow the local contour in concentric "slices" as it should. The trick is in establishing that the whole surface of the coin is parallel to the focal plane. I'm not sure that can be done with a high mag objective as the lens. This is where a turret would come in handy, and that is why I have drug my feet about removing the turret from the microscope base I am using.


BTW thanks for the tip on the adaptor from RAF Camera. The critical detail about his reversing ring is this thread diameter and pitch: M40.5x0.5, which I understand is the filter size Nikon specified for the El-Nikkor enlarger lenses. Does this work also for the Rodenstock counterparts?

Is RAF Camera in Moscow the only source for these?

Edited by lrbguy
07/13/2016 10:31 pm
Pillar of the Community
Learn More...
United States
4038 Posts
 Posted 07/14/2016  12:31 am  Show Profile   Bookmark this reply Add rmpsrpms to your friends list Get a Link to this Reply

Quote:
BTW thanks for the tip on the adaptor from RAF Camera. The critical detail about his reversing ring is this thread diameter and pitch: M40.5x0.5, which I understand is the filter size Nikon specified for the El-Nikkor enlarger lenses. Does this work also for the Rodenstock counterparts?

Is RAF Camera in Moscow the only source for these?


Many enlarger lenses have the M40.5 filter threading, but not all. You need to check each lens individually to make sure.

There are other vendors but I would recommend Raf. He's a good supplier to the community and deserves support. Plus, he ships pretty quick compared with other international sellers. I've bought many items from him, and even had items custom-made for reasonable prices.
Contact me for photographic equipment or visit my home page at:
http://macrocoins.com
Pillar of the Community
austrokiwi's Avatar
2087 Posts
 Posted 07/14/2016  12:53 am  Show Profile   Bookmark this reply Add austrokiwi to your friends list Get a Link to this Reply

Quote:
Is RAF Camera in Moscow the only source for these?


I thought he was based in Belarus. I would agree he is a great supplier.
Pillar of the Community
pepactonius's Avatar
United States
9395 Posts
 Posted 07/14/2016  02:26 am  Show Profile   Bookmark this reply Add pepactonius to your friends list Get a Link to this Reply

Quote:
I thought he was based in Belarus. I would agree he is a great supplier.


I thought the packages were mailed from Moscow?

He may ship quickly, but the items can take up to a month to get here (US). Sometimes they get here much faster, though.
  Previous TopicReplies: 65 / Views: 8,190Next Topic
Page: of 5

To participate in the forum you must log in or register.


Disclaimer: While a tremendous amount of effort goes into ensuring the accuracy of the information contained in this site, Coin Community assumes no liability for errors. Copyright 2005 - 2026 Coin Community Family- all rights reserved worldwide. Use of any images or content on this website without prior written permission of Coin Community or the original lender is strictly prohibited.
Contact Us  |  Advertise Here  |  Privacy Policy / Terms of Use

Coin Community Forum © 2005 - 2026 Coin Community Forums
It took 0.6 seconds to rattle this change. Forums