Quote: I thought the packages were mailed from Moscow?
Perhaps we are all making erroneous assumptions. I used to think RAF Camera was Russian, but then I noticed all the items I received were being shipped by Belpochta which is the Belarus postal service, the last working tracking number that I have shows the package was dispatched from Minsk. I gather you are receiving the items from another service based in Moscow
Quote:
He may ship quickly, but the items can take up to a month to get here (US). Sometimes they get here much faster, though.
Same problem in Europe. The pattern I have observed if the item is sent track and trace it takes a lot longer( some times as long as 4 weeks). If I take the risk and have it sent ordinary post it arrives in less than a week.
Note that Nikon made similar adapters, though they are usually very expensive. They made them for both 40.5mm and 34.5mm thread sizes. Both adapt to M39. Here's an example of a 34.5mm version that sold recently (for an astounding low price):
I was able to diagnose the parallelism "problem" in my setup to a problem getting the z-rail unit to sit flat on the microscope table when it is close to the edge. So the whole subject plane really was out of parallel.
I have taken a few more stacked series of this same subject, with 20-47 frames per series. I want to composite each one, but I am having trouble with CombineZP. After it runs the alignment macro it consistently hangs in trying to run the first (of six) stacking macros. I can't diagnose this problem, but have not yet tried a system reboot to clear memory. Anyone have any experience with this in CZP?
The "all methods" option automatically gives an output for each of the methods in a single folder, and it automatically precedes the stacking macros with an alignment macro. Very handy for fastracking the learning curve.
A system reboot cleared up the results of the earlier failures. A little more exploring helped me figure out the trouble. Typical newbie error, no doubt (at least I hope it was typical). +++Bottom line - it is important when running that program that the focal progression of the photography does not "hiccup" (backtrack and recover). +++ The alignment protocol compares each frame to its successor, and will attempt to "fit" images that repeat earlier images. Some of the stacking protocols tolerate a bit of that, but the "weighted averaging" protocols will not. When it gets to be too much they hang.
So, for example: CZP is able to handle smooth (continuous) stacks up to 255 layers deep. I had one group that was 47 layers, but it choked the program right out of the gate every time in three tries. So I went through that group layer by layer and selected the frames that gave the most complete continuous flow. I ended up with 13 that gave it all without any backtracking. Here are the results for two protocols: first is "Pyramid weighted average" (becoming my favorite for this) followed by "Do Soft stack" (noisy but less lossy at the margins).
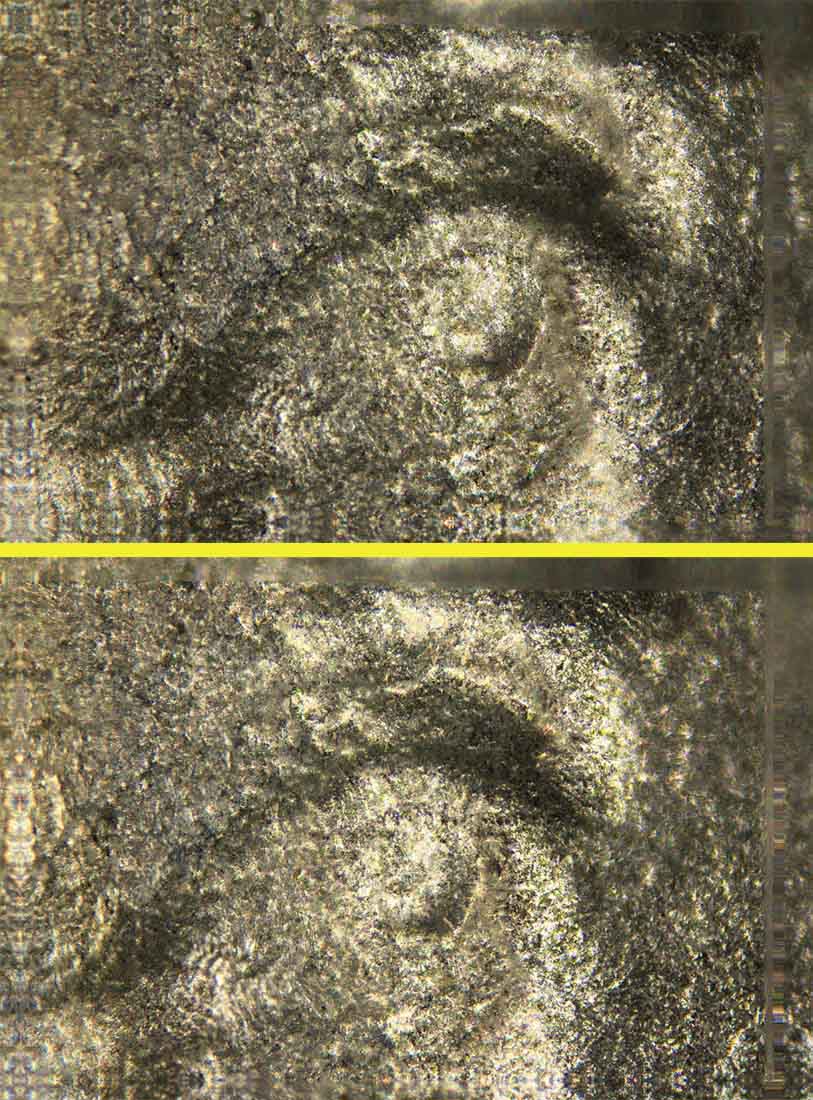
By way of comparison, here is an over/under for, first, the same "Do Soft Stack" output image as above, then the "Do Soft Stack" output for the same subject, but composited from another 23 frame stack sequence that was not corrected for continuous focal progression:
They are certainly the same subject, and have the same marginal loss at top and right. But the continuous "clean" sample has lost more on the bottom and left, and has lost some detail in the shadow above the eyeball. {edit: boy did I turn around what I meant to say in that paragraph. It contradicts the visual evidence because of that. The clean sample kept more on the bottom and left, and more detail in the shadow area. My point was supposed to be that backtracking in the stack sequence messes that up.
More important than those differences, for my purposes, is the fact that I cannot give the result for the "Pyramid Weighted Average" protocol, because it choked the machine twice.
So I think it is safe to say that stacking works best when the plane of focus only moves continuously ahead without backtracking. That requires great attention to detail when the magnification is high.
lrbguy just wondering did you move across as you stacked by 1mm or 1/2mm movements. also did you refocus very often as you went through a stack. I like the high mag you are using. I can see where this would help me. with some of my error coins. the highest I ever used was a 5 x plan objective. you are doing good have a great one
For this subject the movement steps averaged slightly less than 50 microns each along the z-axis. However, because the coin did not sit squarely with the camera lens (plane of focus) there was a side-to-side aspect to the range of focus as well. I do not know what that dimension actually is, but it is slightly more than the width of the eyeball on the original subject coin, maybe 3mm total in 13 steps.
As for refocusing, the objective lens I was using is unifocal, it can't be refocused. In this case the changes in focus are entirely the result of movement of the subject, via a z-axis stage, within the focal range of the lens.
That is a very generous offer, Ray. The stack is 13 jpg files averaging 5-5.75meg each.
Quote: What was your magnification on this stack? 50um steps seem very large, too large for even 5x.
I have to let you do the math, I have a commitment for the day and have to leave.
A 10x objective lens with approx 5 inches of extension from the font of the camera, add one inch to the sensor plane. See the first pic in my second major setup post (not the pics in my first post) for the exact setup. These numbers will rough it in, not precise.
As for the step size, when I did 50um steps the stack came in at 8 files. Average the range over 13 files for the new number.
Irbguy: I have been looking at your shots on the first page of this thread and could not shake of the suspicion that some of the image quality may be being reduced by diffraction caused by poor lighting( not diffuse enough). So today I tried my best to repeat what you did taking one 10X stack with out diffusion and a second stack with Diffusion. To my eyes there does seem to be improvement when diffusion is used. My technique a translucent half sphere with a hole cut in the top that just fits around the objective ( I have never been able to get janscos to work for me) the objective is an unknown, to me brand: HS 170 10/0.25 ( its probably not as good as the objective you are using).
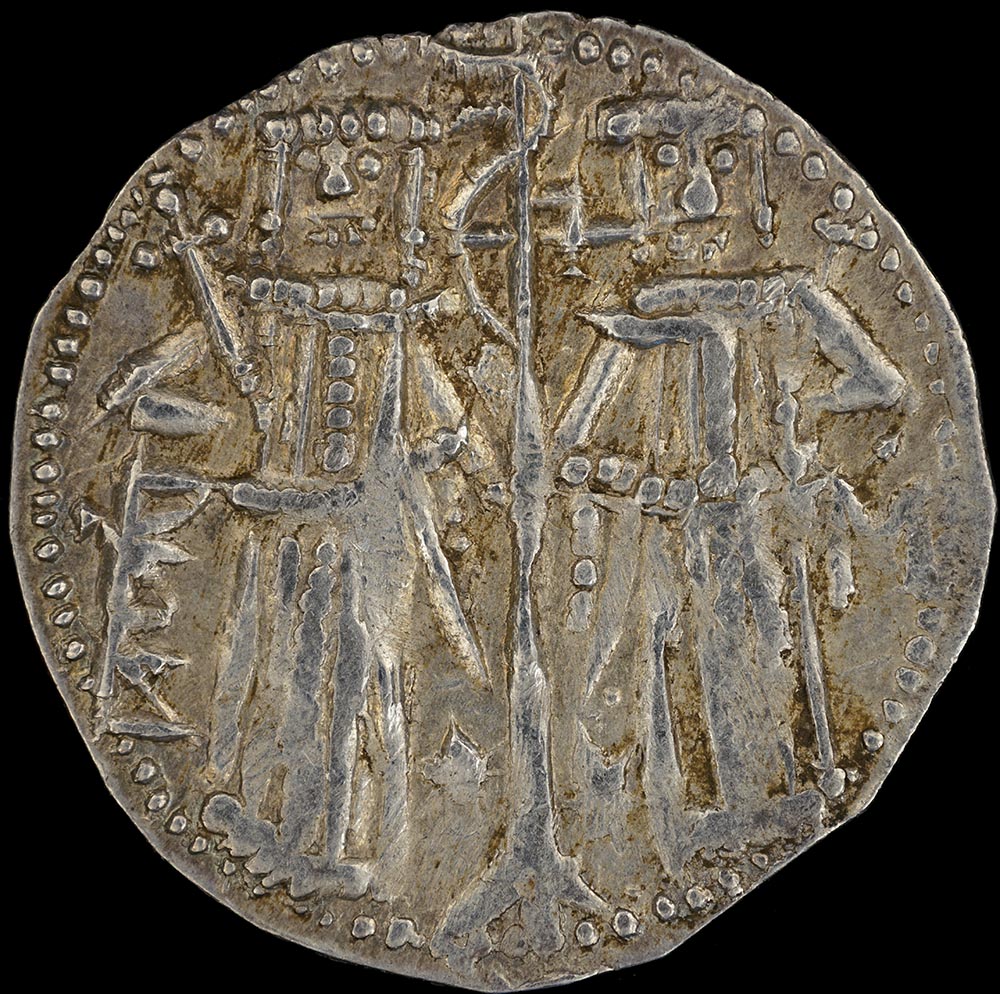
The subject is a medieval Bulgarian Grosso( first picture. I tried to find something with a comparable, to your subject, surface texture. I focused on the eyes and nose of the right hand figure( viewers right). Note camera is a Sony A7rII ( full frame) and I used Silent shutter
I leave you to judge whether diffusion has made any difference, I believe there is an improvement.
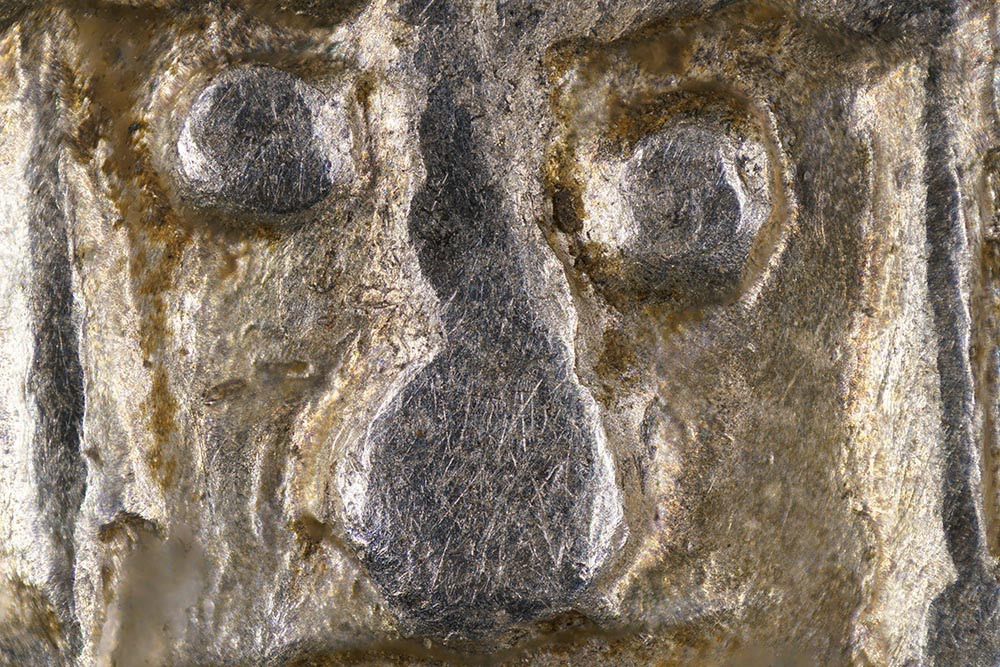
Next is Un-diffused shot... Stack of 65 step 0.003mm Stacking method Depth map. Like you I didn't get the stack right so you can see some out of focus areas in this picture:
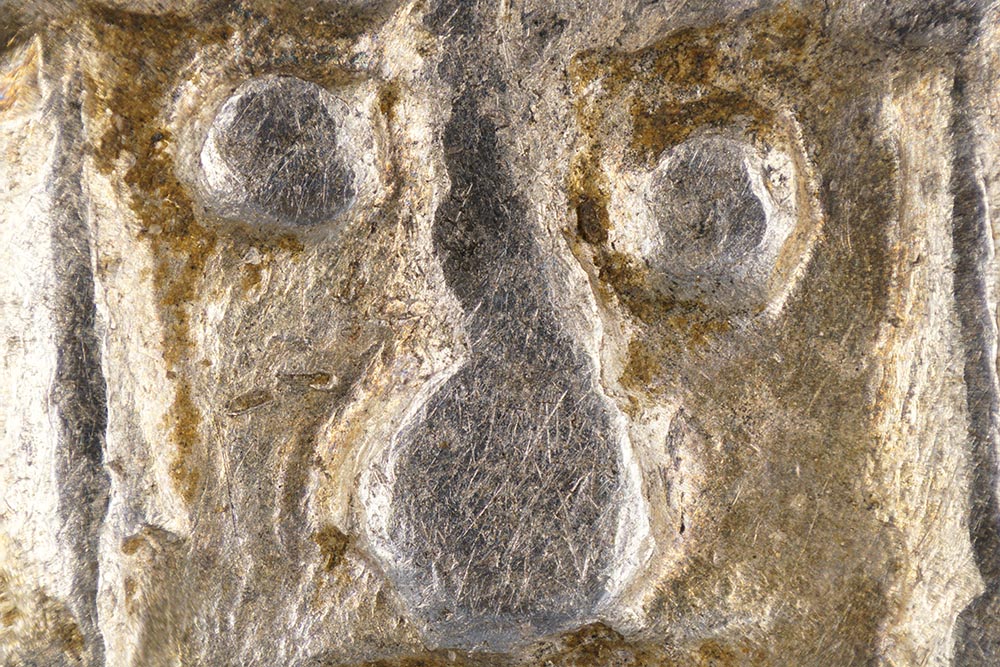
Final picture is with diffused light I got the stack right this time same step same stacking method.Final image is from a stack of 93. {I did get the exposure a little wrong hence the blown out highlight on the left}
The diffraction I am referring to is not linked to the aperture but rather diffraction caused by light being reflected from nano features on the coins surface. It can look like Chromatic aberration or strong speckling. Diffusion can significantly reduce this effect.
Okay, now I can attend to coin photography for a while. Austrokiwi, I appreciate your efforts to match a coin sample to the subject coin I was using. That was an impressive effort, and took some time to do, and I thank you for it. Now, however, I am challenged to replicate your principles, if not your method, on the original sample so we may compare apples to apples.
{Sheepish admission} About two months ago I bought a package of ping pong balls and a conical M42-RMS adapter, but never got around to making the diffuser. Your tests inspired me to get to it. Whether it will give me the kind of lighting control that I want is uncertain for me at this point, but I want to explore it. Normally I find that there are certain details for which diffuse lighting is NOT the way to go, particularly when you want to illustrate depth and dimension. When you are ultra close that same principle also applies to texture, which is less apparent in diffuse lighting. I feel that your first stacked example does better with depth and texture than your second (compare the "presence" of the left eyeball).
I am not sure what controls you used for matching your results to mine, but here are some important specs:
1. By caliper measurement, the width of the eye socket on my coin is 1.7mm (not 3mm as I had imagined). With surrounding margins we arrive at a maximum unmagnified width of 2 mm.
2. Bellows extension, various adapters, and a helicoid tube added to the separation of the lens from the plane of the photosensor, so the magnification of the subject was not limited to what the 10x alone contributed. I need to specify those numbers before we can move from qualitative to quantitative comparison.
3. The alloy of the coin is a factor in the texture of ultraclose images. First introduced as debased currency 18 years earlier than this piece, the alloy of the struck issues grew noticeably grainy. The surface finish is dull by comparison to full silver, and up close it sparkles.
I will spend today trying to match what I had done earlier, but this time using the diffuser, and will get back with a result asap.
Ping Pong Ball (PPB) diffusers are excellent for creating a full, all-direction diffuse effect. This is a good type of illumination for true 3D subjects (eg bugs and such) but the effect is not the best for showing coin surfaces. Just as with full-coin photography, minimizing the amount of light coming in from the sides will improve the shadow detail of surface features, thereby making them more apparent. Highly-diffuse illumination creates a "shadow-free" effect which actually obscures surface detail. The detail is there, but it cannot be easily distinguished because the lack of shadowing reduces contrast to the point the features are hidden.
To mitigate this effect, but still keep the positive benefit of the PPB, I mask the lower portions of the PPB. Masking the outside of the PPB will keep external light from shining through, and "shapes" the light source to only shine from the upper (higher angle) regions. This reduces the side lighting, but does not eliminate it, because the light that reflects from the coin or other surfaces will shine onto the inner surface of the PPB, and then re-reflect onto coin from the lower angles. This light also has uncontrolled white balance, since much of it will reflect from the coin, and will be tinted by the majority color of the coin (or of other non-gray surfaces). This might not be a problem for silver coins, but is a big issue for copper, and tends to homogenize the final color balance of the coin. Masking the inside of the PPB minimizes this effect. I use flat black paint to paint the inside and outside of my PPB diffusers, leaving effectively a "ringlight" at the top of the PPB.
Now, the above discussion is mainly aimed at objectives with short working distances, such that light from the lowest areas of the PPB would hit the coin from a low angle. If the objective has longer working distance, then the angles are more favorable and no masking is needed. Judge the need for masking based on the actual angle from the lowest edge of the PPB to the farthest edge of the field of view.
Here is an example of a masked PPB diffuser being used on a Nikon 4Plan objective. The 4Plan has a bit longer working distance than the M5, so a diffuser for the M5 should be masked at a higher angle. 10x objectives generally have even shorter working distances, so should be masked even higher, but be careful to not mask such that there is no area of the PPB that illuminates the subject!
Contact me for photographic equipment or visit my home page at: http://macrocoins.com
1. By caliper measurement, the width of the eye socket on my coin is 1.7mm (not 3mm as I had imagined). With surrounding margins we arrive at a maximum unmagnified width of 2 mm.
By caliper measurement the eye to eye distance is 1.33 mm. But this wasn't particularly accurate ( see next Comment)
Quote:
2. Bellows extension, various adapters, and a helicoid tube added to the separation of the lens from the plane of the photosensor, so the magnification of the subject was not limited to what the 10x alone contributed. I need to specify those numbers before we can move from qualitative to quantitative comparison.
So I gather you were using greater than 10X magnification(?).
I hate using maths to work out extension and magnification( I always fear I will make a mistake). To avoid silly mistakes I use a ruler/microscope calibration slide. I adjust the bellows extension so that the field of view(across) measured 3.6mm on a microscope calibration slide at which point I knew I was using 10X magnification(My cameras sensor is 36mm wide).
Quote: 3. The alloy of the coin is a factor in the texture of ultraclose images. First introduced as debased currency 18 years earlier than this piece, the alloy of the struck issues grew noticeably grainy. The surface finish is dull by comparison to full silver, and up close it sparkles.
That is to be expected My only other ancient coins were significantly different, the Grosso was the closest I could find( with out going to the bank)
I have a suggestion for working out the depth of field for setting the step increments for stacking. I never trust my maths as I lack the mathematical literacy to understand what is going on with the equations. So I revert to a form of maths I know: Pythagoras(a² + b² = c²).
I have backed a microscope calibration slide with white tape and then permanently mounted it at a 45 Degree angle. Once I have set up the camera bellows and objective/s. I image the calibration slide, and measure how much is in focus. That tells me the value of "C". I square that result, then divide by 2 and( of course), then, take the square root. By that method I know accurately the DOF without having to worry about variables like, focal length, entrance and exit pupil sizes etc).
I realized I had a better comparison subject. An Axumite Bronze coin( I haven't checked my data base so All I can say is it dates to before 500.)
I now can really appreciate the challenges.... the Grosso was an easy subject. the following picture is a stack of 240 shots( it was about 50 more than necessary ) 0.003mm movement between each shot, at 10 X magnification. As rmpsrmps pointed out with the full diffusion the 3d nature of the coin is lost. (top right corner is soft....I hadn't focused deeply enough at the start of the stack)
This video ( low quality) produced from the Helicon soft 3d model gives a better understanding of the depth that the lack of shadows is hiding.
irbguy: I tried to send this suggestion as a private message but you are not receiving emails. With more than 5X magnification work Enrico Savazzi recommends some form of Vibration isolation. Your rig is very good and I think if you follow Enrico's principle you will be very satisfied with the result. Here is a cheap suggestion:
Have a look around your local hardware stores, Garden centers, and Stone Suppliers for a Granite slab. The one I use is 600mm X 600mm X 30 mm( weighs just under 60lbs). Be patient and don't get suckered into paying a lot for one... mine cost under US$10.00. Then , the most expensive part, find four Sorborthane feet like this:
Just sit the slab on the sorbothane feet and then sit your rig on top of the granite slab. A cheaper alternative is a concrete paver of at least 25Ibs weight( Should cost no more than US$5.00) which you place on the base board of your rig, while the rig sits on the sorbothane feet. The Granite slab will protect your picture taking from vibration in the magnification range of 5X-20X. It may do well beyond 20X, but 20X is the limit of my experience with this technique.
Disclaimer: While a tremendous amount of effort goes into ensuring the accuracy of the information contained in this site, Coin Community assumes no liability for errors. Copyright 2005 - 2026 Coin Community Family- all rights reserved worldwide. Use of any images or content on this website without prior written permission of Coin Community or the original lender is strictly prohibited. Contact Us | Advertise Here | Privacy Policy / Terms of Use