| Author |
 Replies: 65 / Views: 8,194 Replies: 65 / Views: 8,194 |
|
|
|
Pillar of the Community
2087 Posts |
Irbguy. I hope the multiple posts Ar not mucking up your thread. I tried to replicate the look of your shot and although I couldn't get a match are started to see some of the artifacts I was perceiving in you 10X stacked images: First of all by way of reference. here is a stack of 64 photographs combined using depth map method. I used all my standard techniques with Silent shutter( no front curtain shutter and no rear shutter), image stabilization off, used a step of 0.010 mm This is the result ( same coin just the obverse). 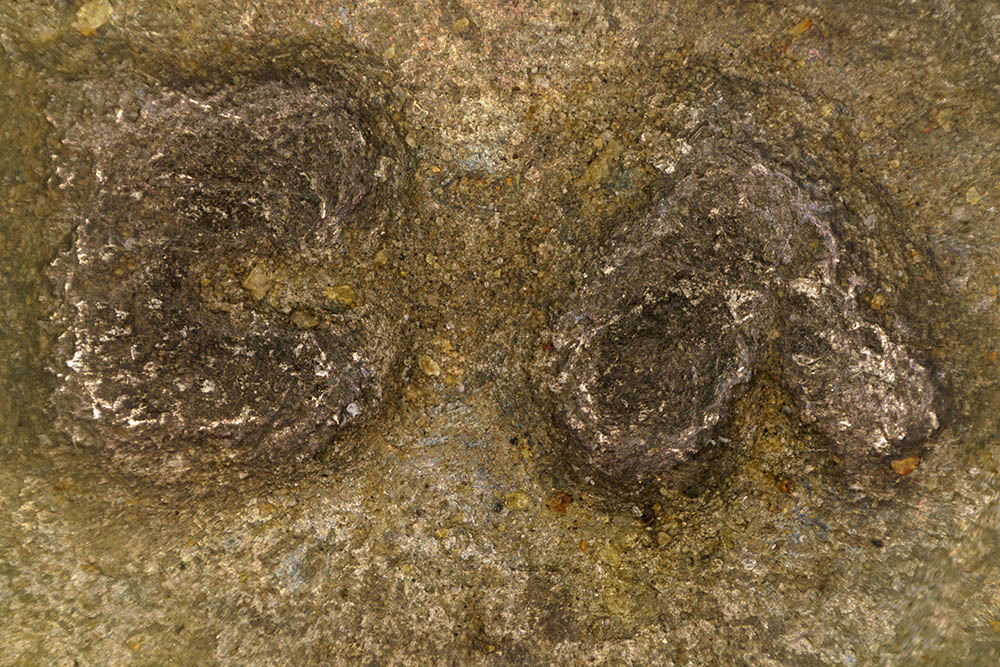 I then conducted the same procedure but used a step of 0.050mm ( I believe this is what you were using earlier in the thread). As you can see by the following shot there are areas that are sharp and others that are soft:  For the final shot I tried every thing I could to introduce as much vibration as possible. I went to full shutter operation, and I turned image stabilization on. as with the last shot I used a step of 0.05mm. This is the picture that I believe shows similar artifacts to your shots. 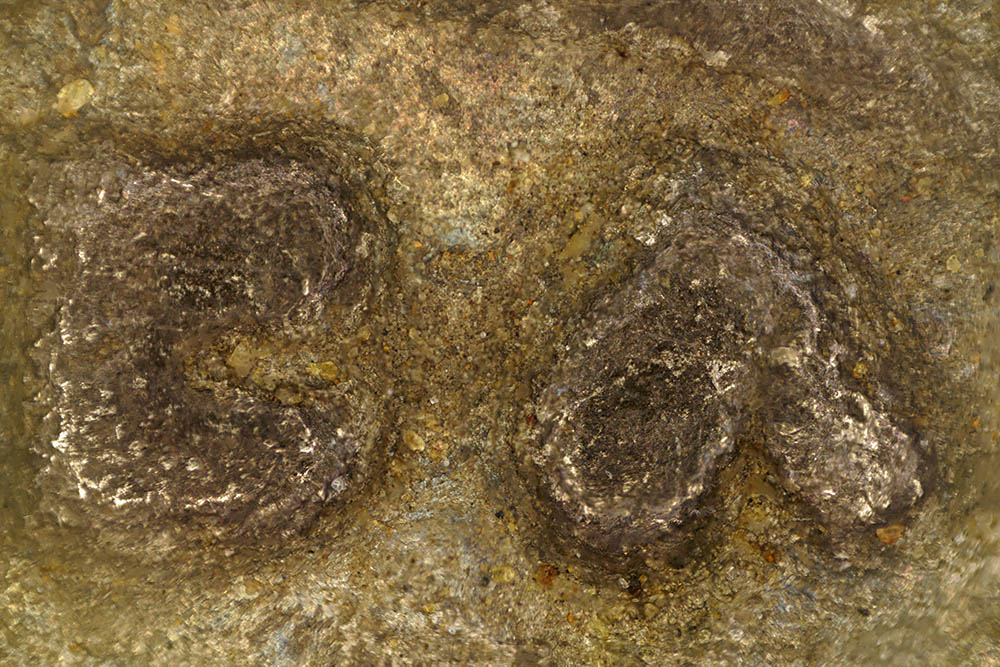 Before posting I previewed the post and I have to say all three pictures look as if I could do better. I found I had to move about a meter away from the monitor to see the differences that are much more obvious on the full sized pictures |
|
Pillar of the Community
United States
9395 Posts |
Quote:
At the 10X magnification you are using you should be using steps less than 0.050mm probably around 0.014mm(assuming you are using F4. Have a look at this link( if you haven't already) third table for microscope objectives For the usual 10X/0.25 NA objective, I would have thought the proper step size would be no more than the 8.8 microns shown in table 2-C in the link? I seem to recall folks at photomigrography.net suggesting somewhat less than this step size (maybe 2/3 to 3/4 of the 8.8 microns?) With my 10X/0.28 objective, the DOF would be about 7 microns, and I use a more convenient step size of 5 microns, since I have to manually turn a microscope fine focus knob to do the steps. |
|
Pillar of the Community
2087 Posts |
I think my morning coffee hadn't cut in when I posted( At least that's the excuse I am using) Yep 0.0088 should have been the figure. Normally I go for 75% of that figure. The 0.003 I had previously used produced much better pictures
|
|
Pillar of the Community
 United States
949 Posts |
Ah, hmmm, how to put this in a way that doesn't sound loaded. I hope this sounds neutral and matter-of-fact, it is meant to be.
All of the information you are guessing at about my system has been given earlier in this thread. I have not changed the basics nor the sample coin since the beginning, but have stuck with an antoninianus of Balbinus of 238AD. What I have altered, such as lens selection, has always been introduced. Please make use of that information so you are not "flying blind" or "reinventing the wheel" in your further troubleshooting of the micro level shooting I am trying to master. The camera system is tethered using the EFCS mechanism exclusively. There is no need to consider alternative methods.
austrokiwi, please also take a close look at the surface texture of the displayed images of this subject that I took using an M5 (page 1) and later a plan4 microscope objective (page 3). Those lenses and images give a broader view of the subject under the same lighting conditions. The surface "granularity," which I am now seeing as partly structural and partly an aberration artifact, is already visible in images not making use of stacking. Certain facts must be kept in mind: Silver antoniniani of the mid-third century have more of a matte surface than the glossy surfaces of earlier denarii and some later siliquae (silver) coins. Both styles of alloy appear among the argentei of the early 4th century. If this is not the entire source of the roughness in the 10x pics, it is certainly a significant contributor.
The 10x imaging so far is not helped by diffused lighting, so for the present I am going to forgo exploration of the use of a diffuser. I agree that getting precise about step size is critical and is my weakest link. My fine focus instrument is a manually adjusted z-stage unit, which Ray has said is calibrated to 10 micrometers at its smallest marking. I can estimate to half that, giving me an approximately 5 micron step as the smallest.
I will be exploring that today, time permitting, and will get back once I have something repeatable/replicable.
Edited by lrbguy
07/22/2016 09:47 am
|
|
Pillar of the Community
2087 Posts |
Irbguy: (First note I am really impressed at what you are achieving with manual stacking) It was those photos , both page one and three, that made me think first of surface diffraction and the need for diffusion, Specifically this shot: 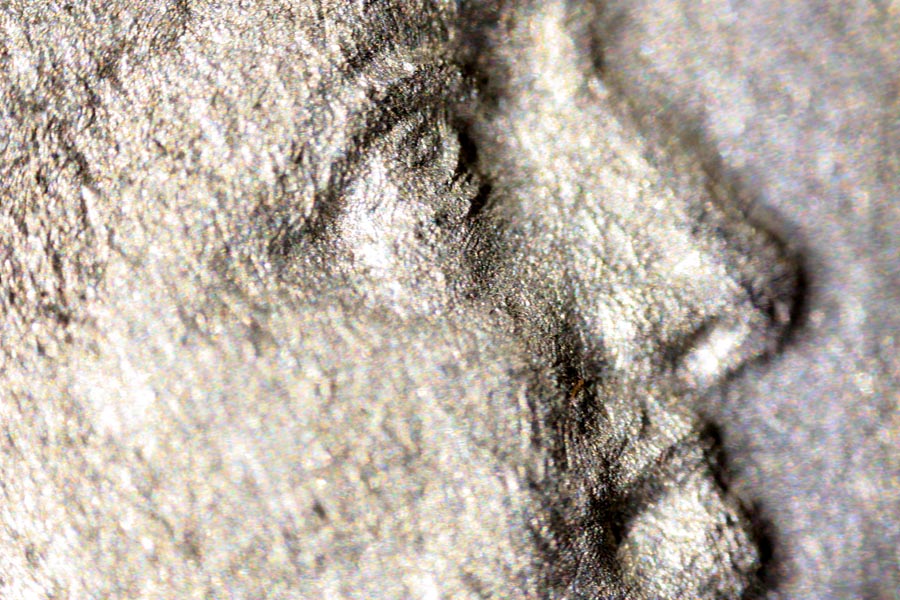 The "rainbow" speckles are typical of surface diffraction ( but there is probably also an issue with CA) as I understand it. I note that in the sharp area there are sharply defined lines. Now the page 3 comparison shot:  both shots look to my eye to be blurred, and most probably due to too large a stacking step. I have the advantage of using an automated stacking system( stack shot). In the stack shot controller the current program I am using sees me set the step size. I then use the cameras focus peaking to set the start of the stack, and the end of the stack. I am using a coin of similar 3D structure to yours and with a step of 0.007mm I need 104 shots to cover 0.728 mm of vertical movement. I would expect that you would also have to produce a stack of above 60 photographs to cover the coin you are photographing. I don't doubt your accurate on the surface condition of the coin, but I suspect you are not getting small enough steps and/or are not covering enough vertical movement to get a sharp stack (I am not claiming my stacks are sharp...looking at them I would like to do more work to improve them). I await with interest your next posts Manual stacking is hard I know I tried for months to find an accurate enough focusing rail ( I wasn't aware of Z stages at that time) before I finally gave up and purchased an automated system. The challenge is finding accuracy at an affordable price and I don't know anything that is cheap and effective: I am familiar with the type of Z stage you are using and if it is the Chinese or Indian version ( like this listing: http://www.ebay.co.uk/itm/Z-axis-Pr...OSw-tNXHzB8) then it is possible, even with the mitutoyo micrometer head, that you are not getting accurate step adjustments. I decided against that type of Z stage for that reason, the engineering tolerances are just too variable. You have an option to improve it: However I suspect the price of this replacement micrometer head would be over US$200.00 http://ecatalog.mitutoyo.com/Microm...g-C1559.aspx Unfortunately accuracy costs. For example a much more reliable focusing rail is produced by Hejnar: http://www.hejnarphotostore.com/pro...-p/ms4-1.htmUnfortunately even that rail lacks a 0.001mm Micrometer head. With the right head( you would have to purchase it separately) you are so close to the cost of Cognisys' Automated Stack shot ($549.00) that it would be silly not to buy the Automated system. As I said I look forward to seeing you next attempt. As a final comment: It may well be that it is just the metal surface, and that I am wrong. I am finding this thread useful as it is making me push my skills envelop out a bit. Edited by austrokiwi
07/23/2016 01:31 am
|
|
Pillar of the Community
 United States
4038 Posts |
I've done successful stacks at 20x with the cheap Chinese Z-Stage so I don't know what's going wrong. Have you tried half-steps? That will give you ~5um steps that should be perfectly fine with the 10x objective.
I suggest you do your stacks the old-fashioned way, ie watch your live view screen and adjust the Z-height until you see the smallest changes in the focus, and snap the shot. It's a bit more tedious, but you can make sure every critical feature is in sharp focus this way. Go through the whole vertical range, noting what goes into and out of focus as you move vertically. This will give you an idea of how sensitive you need to be.
Contact me for photographic equipment or visit my home page at: http://macrocoins.com |
|
Pillar of the Community
2087 Posts |
I was also wondering if the micrometer head adjustment is too fiddly. Would attaching a large diameter disk( perhaps even a circular protractor) to the screw handle make it easier to make fine adjustments?
|
|
Pillar of the Community
United States
4038 Posts |
I think the micrometer is probably OK, but there may be play in other parts of the setup that cause "missing" parts of the stack. Doing it manually while in Live View will show this very quickly if it's happening.
Contact me for photographic equipment or visit my home page at: http://macrocoins.com |
|
Pillar of the Community
United States
949 Posts |
Gentlemen, I am truly grateful for the advice, challenges and assistance, and I don't mean to disappoint you, but you are moving too fast for me. I am a methodical person who does what I can in a step by step fashion. My first priority has been getting familiar with the lenses I have acquired. The second priority has been to study the effects of close LED lighting. From my end, all the testing and examples up to now have served these two needs. The next agenda item you suggested for me was vibration stabilization, for which I may have a solution that I cannot yet implement. Now I need to attend to the accuracy of the movements for fine measured steps in the stacking routine.
In each of these stages special adaptations to equipment has been an issue that needs to be solved as we go. I am still waiting for the arrival of the lens reverser you suggested to me, which was not in my PO Box when I checked this A.M. but apparently is in the box now. For the lighting I had to take some time to fashion the ppb diffuser (without instructions - I have never tried to cut a ping pong ball before). For the stabilization block I still need to find some steel plates.
So far the fixes have been rather simple for me to devise. However, fixing the mechanical advance problem is at another level entirely. At this point I have been dependent upon the focusing controls of a microscope base unit to provide the vertical stacking steps. It is obviously not up to par, but it is the best I can do for now. I have a z-stage unit, and I can use it as a stage block, but I cannot yet use it for its intended purpose. I have not devised a way to mount or anchor the z-stage unit so that it moves ONLY in the vertical direction intended when I attempt to turn the micrometer handle. Until I figure out how to devise a stable base, I cannot do the kind of testing you are taking for granted.
Ray, you say that you are able to use the z-stage with a 20x lens and get a clean result. How? What keeps the stage from rotating or shifting in the x-y plane when you touch it, let alone attempt to rotate the handle?
Edited by lrbguy
07/23/2016 5:56 pm
|
|
Pillar of the Community
United States
4038 Posts |
Quote:
Ray, you say that you are able to use the z-stage with a 20x lens and get a clean result. How? What keeps the stage from rotating or shifting in the x-y plane when you touch it, let alone attempt to rotate the handle? Mine is taped to my stage plate with thin double-stick tape. This is not perfect, but is stable enough to do 20x stacks with ~5um steps. I think the double-stick tape adds a little dampening to the system as well. Contact me for photographic equipment or visit my home page at: http://macrocoins.com |
|
Pillar of the Community
United States
949 Posts |
Thank you Ray. Today I picked up another plate that I will be using to mount the z-stage. I like the idea of using a double sided tape so I can remove the delicate z-stage when I wish. But I learned that there are many types of double sided tape, one of which is called "mounting tape." The package has a warning, "This is a permanent tape and may cause damage if removed." Since this particular tape is good for up to a 15 pound load, I purchased it. But before I use it, I want to make sure I am not making the wrong choice.
Is this what you are recommending: 3M Scotch outdoor mounting tape, holds 15 pounds. Works with metals.
Is there something that can be removed with less danger to the delicate z-stage?
Edited by lrbguy
07/24/2016 10:09 pm
|
|
Pillar of the Community
United States
4038 Posts |
The 3M outdoor mounting tape is too thick and too flexible IMO for this application. You might get by with it if you stuck down the entire surface of the Z-stage, but then it would be very tough to remove.
If your Z-stage is like mine, it has 4 raised areas on the bottom (around the screw mounting holes. I use regular Scotch double-stick tape, which is just a little thicker than their single-sided tape. Four pieces, one on each of the raised corner areas, makes the Z-stage very stable. It's pretty easy to remove as well.
Contact me for photographic equipment or visit my home page at: http://macrocoins.com |
|
Pillar of the Community
United States
949 Posts |
Thanks again, Ray. On Sunday I was able to pick up the kind of tape you recommended, and did a temporary mount of the z-stage to a new plate for it. I have an idea for a more permanent solution, about which I will share if it proves to be useful. For now, the light weight tape is getting the job done. I am honing in on weaknesses in my stacking technique, but running into snags. In a test Sunday I was able to use the z-stage alone to step the focus of the test coin (Balbinus antoninianus). Since I wanted easily recognizable images for this initial run, I used an M5 Nikon objective lens with the bellows setup. For the first test I did not use a light diffuser. For the shooting I used the Live View/ EFSC hookup, alternating between normal and magnified views for each shot. My interval was each marked striation on the micrometer dial, and I stepped entirely around the dial twice in one continuous succession. The actual limits of the focal range for this coin were reached within 70 steps. Prior to this I had been letting the right to left progression of the focus determine when to start and stop a stack. However, that was not consistent in this new setup, so I have decided henceforth to define focus for a z-axis range (e.g. .5 mm) and sort from that. Unfortunately I ran into a limitation in my computer/software for processing the 70 selected layers. CombineZ apparently limits processing to what it can handle for a given system memory size (16gb for my Win7system). Even when I selected only one stacking module (e.g. Pyramid DO) it choked at more than 30 images. As a workaround I selected 2 groups of 30 layers each and ran them under the "Pyramid Do" macro. Here are the original output images (adjusted for color and file size; the composite of the first 30 steps is on the left:  The idea was to use these images as the source files for a composite stack. The mess below shows how that turned out (with error compounding)" 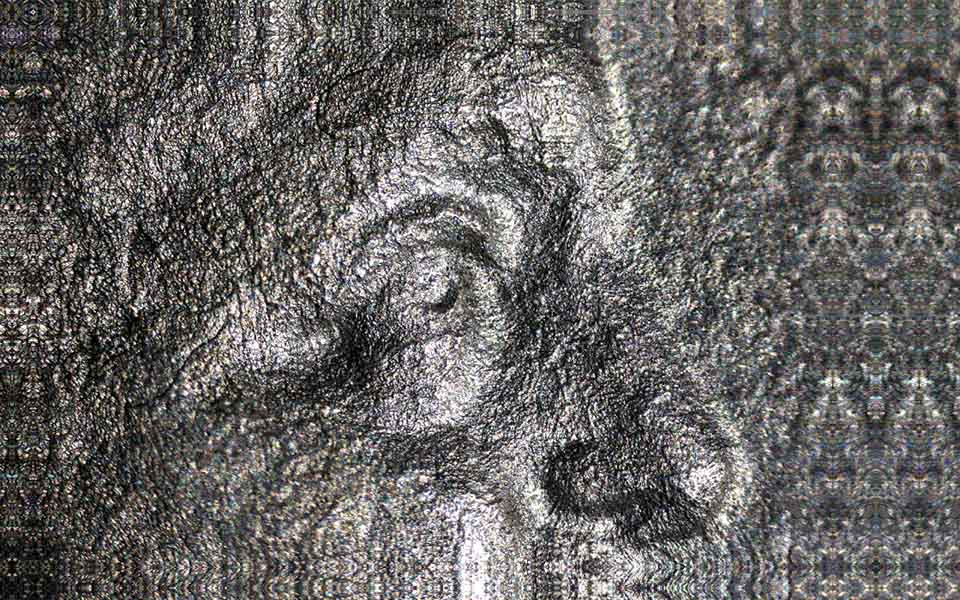 Apart from trying different software, not sure how to proceed from here. |
|
Pillar of the Community
United States
4038 Posts |
CZP does a lot of image processing in addition to the actual stacking. Main issue I had with it (and why I stopped using it) was the added sharpening it does at the end and possible in interim stages. I could have written my own scripts but that's not my thing, so I went for Helicon and have never looked back.
One thing that might help is to increase the step size to 2 or even 3 increments (20-30um) on the micrometer. The M5 has NA 0.1, or nominal f/4 aperture, and you don't need such small step sizes for it. The calculators say 35um, so you should be able to reduce your stack depth by 2-3x, making it practical to use CZP in one shot.
Contact me for photographic equipment or visit my home page at: http://macrocoins.com |
|
Pillar of the Community
United States
949 Posts |
CZP does say in their help section that you can alter certain features by doing little edits on each or any of the macros you want to use. But that is not my thing either, though I may try it to see if I can get a fix. Helicon and Zerene are both tempting, but I am not yet at the point where I am ready for either of them. When I can make an informed choice, I will. Meanwhile I will try your suggestion, at least with the M5 (and probably the Plan4). But what about the 10x? What do the "calculators" say about step size with that? Austrokiwi seemed to suggest that the smaller the better. Maybe if I switch off a low pass filter or other functions in the macro de jure more will fit the stack size limits? Along the lines of your suggestion I went through the stack of images and selected every third one. I tried it in CZP, and got output for two modes, but when I tried Pyramid DO it choked trying to build a high pass filter. Here is the DO Stack macro output: 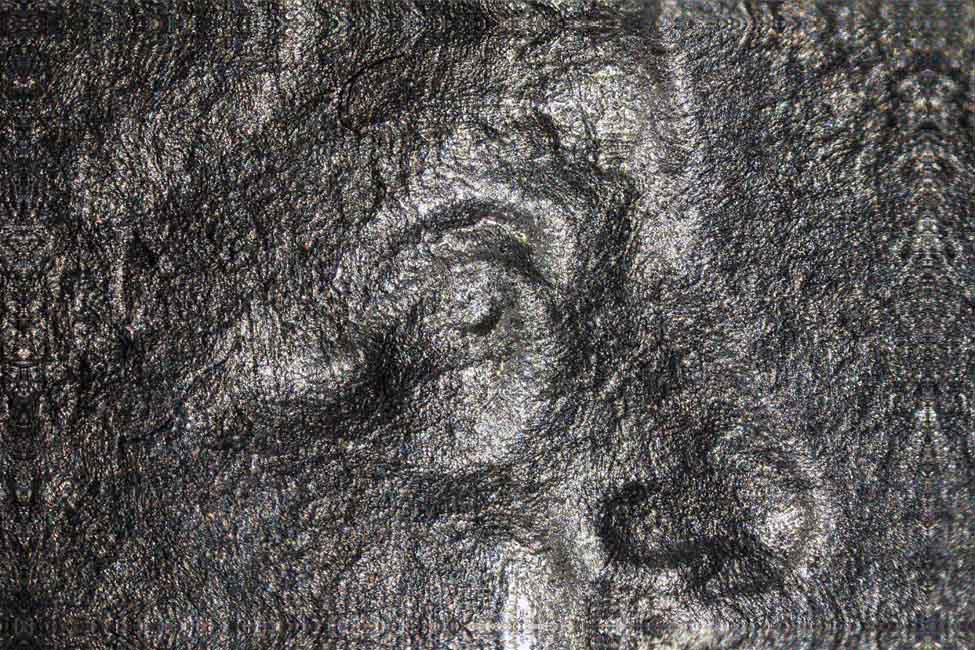 Other updates I forgot to append last time: I picked up the lens reverser from Raf Camera on Monday (Jul 25), but have not yet had a chance to test it out. Delivery time was quite good. It was purchased July 14, arrived in New York July 19, and was placed in my PO Box July 23. I expect to test it today. 1/4" Steel plates have been ordered for the stabilization base, as well as a set of 1/2" thick Sorbothane discs. (This combo will go in each corner of the frame between the frame and the granite block.) Now I just have to figure out where to put the Xerox machine. |
| |
Replies: 65 / Views: 8,194 |


