| Author |
 Replies: 15 / Views: 7,304 Replies: 15 / Views: 7,304 |
|
|
Pillar of the Community
United States
887 Posts |
I have spent days trying to do this awesome side-by-side images with a nice background, text, and TPG label (when applicable), but I have gotten nowhere. I know many of you do this, and have templates made up to make it quick and easy, but I can't figure it out. I've been looking for a tutorial on doing this, but I can't seem to find any that will work for what I'm trying to do. Any guidance out there? |
|
|
|
Bedrock of the Community
 United States
12477 Posts |
Sorry, I can't help with Photoshop. I know of a few here who use it for what you're describing and hopefully they'll provide some suggestions.  In Memory of Crazyb0 12-26-1951 to 7-27-2020
In Memory of Tootallious 3-31-1964 to 4-15-2020
In Memory of T-BOP 10-12-1949 to 1-19-2024
|
|
Moderator
 United States
14463 Posts |
I don't use photoshop. I use Picasa 3 (freeware) to crop the individual images, then use MS Paint to make a side-by-side images. Hopefully, SsuperDdave will join the discussion.  |
|
Pillar of the Community
2087 Posts |
Here is how I do it using Photoshop elements. I first open both pictures in elements.  in the followign piictures the two main tools are the ruler and the marquee ( if I have spelt it right) in the above photo I have marked the tow relevant menu items. you active the ruler in the view menu ( see next photo). The marquee is the square box symbol under the selct menu( left hand side)  PLace the cursor on the top (or side) ruler press and hold the left click button on you mouse and brack a line down . You want to make a guide frame. See this photo to see how the first line looks  the next photo covers several steps. First complete the guide fame a=ound the coin. The click on the marquee button and change it to eleeptical marquee( see the two red arrows pointing to the left menu position the cursor on one of the corners of the box made by the guide leins click and hole the left mouse key. The move the cursor to the opposite bguide box corner. This will see a dotted circle created around the coin. when you have the circle position correctly release the left mouse button. now either press "cntrl C" or go to the edit menu button and find copy and clik on it. at this point you will have selected and copied a circular image of the coin. Now you need to decide on your background colour at the bottom of the left had menuis a menu item consisting of two over lapping boxes. Choose the bottom one. and then select the background color you want and click ok. menu item is shown in this picture: 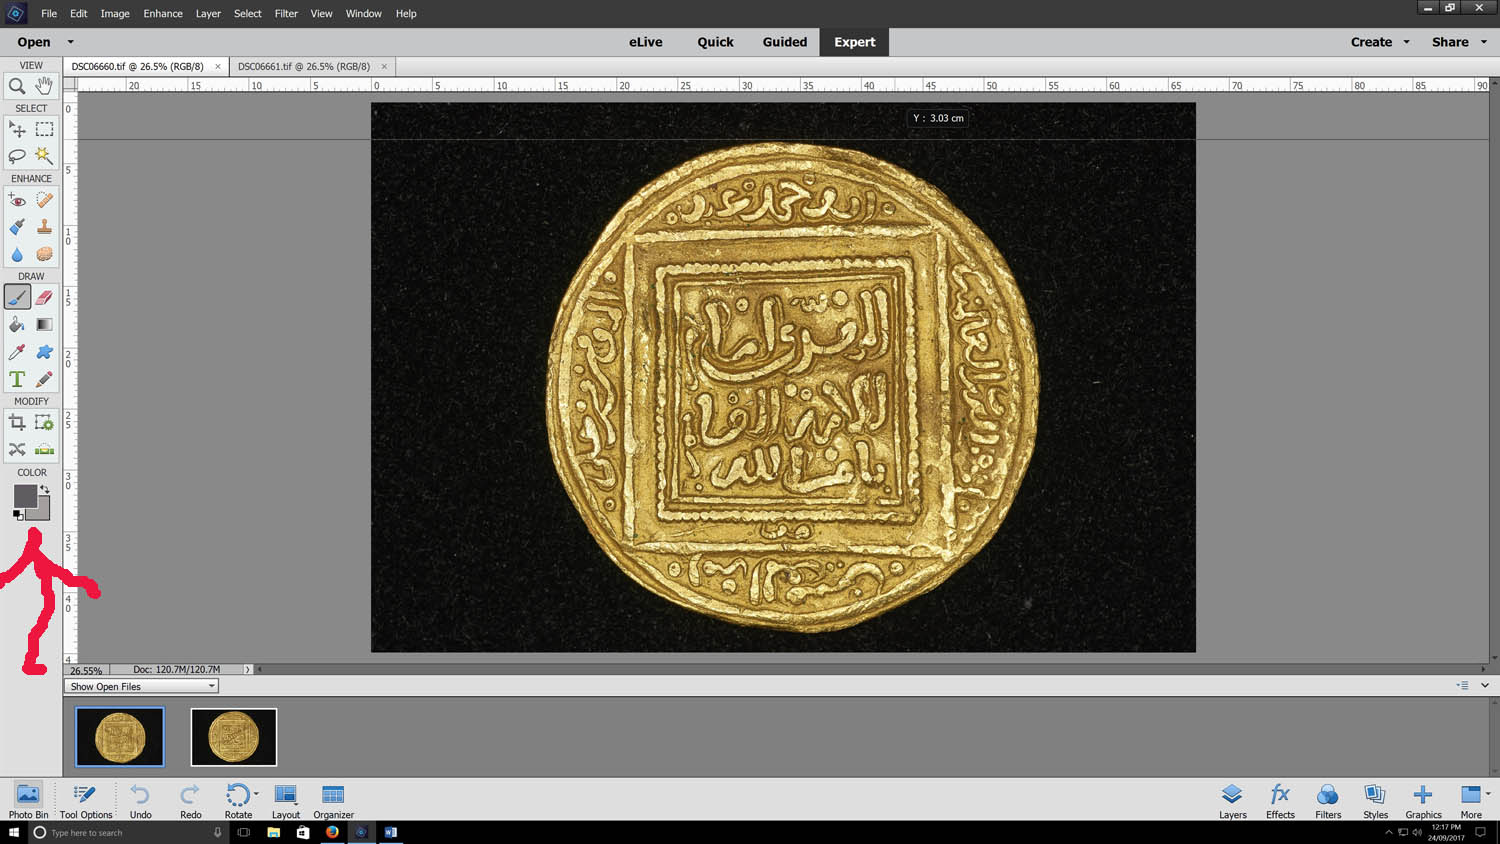 red arrow shows you the box to click on to change the back ground color now you need to create a new file go to "file" top left corner of screen ( of press cntrl new. YOu will then get a new file window as shown in the box. the file size will beby default the same size as the image of the coin you have already copied. YOu need to do two things before finishing the create new file step. 1: in the new file menus ( bottom item) title background contents change the option to background column( or transparent if you want to end up with a white background. 2 nd thing is change the file width to double that seen in the new file window... as is seen in the next picture( width is now double in this shot).  You will now have a blank image rectangle in you r selected background color. now click on paste ( or control P) and the circular image you had previously copied will be pasted on to the middle of that rectangle. Move the image to the position you want it to be.  Take note of the red arrow drawn in the above picture. When you have the image positioned where you want it. clcik on layers( where the arrowe is pointing and the slect either merge I orflatten image. All you then need to do is repeat the process with the other side of the coin so that you end up with this( don't forget to merge( or flatten)) the second time:  this was a very rough and quick set of instruction... but I hpope it helps. ( I will fix typos later) |
|
Pillar of the Community
 United States
887 Posts |
austrokiwi, thanks for that. That must've taken forever to post. I glanced at austrokiwi's post, and was going to give it a try, so I took a bunch of new photos to work with. Before following his instructions, I started playing around again, and I'll be darned! I did it! Honestly, I'll have to do it again to make sure I remember what I did, but I think I do. Anyway, this is what I got; What d'ya think?  |
|
Moderator
United States
14463 Posts |
Nice job edit - I may have to give it a try to include a thumbnail of the label like this on my next photos. |
|
Bedrock of the Community
United States
12477 Posts |
Excellent! In Memory of Crazyb0 12-26-1951 to 7-27-2020
In Memory of Tootallious 3-31-1964 to 4-15-2020
In Memory of T-BOP 10-12-1949 to 1-19-2024
|
|
Rest in Peace
10197 Posts |
Really neat!. Now to figger it out for the full blown Photoshop...got ten times the crap on the bars to use, that looks much easier than on my laptop!  |
|
Pillar of the Community
United States
1298 Posts |
Beefer518, very nice photos and side by side with TPG label. What program are you using? Were you able to save a template? Ham. |
|
Pillar of the Community
United States
887 Posts |
I'm using Photoshop CS6.
Turns out this was easier then I made it out to be. I figured out why I was having troubles, and know it's easy peazy.
Maybe I'll do an instructional post like austrokiwi's over the next few days.
|
|
Pillar of the Community
United States
887 Posts |
Here's an example of what I was doing all last night once I figured it out. I added text, and I'd like to add maybe a drop shadow or something to make it look a bit more interesting, and not so flat.  |
|
Bedrock of the Community
United States
10038 Posts |
|
|
Pillar of the Community
2087 Posts |
Quote:
Really neat!. Now to figger it out for the full blown Photoshop...got ten times the crap on the bars to use, that looks much easier than on my laptop! Firstly Beefer518. Well done of figuering it out. I am guessing the full PS allows the graduated background. Can you show/tell us(me) how you achieved that. On the quoted text:I don't use the full PS suite. All my major editing work is completed in Raw using Capture one pro( an expensive application... but you definitely get value for money with that app. Doug Mudd( ANA) recommended PS Elements to me, as did the instructors on the Beginners coin photography course at Summer Seminar Edited by austrokiwi
09/25/2017 11:09 am
|
|
Pillar of the Community
United States
887 Posts |
That wasn't me you quoted, not that it matters. ;)
The background was just some image I found online. I place it on the image after I place the two coin images, then move the background to the bottom of the layers. The "New Document" that I start off with is a 6064x3032 pixels transparent blank. I then place my previously edited obverse and reverses (which have pure white backgrounds), merge the visible layers, then with the quick selection tool, I select the white, delete it, and then place the background. If it's slabbed, I then add the label, and put it as the second layer, and then I add any text. Flatten image, and save.
|
|
Pillar of the Community
United States
1375 Posts |
Quote:
I started playing around again, and I'll be darned! I did it! Congrats Beefer518! My opinion is that with computer software you always learn it better if you figure it out yourself. Plus, I usually find loads of other neat features trying to figure out the one I want to use. With my coin photographs, I use GIMP instead of PS to accomplish what you've done. In trying to figure GIMP out, it was helpful to search YouTube for tutorials. I found many that showed me how to do something that I didn't even know I wanted to do before I saw the tutorial! I'm sure that there are hundreds of tutorials for PS on YouTube as well. One thing you might consider adding to your layout is a copyright and collection attribution. I know that most of us don't have pedigreed collections, but it can be useful to have a picture of your coin that says you took the picture and that it belongs in your collection. I use something like this © I.M. BadDogThe BadDog Collection only with my actual name of course  Edited by BadDog
09/26/2017 8:17 pm
|
|
Pillar of the Community
United States
2850 Posts |
I use a full version of Photoshop to do my side-by-sides. To start I open an image of a coin I'd like to edit and crop down. I then zoom in enough to get a good look of the coin without it being too zoomed in. I then select the 'Elliptical Marquee Tool'. Located in the toolbar. (See photo)  Once the Marquee Tool is selected, I hold SHIFT and click on the canvas to drag a circle around the coin. When you get the desired size, while still holding SHIFT, release you mouse click to complete your circle. You can click and drag it around to adjust if necessary. Once you get your circle positioned how you like, go to the toolbar and select EDIT > COPY. This will copy whatever is inside your circle. Then go to FILE > NEW to create a blank canvas (which will be the dimensions of your copied selection, so leave the dimensions alone). Once your blank canvas is created go to EDIT > PASTE and it will paste the area you just selected (See photo)  Repeat the same steps above for the reverse of your coin. I then make one large blank canvas..  And then copy and paste the cropped image of the obverse and reverse onto this canvas.  I add the border and an outer glow to finish off the product.  This method will allow you to add a background if you desire.. You just add it in a layer BENEATH you coin's layers. For the one below I just used a simple two-color gradient using the gradient tool.  You can watermark your name with the gradient too.  Edited by WheatBack
09/27/2017 3:11 pm
|
| |
Replies: 15 / Views: 7,304 |
|


