| Author |
 Replies: 14 / Views: 3,706 Replies: 14 / Views: 3,706 |
|
|
Pillar of the Community
United States
2403 Posts |
I figured since I was upgrading my lights this week I would try my hand at building a copy stand to go with the new lights. I am more of a computer geek than a wood worker. I know how to use a drill and saw and that's about it. So bear with me if this looks REALLY crude. I took apart an old tripod of mine to borrow the camera boot part. I then found a broom handle the "boot" slid over. Attached broom handle to sanded down plywood and secured its base somewhat. Here is a shot of it. You can see how it works. 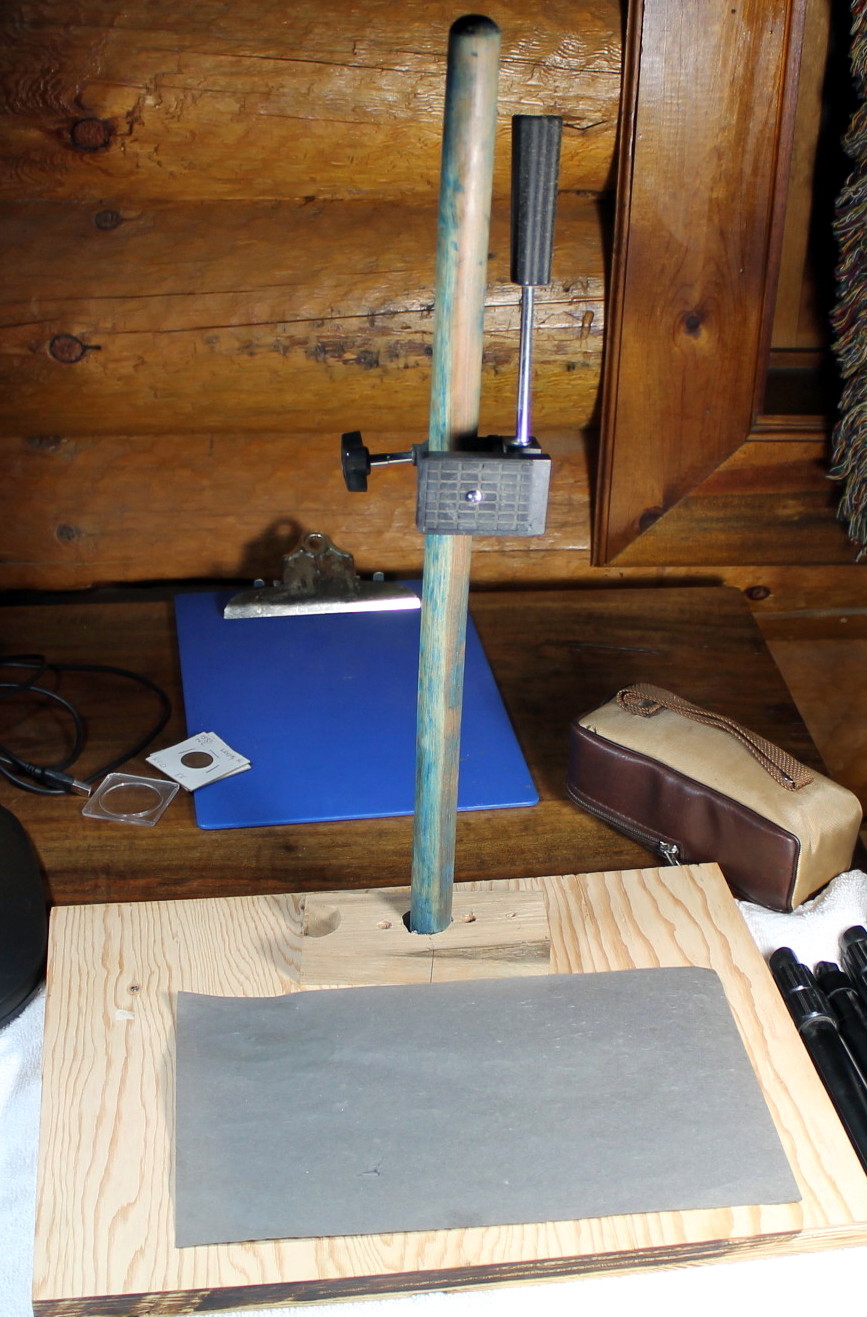 Here is a shot taken by my wifes' tablet showing my camera attached. 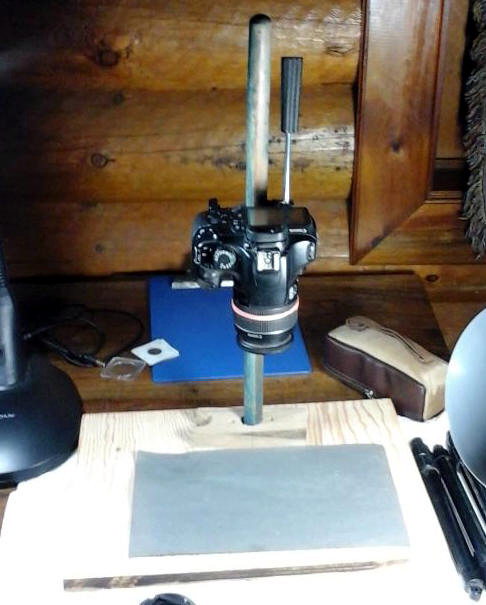 Since I have used a tripod seat for the camera to sit on I have more than up and down movement available with the camera. Still need to clean it up some. Any suggestions on what to cover the plywood with? Should I make a small pedestal to put coins on? What do you think? Thanks for looking...Mont. |
|
|
|
Pillar of the Community
United States
3327 Posts |
Interesting! I need to build one as well.
I'd suggest sanding the plywood and applying some adhesive shelf paper of suitable color, probably should be nom-reflective if possible. Thanks for sharing.
"Nummi rari mira sunt, si sumptus ferre potes." - Christophorus filius Scotiae
|
|
Rest in Peace
United States
17900 Posts |
Everything around the coin stand should be monotone and reduce reflective glare. Pretty handy there for a geek  |
|
Rest in Peace
10197 Posts |
Great idea Mont. plywood is fine, just it will get "dusty", has the propensity to have that fine wood sawdust that'll ruin a shot if you don't watch out. I would coat it with a few coats of satin non refective clearcoat or a neutral color of grey/black. May also think on adding walls once you figure how your lights work this way, eliminate all but your light sources which you control. If you do that pix will remain the same over all attempts. Differences in background light inputs is why everyone's results always seem to be different!
Wood is easy to work with to develop your ideas. I did that on my tinkerings, then I would search for more stable materials, better wood, plastic or metal, metal or segregated bars, slidelocks, own die/tap settings. Make it upscale.
Think on a dual pole/riser approach also, better stability and control of movement/vibrations.
Edited by Crazyb0
12/18/2017 9:00 pm
|
|
Rest in Peace
United States
10625 Posts |
I like it Mont! It's actually less crude than the one I made about 5 years ago for my point & shoot Canon.
|
|
Bedrock of the Community
United States
94367 Posts |
|
|
Pillar of the Community
 United States
2403 Posts |
Thanks all. I do plan on covering the plywood with some sort of non reflective material. I did sand the both the pole and plywood. Woohoo got to use my electric sander on that one I'm thinking that I will use some sort of grey construction paper to cover with plywood with. I wanted to wait until the Jansjos came in to see what kind of light I am working with to make any final decisions on background color. I did take a test pic to make sure it was steady. Again my lighting is too harsh imo. Can't wait until the new ones gets here. Test pic 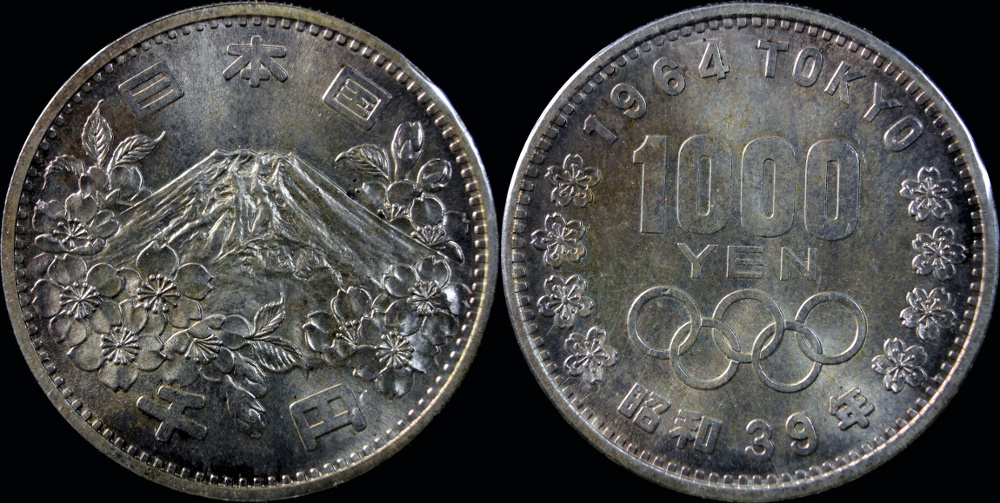 |
|
Bedrock of the Community
United States
12477 Posts |
I like it.  If I had a camera to mount, I would make one, too. Quote:
May also think on adding walls once you figure how your lights work this way, eliminate all but your light sources which you control. I think that's a great suggestion, Crazyb0. Control the light as much as possible. You can flex your Jansjos over/around the walls. Even something like plain white cardboard as walls will take the diffused light and bounce it around even more. In Memory of Crazyb0 12-26-1951 to 7-27-2020
In Memory of Tootallious 3-31-1964 to 4-15-2020
In Memory of T-BOP 10-12-1949 to 1-19-2024
Edited by spru
12/18/2017 10:37 pm
|
|
Moderator
 United States
56855 Posts |
Replace the wood with plexiglass, and you can also dull the surface with sandpaper.Just an idea. Looks like a good job/idea you have there. John1  |
|
Valued Member
United States
411 Posts |
It looks good.
A few years back I took a block of wood and made one. 2x4x10 with a all thread . put a nut on each side of the wood to hold all thread in place then I put a nut on with a metal I found in my junk pile with a nut on top . Mounted the camera and voila , it was had to get the camera up and down at times so I finely threw it away. Sorry no pictures of it.
|
|
Moderator
United States
189599 Posts |
Looks good. It will do the job.  |
|
Pillar of the Community
 United States
4594 Posts |
Shade tree engineering at it's finest.
-----Burton 50+ year / Life / Emeritus ANA member (joined 12/1/1973) Life member: Numismatics International, CONECA Member: TNA, FtWCC, NETCC, EveryCountry (online) coin club Owned by three cats and a wife of 40+ years (joined 1983) Author: 3rd Edition of the Sample Slabs book, https://www.sampleslabs.info/ |
|
Moderator
United States
15496 Posts |
Amazing what ingenuity and some at hand materials can create. Well done I say ... recognizing the limitations such a set-up impose on (perhaps) camera stability and accurate 90 degree images. Take a look at my other hobby ... http://www.jk-dk.art |
|
Pillar of the Community
United States
2403 Posts |
Quote:
recognizing the limitations such a set-up impose on (perhaps) camera stability and accurate 90 degree images. Thanks nickelsearcher. The camera is very stable due to the collar being very tight on the wooden rod. I do have a hard time moving it up and down. As for the angle part...I keep a small torpedo level on hand to assist with this. It isn't perfect, but seems to do the job okay. |
|
Valued Member
United States
397 Posts |
Necessity is the mother of invention! Nice looking rig MontCollector. Having the camera mount from your tripod seems to have simplified your design. I think you've given many of us some ideas to get started on our own stands.
|
| |
Replies: 14 / Views: 3,706 |
|


