| Author |
 Replies: 30 / Views: 3,007 Replies: 30 / Views: 3,007 |
|
|
|
Pillar of the Community
United States
8521 Posts |
Quote:
Only problem is Lincolns are an alloy of 95%copper and 5% zinc/tin - the large cents are 100% copper - big difference Oh geez, I suggested a Lincoln Cent so he can get a feel for removing gunk and verdigris. If you're that picky just get a large cent for a few bucks off ebay that's roached and play with that. Oregon coin geek.....*** GO BEAVS ! ! ! ***
|
|
Pillar of the Community
7234 Posts |
Quote:
If you're that picky I just wanted to point out a purity is not the same as an alloy - - if you are so darn sensitive to actual facts, well I feel sorry for you!! |
|
Pillar of the Community
United States
8521 Posts |
Went right over your head.
Oregon coin geek.....*** GO BEAVS ! ! ! ***
|
|
Moderator
 United States
189767 Posts |
Please let it rest.
(Directed at both)
|
|
Moderator
United States
189767 Posts |
Quote:
If you just purchased the coin, return it. Buy one without the green junk. I agree.  |
|
Pillar of the Community
 United States
521 Posts |
The seller wasn't amenable to a return so I settled on a $10 refund (appx. 25% of the original price). Even though there was a 14 day return noted, I decided not to pursue it and kept the coin. So, I was then ready to experiment. I followed the three steps as outlined in my original post. I soaked it in warm dish water and rubbed it gently in my palm. This did take off some surface dirt. I then used acetone on a Q-tip in a rolling motion. This really picked up a lot as I had about 5 with stained green tips. After no more was showing, I moved to Verdi-care. I again began by rolling a Q-tip. I let a small puddle soak on on side at a time and prodded the tougher green spots. Some of it around the lettering also loosened. I think I could get almost all of it but I stopped after I noticed a red spot under the largest bit of gunk (under the E in CENTS). I used toothpicks under a stereoscopic microscope. I patted it dry and now it's still air drying. I have included two sets of pics here. The first set was taken under similar conditions to those that appear in the original post in order to highlight the surfaces. The dark background seems to really "lighten" the pics. The second set are more respresentative of how the coin looks in hand.  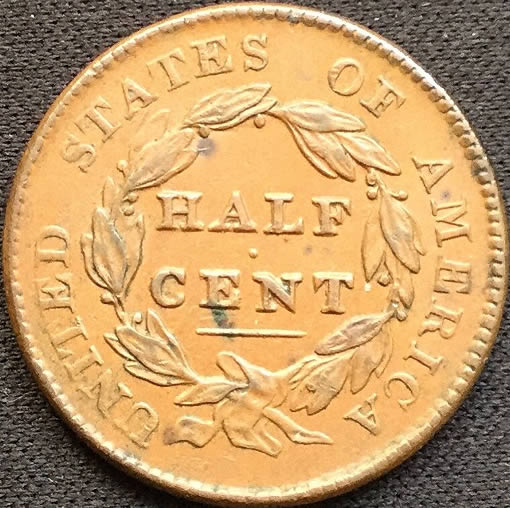  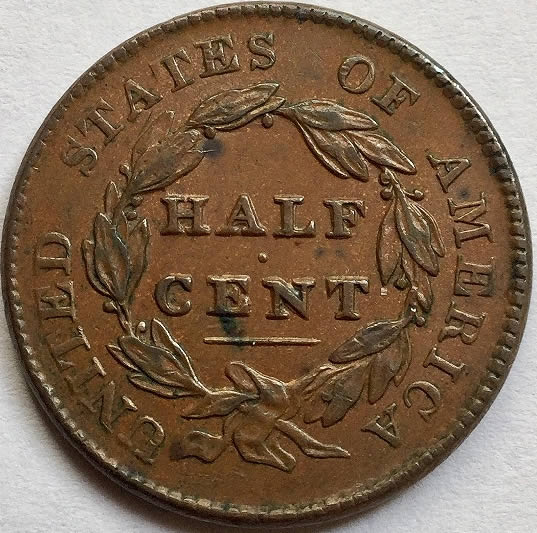 |
|
Pillar of the Community
7234 Posts |
WOW! - That looks great from what it was - Good job  |
|
Pillar of the Community
5464 Posts |
Very nice! |
|
Pillar of the Community
United States
8521 Posts |
That's a nice improvement. Toothpicks and Verdi care work great, just gotta be careful. Glad you weren't afraid to try it.
Oregon coin geek.....*** GO BEAVS ! ! ! ***
|
|
Pillar of the Community
United States
8715 Posts |
That's a big improvement, great job!
|
|
Pillar of the Community
5464 Posts |
Quote:
Glad you weren't afraid to try it. That's a good point. I for one would have been afraid to try it! |
|
Pillar of the Community
7234 Posts |
Quote:
I for one would have been afraid to try it! How else does one learn? If it costs you $$$ by experimenting it seems like you learn faster!! |
|
Pillar of the Community
5464 Posts |
Well, I have practiced on some throwaways from time-to-time. 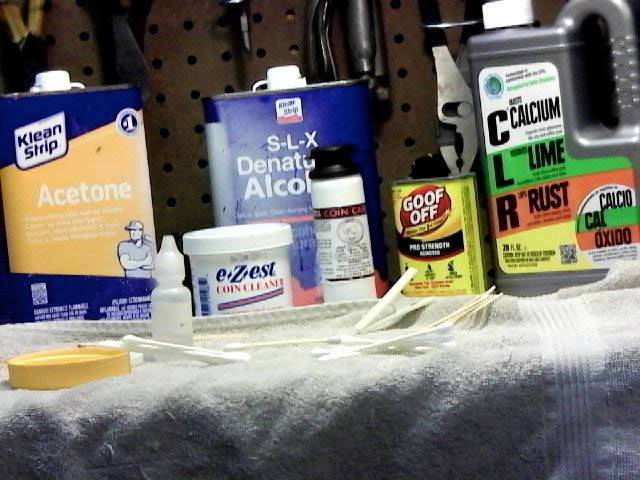 |
|
Pillar of the Community
7234 Posts |
Quote:
Well, I have practiced on some throwaways from time-to-time. If ya don't practice ya don't learn! |
|
Moderator
United States
189767 Posts |
Looks much better! Good work. |
| |
Replies: 30 / Views: 3,007 |


