| Author |
 Replies: 59 / Views: 9,182 Replies: 59 / Views: 9,182 |
|
|
|
Pillar of the Community
United States
1156 Posts |
I certainly agree that the level of effort used to authenticate some coins is often insufficient however I think this is part of the TPG business model. For coins submitted in the lowest value tier, it probably costs less to pay out against the warranty than it does to spend more time on authentication. PCGS is a public company and you can see their warranty provisions in their financial reports. I believe they paid out $612k, $455k and $360k in fiscal years 2015, 2016 and 2017, respectively. I have not tested the PCGS guarantee but I have an 8 reales and a rouble in NGC slabs that I will be sending in for authentication review. Edited by jgenn
10/06/2018 4:16 pm
|
|
Pillar of the Community
United States
1962 Posts |
Again, the PCGS business is not really the point here. Not even in the slab anymore... Interesting coin came up on the PCGS boards... This is what would appear to be a trial strike of an East India Co. copper reverse - but using a master hub (raised detail) rather than an actual working die. http://www.icollector.com/British-I...35_i19335623Per the description, the side that was struck, with the crisp detail (left side) is in fact INCUSE. The other side is a mushy positive (apparently a very thin test planchet, allowing an impression from the other side to push through). It's a different situation than this coin, but the point is how the left side, due to optical illusion, would very much look like a raised image (i.e., detail raised up, as on a normal coin) if you weren't told otherwise. Maybe that is in fact all that's going on here, a stark optical illusion - would be a much simpler solution. But then, that shield-side detailing IS still a bit strange. 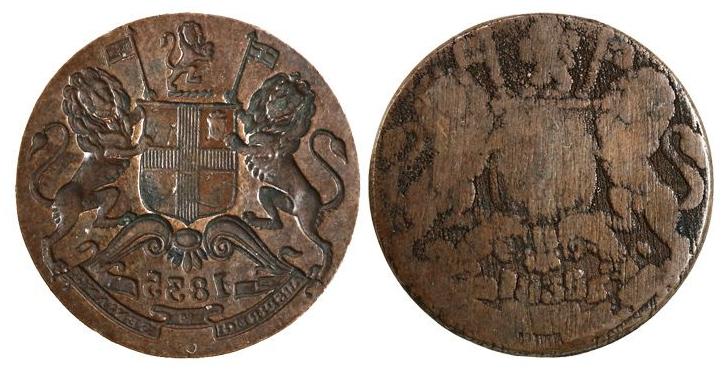 |
|
Pillar of the Community
United States
5362 Posts |
I agree that an optical illusion is possible and should be ruled out when possible. However, the Heritage photo of the 1766 8 reales clearly shows that the "clash" image is in fact raised.
Look at the shadows thrown by the X in REX and the adjacent "clash" 7 and note that the shadows appear on the same sides indicating a light source above the coin and slightly right of center. If one feature (the X) was raised while the other (the 7) was incuse the shadows would appear in different spots.
So at least in the case of the 1766 coin there is no optical illusion due to the way the picture was taken.
The problem with the test strike of the East Indian coin is that the rim of the coin does not show - therefore there is no reference point to review lighting angle to determine if the image is raised or not.
|
|
Pillar of the Community
 Australia
653 Posts |
The 1766 Mexican 8 Real coin is now in my possession and I have used calipers to determine diameter and thickness. The diameter varies from 37.82 mm to 38.09mm (measuring the diameter along compass points in relation to the coin). The average is 37.92mm The thickenss varies from 2.54 to 2.60mm. the average is 2.57mm. Applying a correction of 0.5mm for the "thin points" (as per swamperbobs post at http://goccf.com/t/254958 )gives a thin point of 2.07mm with an average of 2.32mm Following on from the procedure in the post, area of the coin is 1129.344mm2, Volume is 2620.07 cu mm. With a weight of 26.98gr this corresponds to a specific gravity of 10.30 Finally, I have attached some photos of the edge of the coin. Feedback from CCF members would be much appreciated. Next week I will check metal content with XRF analysis Squire 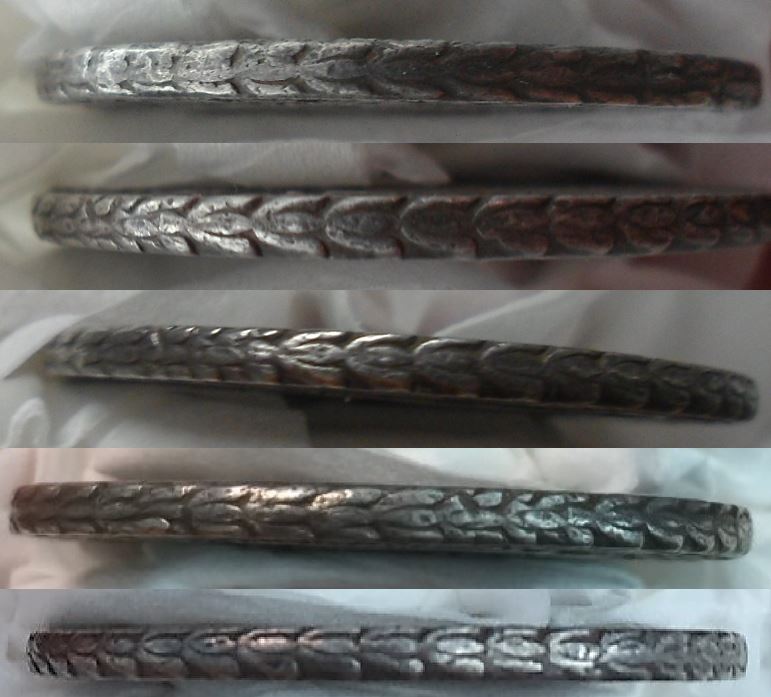 |
|
Pillar of the Community
Australia
653 Posts |
Ok, I can now summarise all the information I have about the unusual 1766 Mexico 8 Real coin that is the theme of this topic. I would be very interested in the feedback that CCF members can give me. Weight is 26.98 grams Average diameter is 37.92mm, ranging from 37.82 to 38.09mm Average thickness is 2.57mm for relief, 2.07mm for thin points with an average of 2.32mm Calculated specific gravity of 10.30 XRF analysis indicates the following for the two sides: Side 1: Silver 96.8% Copper 3.0% Gold 0.1% Lead 0.1% Side 2: Silver 95.6% Copper 3.75 Gold 0.1% (0.03 Carat Gold for both sides) The machine is a Thermo Scientific, found to be reliable in previous analyses of my coins. A summary picture collage is shown below Squire 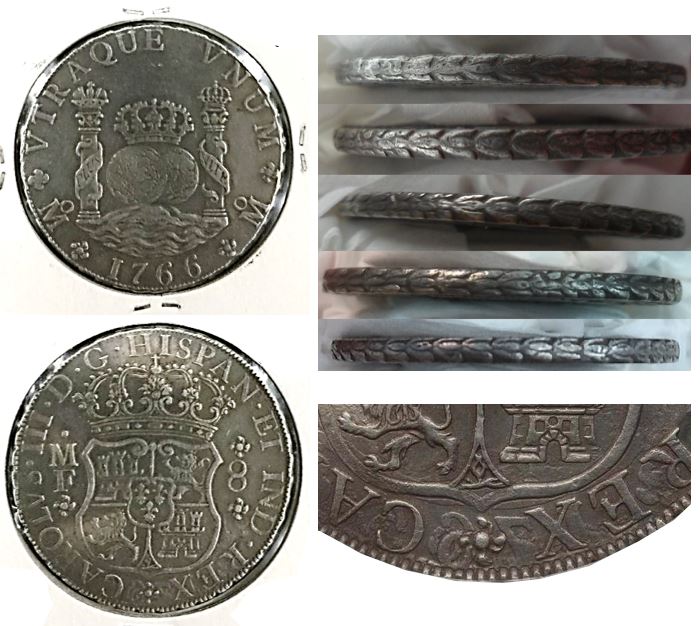 |
|
Pillar of the Community
United States
5362 Posts |
Authentication of any coin is basically a process of elimination that excludes known types of fakes. The process looks at the surface appearance, the design elements punched or cut into the die and the physical characteristics to yield a best possible answer. You can prove a coin is a fake for any of a large number of reasons but not vice versa. There is NO TEST that can prove beyond all doubt that a coin is genuine.
The only coins that can be absolutely authenticated as genuine are those that have a complete unbroken provenance from the day the coin was struck until today.
The tests results reported in this case clearly support the fact that the coin is the correct weight, the correct density and the correct alloy.
The XRF test results indicate gold at 1000 ppm. That is a critical finding in my opinion and means the coin definitely could be genuine. The relatively high silver and low copper reading comes as a direct result of the way the coin was made and the way XRF works. Based on many other tests that we have performed - the surface of most circulating 8Rs was enriched in silver and depleted in copper by repeated annealing followed by baths in heated acid to remove scale and grease. Each acid bath removed a tiny fraction of the copper leaving behind the silver and gold right at the surface. Any acid cleaning done post strike to remove the accumulated grime from circulation continues this process. In addition normal circulation will remove some copper because it is the most reactive metal in the coin.
During the process of creating a coin in this time frame ca 1766 - the material was annealed several times and washed in acid at least one time at the end of rolling of the fillet. After lamination the silver strip had to be annealed and washed a second time. A third annealing and cleaning happened after blanking and a fourth after milling of the edge. After striking and inspection there was a fifth and final acid washing (without annealing) of the finished coin.
All that said - these tests combine to absolutely eliminate the coin as a typical numismatic forgery. So we are left with the likelihood the coin is either genuine or a superb numismatic forgery of a type unknown at present.
Unfortunately these tests never represent absolute proof that the coin is genuine. Each test used by an authenticator eliminates fakes. These tests are as good as we can do at present with the state of the available XRF test database.
Unless or until such time as other definitive trace contaminants are identified the best we can do is to leave the coin as most likely genuine.
|
|
Pillar of the Community
Australia
653 Posts |
Thank you so much for these insightful comments swamperbob. Your depth of knowledge on the topics is amazing and I am tempted to order your book as a Christmas present to myself.  So it appears that the authenticity of the coin is likely. This still leaves the intriguing mystery pertaining to the inverted relief of a 1765 coin pattern on the bottom reverse side of this coin. I will continue researching this Squire |
|
Pillar of the Community
United States
5362 Posts |
Squire Wilson You say: Quote:
This still leaves the intriguing mystery pertaining to the inverted relief of a 1765 coin pattern on the bottom reverse side of this coin.
That as they say is the second shoe. The ultimate authenticity of the coin depends on explaining all anomalies in terms of known causal mechanisms. I would be interested in any other examples you might turn up or in further discussion of exactly how it happened.
|
|
Pillar of the Community
United States
1156 Posts |
swamperbob said: Quote:
During the process of creating a coin in this time frame ca 1766 - the material was annealed several times and washed in acid at least one time at the end of rolling of the fillet. After lamination the silver strip had to be annealed and washed a second time. A third annealing and cleaning happened after blanking and a fourth after milling of the edge. After striking and inspection there was a fifth and final acid washing (without annealing) of the finished coin. Can you please describe "lamination"? I have heard the term as well as "lamination mill" but I don't understand the purpose or process.
|
|
Pillar of the Community
United States
5362 Posts |
jgenn Lamination was a process that took place after the rolling of the fillet ingot into a silver strip of the proper thickness for making circular blanks. The rolling process took the thicker fillet ingot and ran it through a pair of steel rollers several times to thin the sliver. These rollers were not as smooth as necessary and the silver strip produced could have ridges from scratches. The strip made was just large enough for a single row of coin blanks to be produced. The silver strip was softened by annealing and was passed hot (pulled under tension) through what amounted to a slot in a steel plate actually two steel plates positioned precisely at the thickness of a coin blank apart. The slot or steel edges acted as a die that produced a very smooth sheet of silver for blanking. I located a copy of drawings for such a machine from about 1820 - the Apparatus is referred to a Mr. Barton's machine. 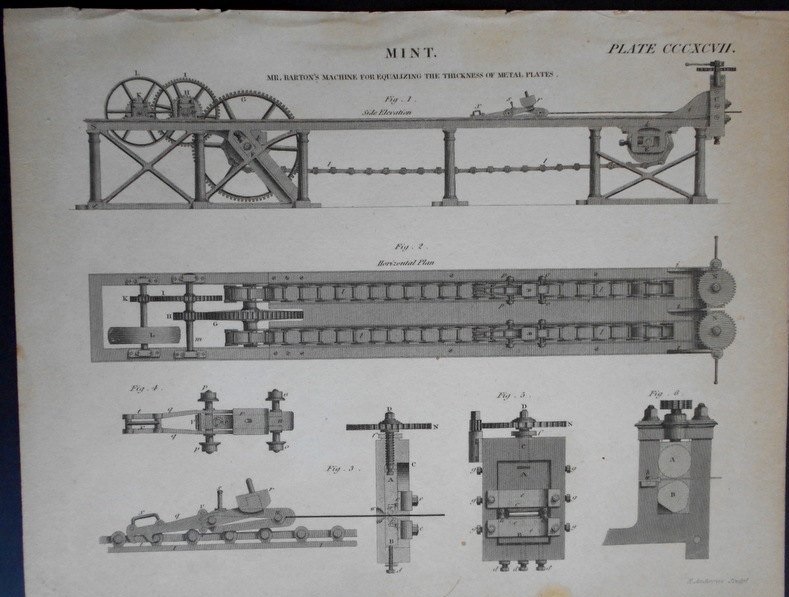 The critical part of the apparatus is visible in Figure 3 at the lower left. It shows the slot with adjustable plates through which the strip passed. These would need to be maintained (polished) so that the silver strip remained smooth.
|
|
Pillar of the Community
United States
1156 Posts |
Thank you for the explanation, swamperbob. With this process it appears that the mint had fine control over the maximum thickness, using the lamination mill and over the diameter with whatever mechanism cut the circular rounds out of the finished strip. We sometimes see parallel grooves, typically on only one side of a struck coin that are referred to as "adjustment marks", as if an assayer had to file down the coin because it was too heavy. However, given a properly calibrated lamination mill + blanking stamp + correct alloy mix, a coin should never be too heavy. Is it perhaps the case that these adjustment marks are really leftover groves from the rolling mill that did not get completely removed by lamination because the fillet was somewhat thinner than average?
|
|
Pillar of the Community
United States
5362 Posts |
jgenn What you posit, that; Quote:
these adjustment marks are really leftover groves from the rolling mill that did not get completely removed by lamination because the fillet was somewhat thinner than average That of course is one possible answer to the source of lines that survived striking. It is however only one possibility. Any mechanism that requires adjustment to achieve perfection can be set up incorrectly. Every new set up of the laminating apparatus would have a "break in" period where a strip either too thin or thick could be produced. At the time micrometers were not used. So the "acid test" for the laminator was the weight of the first batch produced. Too light and the strip was wasted - too heavy and it had to be filed. Because of the work involved - a strip too thin is worse and would be avoided. So at least one or two such thick strips were likely every time the laminator dies needed to be sharpened. For those interested the advent of the micrometer seems to date to the mid-1800s. There is no mention that I am aware of in Spanish records. So lines on the face of the silver strip could come from the rolling process, the lamination process or actual adjustment of the blank. Any of the three is possible and I believe all would fall into the essentially the same category of marks on the planchet BEFORE it was struck. I have seen both raised and incuse lines. The rolling and laminating steps would most naturally result in raised lines not gouges in the silver strip. Adjustment by file would leave incuse grooves. I will leave final sorting of the three to conjecture of anyone interested.
|
|
Pillar of the Community
United States
1156 Posts |
swamperbob said: Quote:
These rollers were not as smooth as necessary and the silver strip produced could have ridges from scratches. Yes, as you said the roller would leave ridges. I should have reread that before my speculation about incuse adjustment marks.
|
|
Pillar of the Community
Australia
653 Posts |
It looks like I may have found another Mexican 8 Real piece from 1766 that has "inverted and raised" script. This time this occurs on the "obverse" of the coin. Note the "inverted and raised "D"" below the "Mo" as shown in the below picture collage. The coin is on the web page at https://premierpreciousmetals.com/n...-choice-679/ Comments from CCF members are always appreciated Squire  |
|
Pillar of the Community
United States
1757 Posts |
It appears as a legitimate die clashed piece in my opinion. I can recall in my collection I have a 90* clockwise double striking - not sure if Bust or Cap/Ray. Screw press errors are obviously EXTREMELY RARE - obviously. In U.S. Colonials under New Jersey Coppers EVEN three legitimate reverse brockages exist from the famous Spiro Collection all sold by Stacks on/off through the years. Have not seen them for awhile. Notice also a letter at K3 looks like a "P". A closer examination under stereo microscope WILL pick up other clashed remnants IN OTHER AREAS.
John Lorenzo
United States
|
| |
Replies: 59 / Views: 9,182 |


