Ok. So, not everyone has $500+ to get equipment, lenses, software, magnification tools, etc. Right? So. Here's a few quick tips to taking awesome photos for UNDER $10.
First, who out there has an Android smartphone? Well, unless you're an Apple fan, most of you. Who has a Windows smartphone? A few less, but still in the same general direction. Sorry, Apple lovers, but you're on your own for this topic. Most of the Android OS smartphones out there have cameras with AT LEAST a 5+ megapixel camera. Guess what the pros use? About the same. So, why are you saying your photos aren't as good?
Who has a few bucks laying around to buy a cheap jeweler's loupe off
ebay? I'm hoping you do if you have anything over a pocket change collection. So,
ebay offers MANY sellers who have 30x18mm and 30x21mm loupes for around $2-3 and even offer free shipping.
Do you have any of those energy efficient lights with the curved tubes and they take a moment to reach full temperature and make the room bright as can be? Again, most people do.
If you have all of these items, a black piece of cloth (old t-shirts work), and either a mount for your phone or a decently steady hand, then you can do it!
1. Turn the phone's camera on. Look in the settings of the camera and see if there's an HD or HDR setting. If so, then you just eliminated the need for super high priced software and some of the equipment. Turn on the HDR (CAUTION! SOME CAMERAS TURN THIS FUNCTION BACK OFF AFTER LEAVING THE APPLICATION OR UPLOADING PHOTOS TO YOUR COMPUTER!).
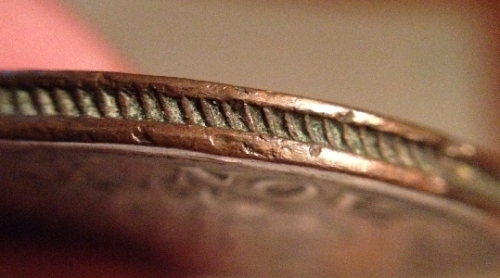
2. Use the loupe to gain a magnified view of the coin. I sometimes put the loupe right next to the camera and just focus them together. Use the screen of the camera on the phone. This screen is usually larger than most digital cameras by averaging 4.3-5 inches.
3. AUTO-FOCUS IS YOUR FRIEND!! And it can be easily activated by one touch to the image of the coin on the screen then releasing your touch. (One second is all that is needed. Anything beyond that may cause the camera to activate and taking a photo you don't want to use.)
4. After auto focus, the HDR kicks in and uses environment-based lighting to create automated brightness and contrast adjustments and sometimes even reduced surface glare. (Wow, did I just further eliminate that high priced photo editing software? HAHA!)
5. Hit the shutter before the auto adjustments clear and the phone goes back into normal mode.
6. Export your photos to your computer, upload to
ebay. Use
ebay's editor to crop and make simple adjustments to further assist contrast and brightness.
In 6 easy steps, you will see that you can take better photos without spending an arm nor a 3-legged Buffalo! :) Remember, brightness can be important to a coin's surface features and contrast can be key when it comes to details with shadows and doubling on proofs.
ENJOY!