I looked for the original one I used and cannot find it :^(
The original, more complex one is here:
http://www.instructables.com/id/Ano...-Macro-Lens/The "Ghetto Version":
http://www.instructables.com/id/Ghetto-Macro-Lens/ Since the one I built is not on the web -- and I researched/compared to find the one I thought easiest/best looking -- here are some dox/pics to make one:
Parts
1. old binoculars - cut off one of the large lenses on the end with a Dremel (saw - anything).
2. PVC Schedule 40 Slip Coupling - lightly sand and then spray paint the OUTSIDE the color of your camera (glue won't stick to paint so do not get it inside. Also, see *note below
3. Plastic cap from spray paint bottle. - cut off its top and slit the side so you have a strip of thin plastic.
4. Epoxy
*note - Maybe the slip covering might not fit well on your lens. So you might want to take your camera to Lowe's and just test fit PVC couplings/pipes onto the end of the lens (and also see if the binocular lens/mount combo will slip into the other end easily). If the binocular lens/mount combo does not fit - try taking the lens out of the binocular mount and slipping just the lens into the end of the PVC (you would also need to find a way to make the lens stay towrds the end of the PVC - another spray paint cap probably) . Remember, this is not an EXACT science - we are improvising here.
Slip coupling picture - about a buck at Lowe's:
http://www.imagebam.com/image/e38bfe129984118Picture of the binocular's cut off end (the lens/mount combo) inserted and glued into end of PVC slip coupling.
http://www.imagebam.com/image/f1b15c129984097Picture of opposite end of slip covering once the lens combo is glued in:
http://www.imagebam.com/image/ad1e52129984110Note right above the letter D you can see the where the two ends of the plastic strip come together. When they were touching, there was too much plastic thickness inside the PVC to allow the camera's lens inside. So I gradually cut back one side of the strip -- a bit at a a time -- and tried to fit the camera's lens in again. I repeated this until I had a snug fit. I THOUGHT, since there is a small gap here, that the lens not perfectly centered and therefore the pictures would be "off" somehow. This was not the case when tested. If the pics had been "off," I would simply have cut the plastic into two pieces and spaced it equidistant inside the PVC slip coupling so it contacted the lens on opposite sides. I lightly glued the strip in after it made for a good fit (not too much glue as that would make it fit more snugly than I wanted.
Pic of macro lens attachment on camera and closeness to subject:
http://www.imagebam.com/image/26e9db129984086RAW - un-cropped picture taken with camera in above pic (large file be patient!):
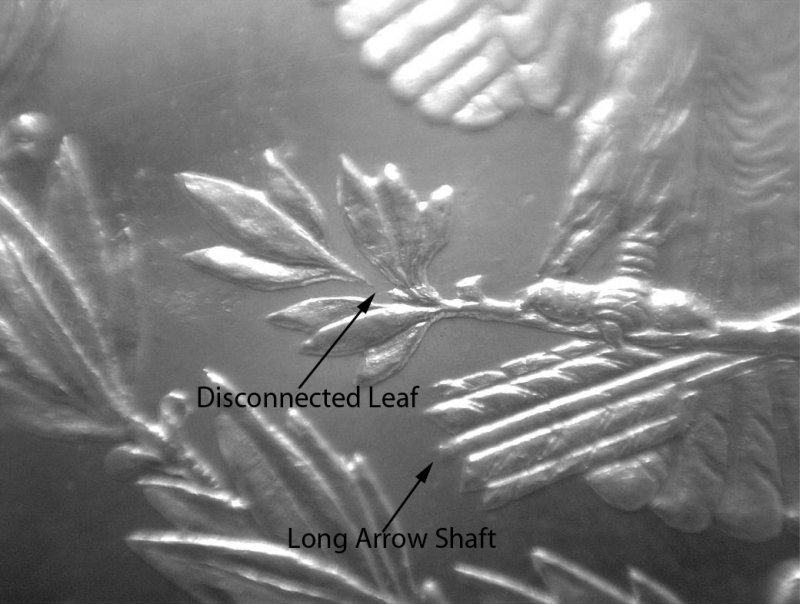
http://www.imagebam.com/image/cec4ad129979654Cropped and zoomed in with graphics program:
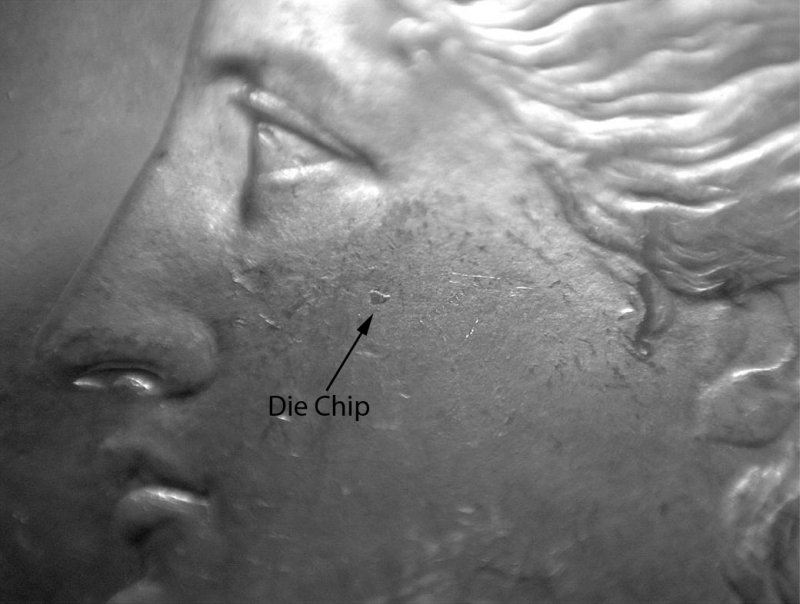
http://www.imagebam.com/image/7820d4129979731I then backed the camera off about 6 inches and snapped this:
http://www.imagebam.com/image/73998a129979718OK - there is the project!
Please note I was not trying for good lighting, or to take a good, quality picture when I set up the camera for this shot. I just put the coin on a book, put the tripod up, moved the camera in to a couple of inches, used the zoom on the camera to make the coin in focus, and snapped. It was that quick. But, as you can see, this system makes it very easy to get decent pics with no special setup. This is literally only my third session of trying to take pics of coins. But it is the equipment doing the work - not me!
Any questions? PM me!
OK... OK... so I cheated - I actually just used a black marker to color the PVC black instead of using black spray paint!