| Author |
 Replies: 40 / Views: 10,251 Replies: 40 / Views: 10,251 |
|
|
|
Moderator
 United States
23522 Posts |
The ideal glass for axial lighting - "beamsplitter" glass - is the stuff they use with teleprompters. Its' best capability is to reflect on the order of 75% of applied light. And it's not cheap - a 12"x12" pane of 75% reflective will run you on the order of $400. A "regular" pane of glass will not approximate that transmission level, both a good and a bad thing. Good, because it limits the possibility of washing out details via excessive illumination; bad because it seriously compromises the "sweet spot" of your settings. You'll need to jack ISO up and exposure down. I'm in the neighborhood of ISO800 and 1/8sec for axial work (at f/8, of course  ) although that will probably improve a bit with a more-lustrous coin like your 1884. You might be able to reach 1/25 or even better (consider ISO1600) with it. The key to axial lighting is the only light reaching the coin is that reflected. One must be very picky about eliminating any chance of light from other sources, direct or reflected from the environment. In addition, you'll find broader sources of light such as regular incandescent bulbs - as opposed to more point-oriented sources like Jansjos - to be the better tool. A point source will supply a point illumination, perhaps not fully covering the coin and leading to "hot spots" of color which fail to cover the whole coin. Slabs will be particularly difficult, and you may end up needing to adjust the glass positioning by a degree or two along both axes - tilt and angle - to effectively illuminate the subject. Pro tip: Once you've got the technique down, point it at a nice Cameo Proof, and giggle at the results. I didn't do this brain dump for your first image because - frankly - it's a great image and IMO quite faithful to what the coin looks like in the real world. It's only a little bit of increased contrast from being world-class. |
|
Pillar of the Community
United States
9792 Posts |
Quote:
The key to axial lighting is the only light reaching the coin is that reflected. One must be very picky about eliminating any chance of light from other sources, direct or reflected from the environment. In addition, you'll find broader sources of light such as regular incandescent bulbs - as opposed to more point-oriented sources like Jansjos - to be the better tool.  I took the ANA Summer Seminar course on coin photography many years ago (film days only) we shot in a dark room after setting up the axial lighting. Got very nice results on ultra high relief medals and coins, very nice on ancients too! (Something I don't have, so I haven't really tried photographing them. I really like the results you got from your first experiments, can't wait to see more CherreePicker!  "Buy the Book Before You Buy the Coin" - Aaron R. Feldman - "And read it" - Me 2013! ANA Life Member #3288 in good standing since 1981, ANS, Early American Coppers Member (EAC), Colonial Coin Collectors Club member (C4), Conder Token Collector Club member (CTCC), Civil War Token Society (CWTS) member, Liberty Seated Collectors Club (LSCC) & Numismatic Bibliomania Society member (NBS), USMex, Member in good standing, 2¢ variety collector. See my want page: http://goccf.com/t/140440 |
|
Pillar of the Community
United States
9792 Posts |
I also wonder if instead of using beamsplitter glass (the best, I know) if a glass platen from an old broken scanner would be close? It should be optically pretty good, and broken scanners can be had for cheap or next to nothing! Haven't tried it, but just may look for one to tear the glass platen out of. Could be better than hardware store glass I'm betting.
"Buy the Book Before You Buy the Coin" - Aaron R. Feldman - "And read it" - Me 2013! ANA Life Member #3288 in good standing since 1981, ANS, Early American Coppers Member (EAC), Colonial Coin Collectors Club member (C4), Conder Token Collector Club member (CTCC), Civil War Token Society (CWTS) member, Liberty Seated Collectors Club (LSCC) & Numismatic Bibliomania Society member (NBS), USMex, Member in good standing, 2¢ variety collector. See my want page: http://goccf.com/t/140440 |
|
Valued Member
 440 Posts |
Well beamsplitter glass @ $400 is too rich for me for a piece of glass. I can see spending that if someone was doing this professionally & making $$ with their work. I'll try playing with exposure levels. Working in a darkened room and blocking any reflected light off unwanted sources seems to be a key issue. I have some DMPL's, cameo proofs & non-cameo proofs that I'm going to experiment with at different exposures & light sources. But first I have to build a better mousetrap to contain & angle my glass. Pirating glass from an old copy/scanner machine sounds feasible as long as it is not too scratched from use.
I realize now how many mistakes were made trying to get an axial lighting pic of this coin; the weird part is this incorrect light attempt rendered the best depiction of this coin regarding its' true color that I have been able to attain. I may try it on some other toned coins to see what the results are.
Dave if I remember correctly I think I did reduce the contrast a bit post photo; how much more contrast reduction do you think this pic needs?
|
|
Pillar of the Community
2087 Posts |
You can get beam splitter glass much cheaper than $400.00 Here one example: http://www.ebay.co.uk/itm/Telepromp...em3ca72bae36For accurately Mounting the glass( rather than cardboard) I discovered a School geometry set that included a large triangular Protractor, as opposed to semi circular. I purchased 2 sets at the great expense of about US$12.00 in total I then used silicon sealer to attach the Beam Splitter to the two large protractors ....the result is the glass sits at exactly 45 degrees. Finding the protractors was a fluke I had been looking at sheet perspex (plexiglass) which I was going to cut but that was closer to US$30.00 a sheet and with the protractors there was no cutting involved. Edited by austrokiwi
03/19/2014 09:29 am
|
|
Pillar of the Community
United States
8517 Posts |
Quote:
I purchased 2 sets at the great expense of about US$12.00 in total I then used silicon sealer to attach the Beam Splitter to the two large protractors ....the result is the glass sits at exactly 45 degrees. I love this kinda stuff, brilliant ! Oregon coin geek.....*** GO BEAVS ! ! ! ***
|
|
Moderator
United States
23522 Posts |
Quote:
You can get beam splitter glass much cheaper than $400.00 That listing is for 30% reflective, approximately equivalent to uncoated glass. Take that 70/30 relationship in the other direction as I mentioned in my post, and you're looking at some expense. The *only* advantage to beamsplitter is superior reflection due to the coating, similar to "one-way" mirror coatings which are beamsplitter with the highly-reflective side toward the interviewee and the transmittal side (with the observers) in a darkened room. Quote:
I realize now how many mistakes were made trying to get an axial lighting pic of this coin; the weird part is this incorrect light attempt rendered the best depiction of this coin regarding its' true color that I have been able to attain. I may try it on some other toned coins to see what the results are.
Dave if I remember correctly I think I did reduce the contrast a bit post photo; how much more contrast reduction do you think this pic needs? That's a testament to the fundamental effectiveness of axial lighting at illustrating color on a coin. The only thing the excess light did was diffuse the color somewhat. I was thinking more contrast, not less, as a result. As I mentioned in another thread, it's important to factor in the lighting conditions under which you look at a coin in-hand when evaluating images. We're always extremely careful about lighting setup for imaging, but far less-so when using the loupe and then we wonder why the photo doesn't match the in-hand look. If you look at your 1884 under sharp, bright direct lighting, you might find it rather brighter-hued than you think. 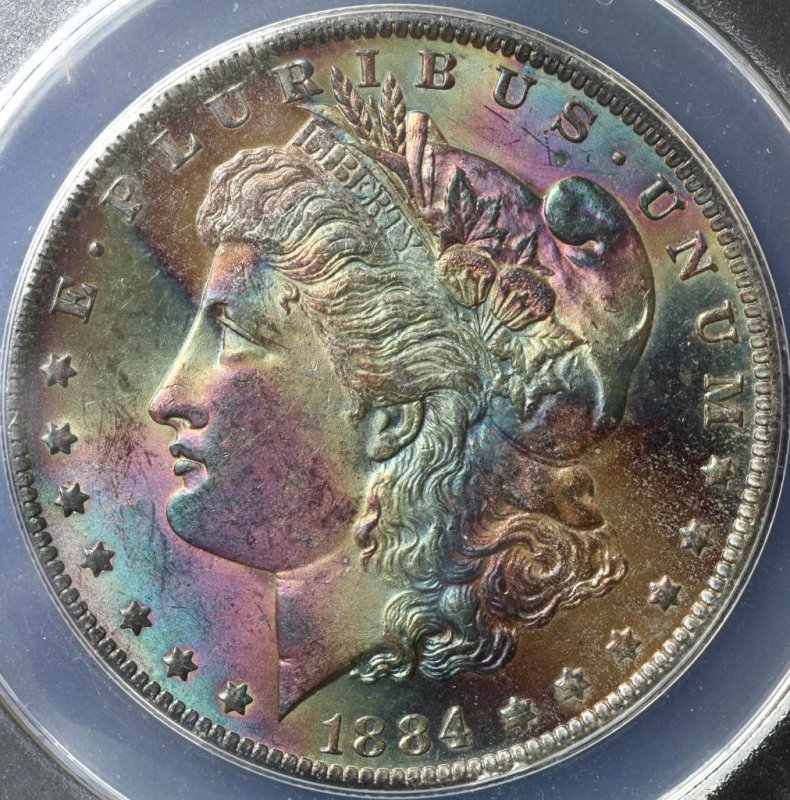 |
|
Pillar of the Community
2087 Posts |
Quote:
That listing is for 30% reflective, approximately equivalent to uncoated glass. Take that 70/30 relationship in the other direction as I mentioned in my post, and you're looking at some expense. Ok I thought hard about that it doesn't sit right Why would you even want to look at a 70-30 beam splitter?. I use a very old glass beam splitter it's a 50-50( I had to check because I used to think it was 30-70). It was an Edmunds NOS. Its optically correct( the most important factor IMHO) and is coated with Titanium dioxide( Cost me US$70.00). It works well Yes only 50% of the light gets to the subject and 50% of the light from the subject gets to the camera. If I have done my maths right of the original light beam only 25 % (50% of 50%)gets to the sensor. If you use a 30-70 or 70-30 you still end up with only 21% of the original beam getting to the sensor. So as I understand it the 30 -70 is just as effective as the 70-30. ( have I got this maths right?) I would recommend the 50-50 splitter You can buy direct from Edmunds ( Go to the 5th page of the link for a decent size.) http://www.edmundoptics.com/optics/...litters/2035Edited by austrokiwi
03/19/2014 2:59 pm
|
|
Moderator
United States
23522 Posts |
You've got all of that right, austrokiwi. A 50-50 is head and shoulders above regular glass, which doesn't do better than 20% or so. The only reason for beamsplitter stuff - and each photographer has to rationalize the cost based on their own needs - is the increased zone of usable settings as one increases in total reflected content.
|
|
Pillar of the Community
2087 Posts |
Thanks Superdave for checking my understanding. For others you may wonder why the concern with how much light is transferred. For me the concerns are two fold ISO and exposure:
The less light that gets to the camera (unless you using Solar flare levels of lighting) the longer the exposure or higher the ISO. With High ISO you can have the issue of noise. With longer exposures vibration becomes an issue. No matter how solid your copy stand is the longer the exposure the more chance of vibration ruining your good work.
You may think I am nit picking however if you get a good Axial lighting set up you will start to get good photos and of course you will want to do better. As you challenge your self more you may start to be frustrated with soft shots caused by High ISO and or long exposure.
|
|
Moderator
United States
23522 Posts |
We nitpick here, austrokiwi. That's what we do. |
|
Pillar of the Community
United States
4038 Posts |
The highest overall transmission you can get with a single glass sheet is 25%, using 50% glass. Less reflection means less light to the coin, so extraneous sources are more intrusive. The extraneous sources also transmit more from coin to sensor, a double-whammy!. Less reflection also means more light passing to the back of the setup that has to be dealt with. All that said, regular glass can work fine as long as it's fairly high quality. A huge caveat here...all the times I've set up axial lighting, I've tried for the "most axial" I could achieve, and have every time been disappointed. "Pure" axial lighting creates very high contrast and extreme shadowing on any surfaces that are not reflecting back to the sensor. Here is a Cent photo I took with an axial setup, compared with a 2-source 75-deg setup:   Notice the 75-deg setup doesn't present much luster, but the axial setup produces virtually none. This is because the "luster" we're used to seeing is a contrast between direct reflection and absorption off the local metal surfaces, and needs to be localized to normal to us. Luster is actually present in these images, but is spread fairly evenly over the 75-deg setup, and perfectly evenly over the axial setup, so it doesn't look like luster. Also notice that the axial setup "hides" a lot of surface finish detail. It takes side-lighting to create the shadows that delineate surface details, and axial by definition does not provide this. Most folks who are successful with axial lighting are actually not doing axial lighting! They have axial setups, but use large or multiple lights to create a variable lighting system that includes axial content to bring out the color presentation only axial can produce as a part of the overall image. Contact me for photographic equipment or visit my home page at: http://macrocoins.com |
|
Valued Member
440 Posts |
"Most folks who are successful with axial lighting are actually not doing axial lighting! They have axial setups, but use large or multiple lights to create a variable lighting system that includes axial content to bring out the color presentation only axial can produce as a part of the overall image."
Interesting because being relatively new at this I was contemplating this very idea. After realizing my axial attempt was not really a true axial procedure I at first tried to contemplate ways to render a truer axial image(which I will most likely still do). Then after re-visualizing this particular coin per Dave's suggestion I still feel the photo I accidentally got during this attempt is to date the best rendition I have been able to get. It truly resembles the coins actual color. I have been rethinking my procedure and was wondering how a combination of axial & additional lighting (which would have to be tweaked) would work on some of my other coins with DMPL, PL & cameo proff surfaces. Lots of experimenting seems to be in the future.
|
|
Pillar of the Community
United States
4038 Posts |
You, sir, are hooked! Welcome to the club...Ray
Contact me for photographic equipment or visit my home page at: http://macrocoins.com |
|
Valued Member
440 Posts |
Ray you and Dave did this to me :)
Can't say that I'm not having fun though.
Bob
|
| |
Replies: 40 / Views: 10,251 |


